Issue:
I like photographing daphnia while they are alive, as the antenna are spread out and it is more fun watching their movement and the action of their internal organs. I have discovered however, that there are a number of good reasons to make permanent mounts of my daphnia collecting, in adjunct to the live photography.For one thing, species identification can be problematic with just digital photography. It is not as sharp as regular photography, and neither is it as good as direct observation. I may not realize till later that critical anatomy, which is out of focus in a picture, is crucial to exact identification. Once the specimen is gone, there is no way to go back and re-photograph or re-examine it.
While I like keeping live collections, there is always the risk of loosing a culture. Or inversely, there is the risk of cross contaminating cultures. If I find a new species in a culture, can I be sure it was from the original collecting site, or whether it fell in from another culture obtained hundreds of miles away? Another risk of wild cultures is the mixed species population, the predators (copepods and hydra) can wipe out small daphnia in a matter of days. A slide made soon after collecting gives a definite record.
Another reason is that some animals
(daphnia and hydra are definitely included here) change their physiology
in response to environmental changes. Color and body shape of the animals
I collect can be different from that of their descendants in my cultures.
The Equipment Basics:
Slides and coverslips:
There is nothing special here. I use the standard size (75x25 mm or 3x1 inch) with standard 22 mm coverslips. There is not a great price difference between the cheap low-end slides and the better quality ones, so I get the better ones that are polished and pre-cleaned. I am not doing oil immersion and other fancy microscopy, so I don't buy the most expensive either.Mountant:
Some of the standard daphnia keys (i.e. Dodson & Frey in Thorp & Covich) reference using Hoyer's solution as a mountant. From my experience, don't try this. It is not that the mountant is poor, but it is almost impossible to obtain these days. It contains chloral hydrate, which at least in the United States is a controlled substance; hence almost unavailable for anyone. I spent several weeks trying to track some down, and even the professionals have, at most, highly prized small bottles that have been around for a long time.Some of the newer polymer mountants seem to be a good substitute; but the only supplier I could find only sells 500 ml quantities (several lifetimes worth for me), which costs over $100. I would like to try it, but not under these conditions.
After some looking around, I have settled on the old favorite - jellied glycerin. The 100 ml jar was in my price range, and will probably be around longer than me.
Sealer:
Most references say to double seal the coverslip to the slide. I usually apply fingernail polish soon after I make the slide (pick your own favorite color), and come back later with a coating of automotive touch-up paint.Miscellaneous Equipment:
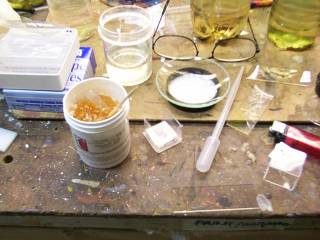
If you are going to the trouble of making slides, have a way of keeping them safe and organized. I have found the plastic boxes that hold 25 slides both economical and convenient. I tend to keep a box for each category of slides (collecting trip). In addition to storage, the boxes are good as a travel box for carrying slide making supplies. At my age, a pair of reading glasses also help.The Process:
Daphnia don't require any preparation, either staining or clearing. They are small enough that the jelly can penetrate the body and preserves them, and their carapace keeps them from changing shape. The only work is to pick them out of their container, get them onto a slide and cover them up.The trick is to get a number of daphnia onto a slide with as little water as possible. I use a small pipette or soda straw to transfer them from the culture container to a watch glass. The watch glass is a nice temporary working space. When placed on top of a black (or white) piece of paper, it is easy to spot the specimens and work with them.
Getting them concentrated on the
slide is the tricky part. My technique is to pipette them from the watch
glass to a cover slip. At least with the cover slips I use, a drop of water
will ball up, so I can spot individual drops from the pipette onto the
cover slip. I keep the drops with a specimen, and remove those that are
empty; further reducing the amount of water. At some point, I have a large
drop with a number of specimens in it. This is still too much water for
making a slide, but it is as close as I can get with a pipette. I have
tried wicking away water at this point with a piece of paper towel, or
coffee filter; but find that the capillary action sucks up my specimens
as well. My latest technique is to place the edge of a slide on the coverslip;
capillary action pulls the water under the edge of the slide, where I can
safely wick it away. The space under the slide is too small for any daphnia
to get through. In this way I can get rid of most of the water, and with
care, keep the daphnia on the cover slip.
Making the slide:
At this point I take a toothpick to cut out a piece of jellied glycerin and place it in the middle of a slide. For some reason I find the toothpick easier to work with than a knife (possibly the roughness of the wood holds the glycerin better). I then sprinkle three or four chips of a broken coverslip on the slide; these act as 'spacers' to keep the small daphnia from being crushed when the coverslip is applied. While a slide warmer would work better, I get by heating the slide over a butane lighter. I slowly heat it up till the glycerin just begins to melt. There will be enough heat in the glass slide to finish the melting (so far, I have never overheated and cracked a slide). I then let the slide cool till the middle of the slide is comfortable to the touch. At this point, I take the coverslip, and invert it over the slide. Depending on how much water is on the coverslip, where the specimens are located, and other subjective factors; I either set the edge of the coverslip in the glycerin and tilt it down (so the glycerin spreads from one edge to the other), or lower the drop into the middle of the glycerin and let it spread out from the middle to the edges. With care (and the right amount of glycerin) the coverslip will be completely covered with no excess glycerin, and no large air bubbles will be trapped.
I have always mounted my daphnia
when they were alive. An alternative worth trying would be to mount anesthetized
daphnia (club soda), or ones preserved in alcohol. It might be easier to
position individual specimens; and they might be more 'relaxed' with the
post-abdominal process extended.
Documentation:
Any documentation is better than none. An undocumented slide is almost worthless.
At a minimum supply the date when the collection was made. If the slide was made from a culture, also give the date when the slide was made (this provides a 'sanity check' for possible contaminated cultures). Also give the location, hopefully specific enough that others could return to the same location. Give the city name, or name of a major geographical feature (name of lake or pond). I don't have a GPS, but it wouldn't hurt to give UTM (or longitude and latitude). At least for the United States, sites like topozone.com have USGS topology maps, and by placing the mouse cursor on the collecting site, the bar at the bottom of the screen shows the coordinates of that exact location (UTM as well as longitude and latitude in degrees or fractions). Not necessarily at the time you make the slide, but at some point give an identification to the organism(s) on the slide. This does not have to be precise down to the species level, but hopefully to the genus.
Let it sit for a while, seal the
edges, put a label on it, and take it for a viewing (not necessarily in
that order).
Problems:
Good mounting is as much an art as it is a scientific technique. Judging the right quantity of mountant, positioning of specimens and neatness are things that take time and practice. While you should strive for the best job possible, in general, an un-artistic slide has as much scientific value as a work of art. The important thing is to be making slides, not to be critical of your work.
One big problem is air bubbles. Slowly lowering a drop onto the slide, or tipping the cover glass onto the slide can prevent capturing big bubbles; but I find the small bubbles that come in the jellied glycerin almost impossible to remove. The best thing I have found it to select pieces of jellied glycerin that are bubble free to start with.
Observations:
Dormition of the Mother of God Orthodox Monastery, Rives Junction, MI (UTM 16 70907E 4695251N).
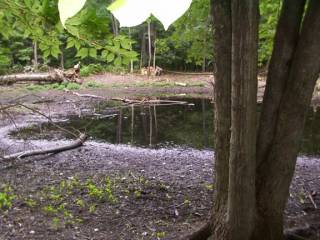
My family made a pilgrimage to the monastery while on vacation, and from prior visits, my wife had told me there was a pond on the grounds. While not scenic, I suspected this would be a good collecting site at first glance. Being a rain-fed pond (rather than spring fed), it probably dries up completely some years. This means no fish, and hence no major predators for the daphnia. I was right, it was thick with daphnia; and also with hydra. The 'turkey baster' easily provided two rich sample bottles. There appear to be three distinct species of daphnia here.
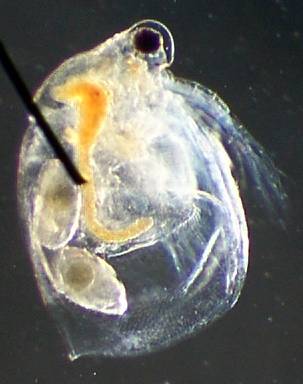
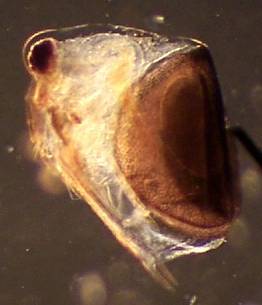
Ceriodaphnia 100x, 2x digital 'good' image
Ceriodaphnia
40x, 2x digital 'good' image
Note, though the image is similar size, this is a much
larger species
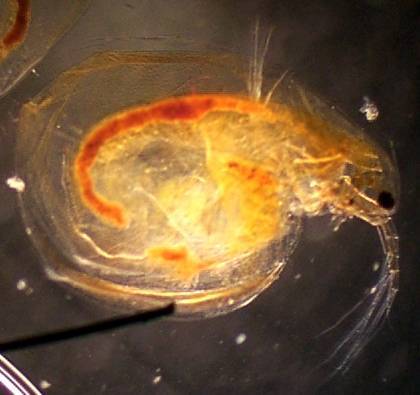
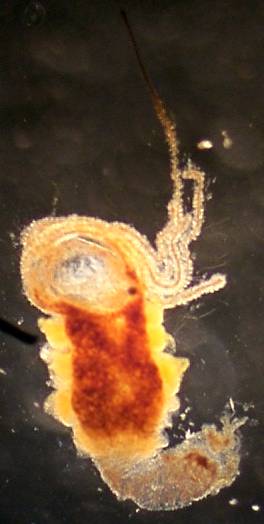
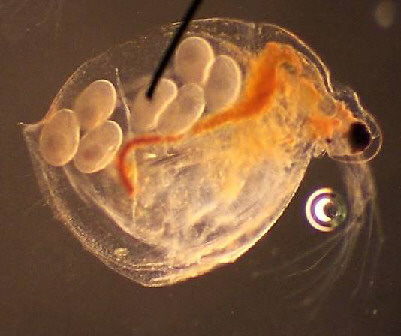
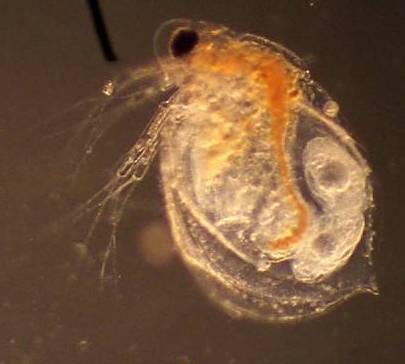
D. Scapholeberinae 100x, 2x digital, 'good' image Note the resting egg in the ephippium; this will be shed at the next molting and lie dormant. |
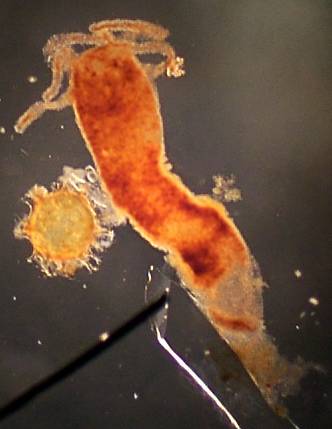
Above: Hydra with egg At right: hydra with male spermatophors
Both images 100x 'Best' image |
 |
Cook Nuclear Power Plant, Bridgman, MI (UTM 16 537093E 4647453N)
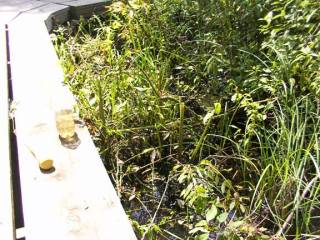
Regardless of your political views on nuclear energy, the Cook facility goes out of its way to create an 'environmentally friendly' image. The facility is located on the shore of Lake Michigan, and is surrounded by sand dunes. They have done a fine job of preserving the dunes, and have the Nipissing Dune Trails wandering through them. Where a glacial clay deposit settled, there is a wetlands in the dunes. It was easy to walk out on the boardwalk path and collect daphnia with a baster.
As a side note, be sure to ask permission
before collecting in most locations. Once I explain what I am doing, I
have yet to be turned down. Even places that are clearly posted 'no collecting
of plants or wildlife' will often grant permission if properly approached.
A few pictures of your work don't hurt, and I usually offer to e-mail them
information and pictures of what I find.
Conclusion:
While my slides are not artistic or professional, any slide is better than none. I hope to continue improving my technique, but I am glad I have started a permanent collection. It has already been useful for going back and confirming where a picture came from.
Slides can also yield unexpected surprises. A while back I went through some older slides, 'scanning' them under low power, and discovered a species that I did not know I had collected. If I did not have the slides, I would have never known there were Scapholeberinae in Grasso Spring (St. Louis, MO); but they are unmistakably there in a slide.
Mounting supplies do not take up
much space. For traveling, I standardly pack enough for about two dozen
slides into a quart size zip-lock freezer bag. This contains a plastic
box with slides and cover slips, several pipettes, a watch glass, 35 mm
film canister with some glycerin, and another with cover slip fragment
spacers. Toss in a few toothpicks, a lighter and a bottle of finger-nail
polish and you have a complete kit.
Addendum:
Since starting this series of articles, I have picked up a few more tricks, which I will recommend others to try:
I got thinking about the advantages of glass pipettes, which can be heated and pulled to create finer tips. I decided to see what I could do with my plastic pipettes, and found I could get somewhat similar results. Rather than heating the plastic, I just grabbed the tip with a pair of pliers and pulled. With a little practice, this produced a nice small tip. Try pulling them cold and see how you like the results before trying to heat the plastic. While it can be worked hot, it is very easy to end up with a molten, burning mass (hardly worth the effort).
I also got to playing with silk screening
fabric. I have yet to attempt making a net, but a small square can easily
be folded into a cone and used as a filter. A whole 1/2 liter bottle will
pour through the cloth without clogging, and easily rinses into a watch
glass. All the organisms in the bottle are now concentrated into a small
quantity. This will now become another of my standard traveling tools.
Technical Note on Photographs:
All pictures were taken with my Kodak 3200 digital camera. The photomicrographs have been cropped, but not enhanced or resized. The 'Good' mode is 576x432 with 2x digital magnification, the 'Best' mode is 1,152x864. The environmental pictures have been reduced.