|
FOR MICROSCOPY |
|
||||
| The main activity of an amateur microscopist is to observe subjects, but he has few means to work on them because the tools must also be on the microscopic scale! You won't easily find in a drugstore, a penknife with a 50 micron blade to dissect an aphid, or very fine needles to manipulate it. |
| But if you are a microscopist, you certainly possess a great curiosity and your interests may extend to other areas of science or technology. Probably the main contribution that an amateur can offer is his scientific specialty: we can use our professional expertise in other domains, to enrich our hobby. I remember when I was a student at engineering school, that I had to visit a naval yard in Brest town (west France). I was astonished by the huge machine tools used to make parts of ship engines, shafts and propellers. But in a little room there was a strange little apparatus, to make very fine work and to make mounting marks on parts: it was an electro-erosion machine. How did it work? Simply by electrolytic machining of metal parts. | |
| When two metallic objects, one called the anode and the other the cathode, are put into a conductive liquid and respectively connected to + and - terminals of a DC current power supply, metal atoms are extracted from the anode and are go toward the cathode (but often they react with the electrolyte to make metallic salts before reaching the cathode ...). The anode seems to erode and becomes very fine and/or sharp in accordance with its primitive shape. | |
|
|
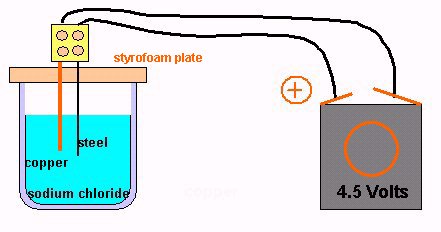
Electrolytic cell |
| To obtain an electrolytic liquid, you can use a solution of sodium chloride (a teaspoonful in half a glass of water). | |
| Why not use this process
to 'forge' little metal rods to make micro-tools? It's easy to find wire
made of steel, stainless steel or tungsten (the latter from an old light
bulb) to avoid rust; see fishing tackle stores or model suppliers. You
need to have a DC power supply around 4 to 6 volts. A 4.5 volts dry battery
is perfect. (DON'T USE car batteries because the short circuit hazard is
great and very dangerous).
The electrical drawing as shown in the picture above, is very simple: the cathode (-) is a simple copper wire 1 mm diameter and anode (+) is your little rod (for example 0.5 mm in diameter) as shown in diagram below. If you want, you can place a 3V 0.5A bulb in the circuit to limit current in case a short circuit occurs. |
| Put the cathode
(copper wire) and anode (rod) into the liquid with around 1 centimeter
between them. AVOID letting the anode touch the cathode, because the current
can be very high and you can destroy a battery quickly!
Small hydrogen bubbles are produced on the cathode and the solution takes on a reddish/brown colour near the anode. (Iron extracted from the steel reacts with chlorine to make iron salts which precipitate because sodium hydroxide is produced near the cathode!) Remove from time to time the 'tool' (anode) and examine it with a hand held magnifier or low power objective. After 5 to 10 minutes, the rod diameter has considerably decreased. If the size is correct, you can now make a sharp tip. Put the rod back into the liquid in such a way that the tip is immersed by one millimeter ONLY and wait until the metal tip is sharpened. |
||
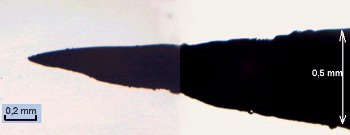 |
Sharp
tip made as described above. Duration of electrolysis 4 minutes.
If you want to make very fine tips, use a 1.5 or 3 volts battery in the last step but the electrolysis time is increased! |
|
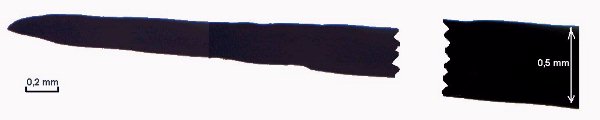
| Picture below
shows a wire machined in two steps, to reduce the diameter from 0.5 mm
to 0.2 mm on a length of 10 mm. On the right hand end you can see the initial
diameter
|
||
| You can also made a little loop with thinned wire. Try also using a rod previously flattened with a hammer to obtain a micro blade. You can find in fishing tackle shops, a sort of needle with flattened tip used to attach live fishes onto a fish hook to act as decoys (brrr...). The needle diameter is around 0,5 mm and they are ideally suited to make microblades or needles. | |
 |
|
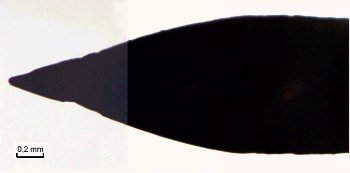 |
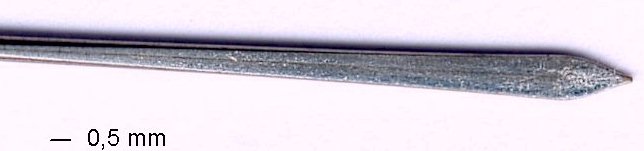
Electrolytically machined tip of the blade above |
| These tools must be mounted
at the tip of a small wooden rod, (the handle of an old fine artist's paint
brush works well), in which you make a little hole to glue the tool inside.
The pictures show some results. I have used stainless steel. Additives to the iron can produce a black coating on the anode which impedes erosion, so remove this coat frequently. You can polish the metal needle with very fine sand paper or abrasive powder. With ordinary steel wire, erosion is much more regular. |
|
|
|
Microscopy
UK Front Page
All drawings and photographs © Jean-Marie Cavanihac 2001 Published in the November 2001 edition of Micscape Magazine. Please report any Web problems or offer general comments
to the Micscape
Editor,
Micscape is the on-line monthly magazine of the Microscopy
UK web
|