Back in the mid-1800s, microscopy was still pretty much in its infancy, although instruments and techniques were improving. At the time, both darkfield and oblique illumination had their beginnings when someone learned that by tilting the mirror slightly off axis, objects appeared that were not visible under in-line brightfield illumination. It must also be remembered that in those early days, staining techniques were unknown and microscopes did not have a substage condenser, so the concave mirror was used to concentrate light on the subject. It seems surprising now that so many discoveries were made with such "crude" compound microscopes.
Darkfield illumination involves the use of a special darkfield condenser or the use of a patch stop of black paper centered on a round, clear acetate disk placed in the filter holder of an Abbe condenser. The latter, of course, is the cheapest way to achieve darkfield conditions, especially with 4X and 10X objectives. High-power objectives, such as 40X, 60X and 100X oil immersion, really require the use of special darkfield condensers to be fully effective.
An interesting variance of darkfield is Rheinberg illumination, discovered in 1896 in London by Julius Rheinberg. The major difference between darkfield and Rheinberg illumination is color. Whereas in darkfield, the background is black and the subject is white, Rheinberg goes a step further and creates a colored background and a colored subject. The simplest form of Rheinberg illumination involves a clear acetate disk and a central stop of a single color, such as red or green, placed in the filter holder of the condenser. In this case, the background appears as red or green and the subject appears as white. The condenser diaphragm should be wide open and the unit racked all the way up. But the condenser can be slightly raised or lowered for the best effect.
If a peripheral disk of some color such as, say, yellow or blue, and a black stop are used, the background appears black and the subject is yellow or blue. Various colored peripheral disks and stops can be used to achieve a wide range of fascinating colors. Probably nowhere in microscopy as a hobby can experimentation with colors be so diverse. It is truly amazing the color combinations that can be achieved with Rheinberg illumination. It is up to the microscopist to experiment to his or her heart's content.
The best way to obtain the needed disks for Rheinberg illumination is to purchase different colored acetate sheets. I purchased a book of 100 colored acetate filters measuring 1½ X 3½ inches from Edmund Scientific, 101 E. Gloucester Pike, Barrington, NJ 08007-1380 (fax 856-547-3292), or shop online at www.scientificsonline.com. Cost of the filter booklet is $9.75 US, plus postage. Of course, you can check out hobby shops, art supply stores, graphics products companies, photographic supply stores, etc.
First measure the inside diameter of the filter ring on your condenser. Then cut several circular peripheral disks from as many colored sheets as you wish. For the stops, start with diameters of 9mm, 12mm and 17mm. You can experiment with various stop diameters until you achieve the effects most pleasing to you. I have achieved excellent results with stops of approximately 9mm in diameter with the condenser racked all the way up.
Place the peripheral colored disk in the filter holder and then center the stop on the peripheral disk. You will be amazed at the colored effects you can achieve. In addition, you can make a hole about 17mm in the center of the peripheral disk and then cut a patch stop 18mm in diameter and center this over the opening in the peripheral disk. Let's say the peripheral disk is blue and the patch stop is red. This will result in a red background and a blue subject. Again, experiment with different diameters until you achieve the desired results.
For those microscopes without an Abbe condenser, darkfield and Rheinberg can both be achieved. Some microscopes have a built in condenser (such as 0.65 NA) and a disk diaphragm. Simply glue a patch stop to a rectangular piece of clear acetate or a glass slide and center under the condenser or stage opening using small pieces of tape to hold the combination in place. For Rheinberg effect, simply cut a peripheral rectangular piece of colored acetate to fit the clear acetate or slide. The disk diaphragm should be set at its widest opening.
As for subject matter, stained specimens, such as cross-sections of an earthworm or rat liver, probably won't show up very well. These are intended to be viewed under brightfield illumination. Diatoms, foraminifera, radiolaria and similar subjects lend themselves well to both darkfield and Rheinberg illumination. Protista, algae and other forms of microscopic water life are also excellent subjects. Whole mounts of small insects and insect parts are also good subjects. Try viewing various fabrics under low power and with Rheinberg illumination. Virtually any unstained specimen should show up quite well under this type of lighting.
Experiment, experiment, experiment. You will not be disappointed with the fantastic color combinations that pop up through the eyepiece.
Micscape would like to hear of your experiments with both darkfield and Rheinberg techniques, and the subjects studied. Just email the Editor (contact below) with your results for a future issue.
Comments to the author Chuck
Huck are welcomed.
Links:Click here for an introductory Micscape article by Wim van Egmond and Mike Samworth on darkfield illumination.
Click here for an introductory Micscape article by Dave Walker on oblique illumination.
The Molecular Expressions Microscopy Primer clearly describes how the Intel Play QX3 microscope can be used with Rheinberg illumination and includes a neat Java tutorial showing how the filter colours affect the image observed.
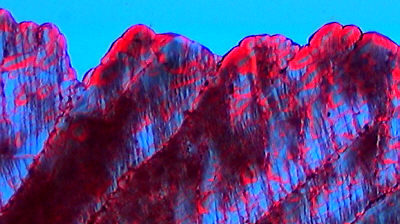
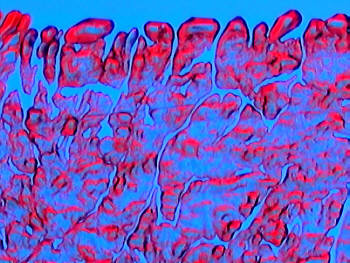
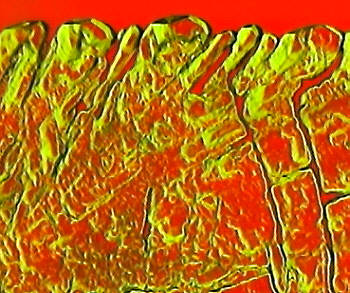
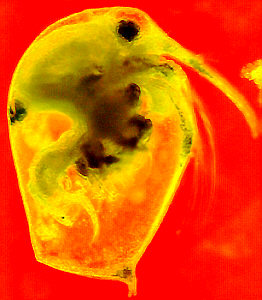
The images below are the Micscape Editor Dave Walker's first attempts at Rheinberg illumination prompted by Chuck's introduction to the technique above. These are rather modest examples but are presented to give some indication of the type of effects created. (Image stills from a security video camera, 9x Russian achromatic objective, no eyepiece.)
Sulphur melt, slide prepared by Mike Samworth. Russian Abbe condenser with filter in condenser tray - blue central disc (9 mm diam.) with red peripheral disc. Sulphur melt, another view. Sulphur melt, as above, but the filter had a red central disc (7 mm diam.) and green peripheral disc. (For this filter and the red/blue filter used above, two thicknesses of the central disc colour were overlayed to give a darker background). The water flea, Bosmina longirostris, permanent fluid mount (NBS course slide). As the condenser iris is wide open, depth of field is small, so subjects with some depth are best appreciated visually.