LOMO Biolam Microscopes.
Notes on refurbishing seized rotating stages.
By Ian Walker. UK.
Introduction.
Since writing an article about general maintenance and refurbishment on the LOMO Biolam stand in 2004 I have had a few queries about seized rotating stages and the best method for dismantling them. The Biolam stand came with two versions of rotating stage, one was a simple hard plastic one designed to be used with the screw-on CT-12 X-Y control which is the most commonly found [Fig 1] and the other is a more complex stage with sliding section [Fig 6].
The first thing to take into account if you are unlucky enough to own or just acquired an old stand that has a seized stage is that soaking the assembly in white spirit or other chemicals will most likely not help free the parts, the reason being that the friction bearing is such close tolerance that any liquid has little chance of getting past the first millimetre or so of the grease packed inside, heating the stage may help but remember the simple stage is made from plastic! The best way is to dismantle and refurbish the stage using a simple tool similar to that shown in [Fig 4] and apply new lubricant, the dismantling tool looks very crude [and only takes about 10 minutes to make] but it works and remember the longer the piece of wood the more torque can be applied although most likely this will not be needed.
There can be an assumption that since the stage has seized, the parts must be screwed together very tight but this may not be the case, the locking ring shown in [Fig 3] on my brother's LOMO stand hadn't been touched for 30 years but the rotation was becoming much stiffer of late so we decided to take it apart for refurbishment, the locking ring turned easily with the tool shown. A lady who contacted me recently with this problem said she had managed to undo the ring with a pair of scissors but I don't recommend this as generally the tips are the wrong shape and slippage is definitely a possibility - enough so for the scissors to spin in the hand and possibly inflict some damage to yourself.
The LOMO stands are an ever popular and cheap way to get into the microscopy hobby with stands of various specifications turning up on eBay regularly every month; with good maintenance they can provide years of trouble free operation and with a wealth of accessories including a large range of good quality optics including water immersion and high NA Apochromatics they can provide excellent results so it's worth spending a little time to get the mechanics in top working condition. Some of the objectives are particularly good including the LOMO phase 10x NA 0.3 and 20x NA 0.65 pre-DIN both of these easily out perform my Zeiss achromats on my Axiostar for resolution and with the industry standard 160mm tube length there are many possibilities to choose from.
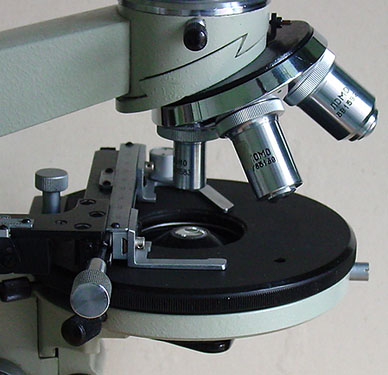
Fig 1.
Simple hard plastic rotating stage with detachable CT-12 X-Y control fitted, the single large thumb wheel at the back of the CT-12 allows removal from the stage. If the stage control arm scratches the stage as it is moved try gently bending it upwards until it is free to move above the stage without touching at any point, alternatively loosen the arm by inserting a jeweller's screwdriver shaft or small allen key into the special retaining nut and reposition. The CT-12 can be troublesome for slack when moving the 'X' and 'Y' controls the slack can be taken up by adjustment but best left alone if you have one that is working reasonably well since even after adjustment it tends to loosen off after a while.
Dismantling the parts.
After removing the plastic rotating stage from the stand by holding the back of the stage with both hands and pulling it firmly towards you against the action of the sprung retention screw [Fig 2] turn it upside down and you will see the construction as shown below in [Fig 3]. If you have difficulty removing the stage from the stand loosen the retention screw or remove it completely with a thin bladed screwdriver like a jeweller's screwdriver, if you are lucky it will be just finger tight. If you remove the screw completely from the stand it is not unusual to find a mass of 'tank' grease surrounding the spring and screw threads which is not really needed so you may want to wipe most of this off leaving a little residue for the threads.
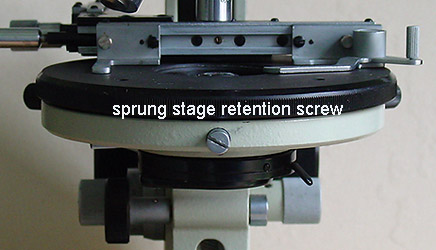
Fig 2.
The best method for removing the locking ring in [Fig 3] is to use a simple home made tool shown at the top in [Fig 4] consisting of no more than a piece of wood with two nails hammered through; its important to file the sharp tips off to provide effectively two pins to match the diameter of the locking ring indentations. If your stage is seized solid and you don't know whether this is due to grease or the ring being screwed too tight it's best to get someone to hold the stage while you turn the locking ring with the dismantling tool keeping firm downward pressure as you turn to prevent slippage and scratching the paint surface. To protect the top surface of the stage you can use an up-turned mouse mat preferably with cloth finish not the hard plastic found on the cheapest mats since these will slide about when facing down on your work surface or you can use a double layer of kitchen towel.
At this point in the dismantled state you may want to look at the cosmetic condition of your stage surface. If it looks grimy, clean the plastic stage in a small bowl with washing up liquid in warm water and using a small nylon brush give it a good scrub [old tooth brush works fine], the surface is tough to take years of moving slides so it won't be affected by a good clean. After you have left it to dry it may look rather drab with dark and light patches and I have found one of the best restorers is 'Armor All Protectant' plastic and rubber restorer mainly used in the automobile trade. Apply a little to a lint free cloth and work into the stage and repeat after it dries in a few minutes to build up a good black lustre and buff off with a dry cloth, it will look excellent when you've finished.
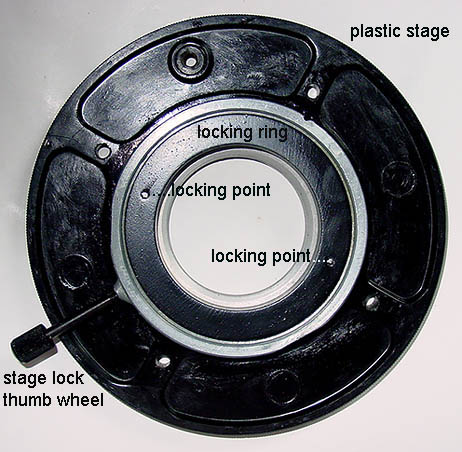
Fig 3.
Underneath of the simple rotating LOMO stage, there are no ball bearings in the design it is simply a friction fit...all the more important to have good lubricant.
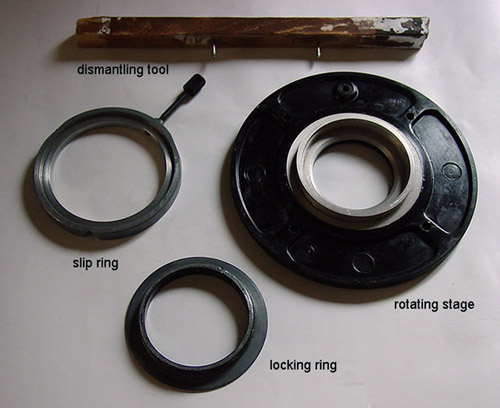
Fig 4.
This shows parts removed from the stage, they have been cleaned and are ready for re-assembly after application of new lubricant.
Once you have removed the metal locking ring you can pull off the slip ring, even if the grease is very solid you should be able to get enough free movement to rotate and pull using the long locking screw to aid rotation [make sure this is not binding by loosening off a couple of turns], also, put back the slip ring the same way otherwise the spring retention screw will not lock the stage into position on the stand. All traces of 'tank' grease must be removed before applying new lubricant; this can be done by removing excess with dry kitchen towels and then with towel dampened with white spirit, several applications may be needed to remove all traces, stubborn dried on grease on flat surfaces can be removed with a very sharp blade and then cleaned. If you are trying to find a lubricant from household sources I have found a light grade clean engine oil works but this is not ideal and does not have the correct damping properties; ideally you should use a high viscosity oil like Nye lubricants MM176F shown right in [Fig 5]. The trick here is to use the minimum amount to provide a thin continuous film on all surfaces which are in contact with each other on rotation with no dry spots, applying too much is wasteful and counter productive since it will ooze out of the bearing and attract dust.
It may seem obvious to use grease as this was in the bearing in the first place but my experiments show that this usually causes a very stiff movement even using high quality Nye lubricants, this is because of the very close working tolerances of the bearing. When re-assembling the screw-on locking ring I suggest hand tighten only, the more you tighten the ring the more the bearing is under stress and rotation usually becomes stiffer with tight and loose spots on rotation. If you have got everything right you should have a stage which can easily be turned with one hand when back on the stand with good damping and no tight spots
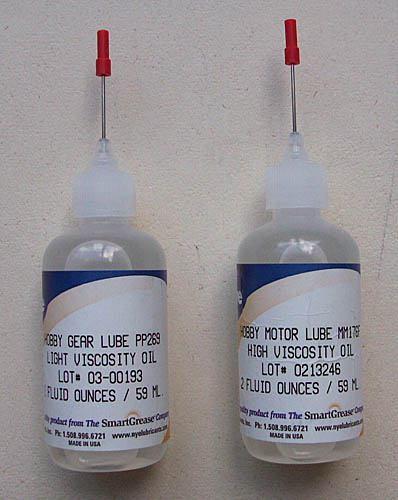
Fig 5.
Nye lubricating oils, this is part of a small lube kit, see the end of the article for details.
Complex stage general notes.

Fig 6.
Complex rotating stage, the X-Y controls are part of the stage assembly.
This is a quite complex stage with the 'Y' position running on a sliding surface adjusted by the lower control in [Fig 6], the 'X' position is adjusted by means of the slide carrier and upper control and the whole assembly rotates with the aid of holding the 'Y' control and turning on its sub-assembly held in place on the LOMO by a sprung retention screw. Unfortunately due to its complexity the 'Y' has a much heavier feel to it than the ultra light 'X' control and there is a tendency of light and stiff points on the rotating section due to being only a friction device rather than ball race, especially if the stage has not been serviced for a number of years. Just beneath the turned aluminium 'X' control you can see one of the black plastic centring screws to centre the stage and to the left and above, the small aluminium rotating stage locking screw. This version is of all metal construction and can be dismantled completely into all its component parts which for the most part are easy to disassemble.
The sliding section comes off if you remove a small grub screw which can be seen through the central slot for the condenser and the rotating parts can be re-lubricated by turning the stage over and removing a metal ring with several small countersunk screws. As always with LOMO's, removal of all traces of the original 'tank' grease is essential before re-applying new lubricant I do this first by removing most of the old grease with a dry kitchen towel and then either soak the dismantled mechanism in a small pot of white spirit and use a small stiff brush or cleaning with several kitchen towels dampened with white spirit depending on the part.
Make sure you leave plenty of time for any white spirit to evaporate from holes or crevices before re-assembly, I normally clean any residue of white spirit off the component parts by using a cloth dampened with isopropyl alcohol or if simple parts using a tooth brush and diluted washing up liquid. Isopropyl achohol can affect the black paint surfaces so keep away from the stage surface, I use this on only on turning or brass parts, the stage shown above had been completely dismantled and re-painted plus fresh lubricants applied for more details see my previous article.
It may be impossible to remove stubborn grease in the sharp angles of the sliding brass sections in which case you may wish to remove these from the stage, these are held in place with small black painted screws and guide pins to ensure they go back in the same place, however it is the slight manufacturing errors that cause the stiff points when operating the 'Y' control and hardened grease always makes matters worse. Out of the two stages I prefer the simple stage shown in [Fig 1] especially with the CT-12 X-Y control removed as this gives a clutter free surface which allows quick manipulation by hand of the slide suitable even with medium power objectives. With most CAD packages allowing radial copy [I use TurboCAD] you can even apply a 360 degree scale to the outer edge of the stage for a professional finish which has been applied on a stand similar to that shown in [Fig 1].
To see my previous Micscape LOMO refurbishment article, click here.
For full details of Nye lubricants visit their website: www.nyelubricants.com
For a link straight to a European Nye lubricants distributor click Micro-Tools
You can type the code below into the Micro-Tools search engine once you have entered the shop and see brief details on the characteristics of the lubricants but it is also worth checking the many other lubricants on offer which may be closer to your requirements than the ones I used.
The shop reference code for a general purpose oil and grease kit suitable for microscopy containing the MM176F high viscosity oil is HOBBY-KIT
the end.
Comments to the author, Ian Walker, are welcomed.
Please report any Web problems or offer general comments to the Micscape Editor.
Micscape is the on-line
monthly magazine of the Microscopy UK web
site at
Microscopy-UK