The
inner epidermis of the onion bulb cataphylls
(the
onion skin)
Easy
and not so easy methods to work with
Walter Dioni
- Cancún, México
Follows
from part 5 Fixing with Alcohols
Fixatives
formulae
We have reviewed (in the first 5 articles) some physical
factors and some chemicals, used alone, as fixatives. Of course, many more products
were tested, by hundreds of histologists, through decades of histological practice. It is clear that the
temptation to mix, and try to combine the characteristics of the different
reagents, to improve the fixation of the investigated tissues, must have occurred very early, if I judge by my own tendency to try just now.
The best reagents needed for success were selected
over a long period. Even now new reagents are incorporated to meet the
requirements of new targets. And many others had been discarded under the
pressure of novelties, availability, prices, or, as in the last decades,
social considerations.
I think it might be instructive to review some of the
earlier attempts, to understand the efforts of our earlier predecessors.
And we can make these, with little effort, with the
reagents at the reach of an amateur.
Allow me a small recapitulation: I have tested boiling water, and 60ºC water, as fixatives for the epidermis of the onion
cataphyll (first article), later I followed the Ceviches track, assessing
citric acid (2nd article), and, after this, the well known acetic
acid.(3rd article) I accepted the 60ºC water as a good fixative, and the citric
acid as a good approximation. But I rejected the boiling water, and only partially
accepted the acetic acid (as a nuclear fixative), used alone in the rough
conditions of these tests.
96% Alcohol (4th article) has shown a capacity
to fix and make evident the cytoplasm, better than the acids do.
I also tested, and approved, at least for my use, the
Blue 1 food dye, as a dye for the onion cells, because it gives fairly good
images of the cytoplasm and very good pictures of the nuclei. (May 2011 Micscape
)
At first sight (after the tests I have presented
formerly) what should seem disappointing, because it stands for a long time as
an histologists favourite ingredient, is the fact that alcohol, especially 96% alcohol, as
shown in the previous article, has given a better representation of the cell as a whole, than acetic acid, even
weakly shows.
After so many years of use by so many histologists, there is a long time
that a consensus was attained, and is now totally accepted that the acetic acid,
used alone, is not a good general fixative.
It seems that it fixes cytoplasm very badly, especially in animal samples;
it swells cells, and dissolves totally or partially, some components, even RNA
(which includes not only the nucleoli, but also many cytoplasmic granules and
the mitochondria), and you can only use and recommend it as a mitotic nucleus fixative,
a fixative for DNA. (This is why the derogatory affirmation of Bolles Lee, did
you remember? If not... read the former articles.)
But, in itself, this specialization is good, and this is why (as they will be seen by my two readers,
whether they followed me and reviewed the formulae as I recommended), acetic
is part of most of the best histological fixatives of general use.
By the way, without to go any further: one of the
histological fixatives preferred by modern
botanists for general use (when they discard formaldehyde) is what many call Carnoy 1, and which others
(also many), who respect the chronology and priorities, and especially
the zoologists and human histologists, call Clarkes Fixative (1851). The year in brackets indicates the
date on which the author published the formula. This is the citation of the
original publication:
CLARKE, J. L., 1851. 'Researches into the structure of
the spinal cord.' Phil. Trans., 141:607
Carnoy, used and published in 1886 (35 years later!), the formula of the Clarkes (alcohol plus acetic
acid in a 3:1 ratio),
reinventing it, or, most probably, copying it without reporting the origin), and
in 1887 he published the formula that
must be properly called Carnoy (which
others call Carnoy 2), which includes alcohol:chloroform:acetic acid
(in the proportions 6:3:1) and is a
most used and recommended fixative for important tasks.
Farmer and Shove (1905)
used for studies of mitosis, two formulas of Alcohol-acetic, which applying the nomenclature I applied before, should
be called alcohol: acetic 16:1 and alcohol: acetic 2:1 according
to the formulas provided by Gray, 1954.
(I have had no access to the original article, and I depend on Gray (1954) not
registering a 3:1 formulation)
Who knows why, and who was the first to be wrong, but some botanists
started to name the 3:1 as Farmer (forgetting Shove, and the real
formulae implied) while some others call it Carnoy 1... and to use, with those wrong names, the Clarkes formula... and so they do
enthusiastically to this day in books and scientific papers. A short review on
your browsers, and reading a few pages, will confirm this. My browser denounces
over 300 articles that cite it when I search for (dont forget quotes) Clarkes
fixative, 470 citations of Farmers fixative, 4800 when I search for 3-1
fixative but 198,000 when searching for Carnoys 3-1. (Tell me, who said Crime
does not pay?)
And at last, what is the Clarke?
Clarkes Fixative - (aka Farmer, aka
Carnoy 1, aka 3:1) was introduced 160 years ago, in 1851, as a fixative for parts of the nervous system. Old as it is, simple
as it is, it is good enough to be currently used professionally in the fixing
of animal and plant histological pieces, especially
for the study of cell division by the mechanisms of mitosis and meiosis: it
fixes very well the chromatin.
It is also interesting that it was the first published formula for a histological Fixative. Its formula is
95 or 96% Alcohol (not less) 3 parts 75%
Acetic acid, pure 1 part 25%
The "not less than" indicates that really
the original formula of Clarke used absolute
alcohol. But, if it is now difficult to find 96% alcohol, 100% alcohol is
currently unreachable, for its price, and is indeed relatively useless for an
amateur. Just open the bottle and the ambient humidity starts to contaminate
absolute alcohol, which is highly hygroscopic. I could indicate ways to keep
dry the absolute alcohol, or even how to prepare it from 96% alcohol, but they
are not very easy, and for normal amateur applications, the 4% of water that
has 96% alcohol does not bother at all. For this same reason, many professionals,
reasonably, use this formula prepared with alcohol 96. (you know... 96% alcohol is (almost) 96 ml of absolute alcohol + (almost)
4 ml water for every 100ml). This is a well known azeotrope mixture, and when alcohol is concentrated through distillation,
alcohol cannot be concentrated purer than this.
Post-treatment of pieces fixed in an
alcoholic fixative
As the fixative uses alcohol with a
concentration of 96%, when I withdraw the epidermis off the fixative I wash it
in 96% alcohol (a couple of minutes) and then in alcohol 70% (another two
minutes). What I try is not to distort the fixed cells with strong and sudden
changes of alcohol concentration... and, also, not to carry over acetic acid.
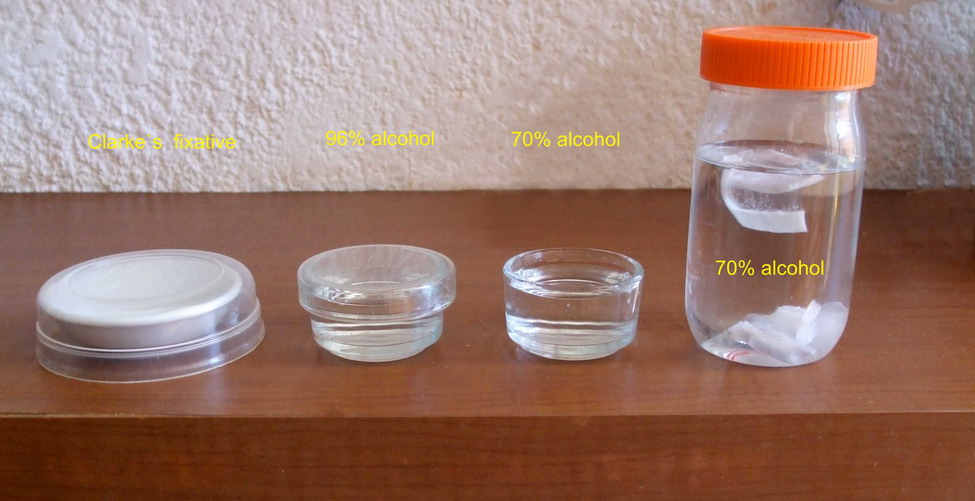
Fig 1 - This is my series: Clarkes (with
lid), 96% alcohol (with lid), 70% alcohol, collector flask (with tight lid)
It is also a norm that dyes should be in
the same alcohol graduation than the piece to be stained.
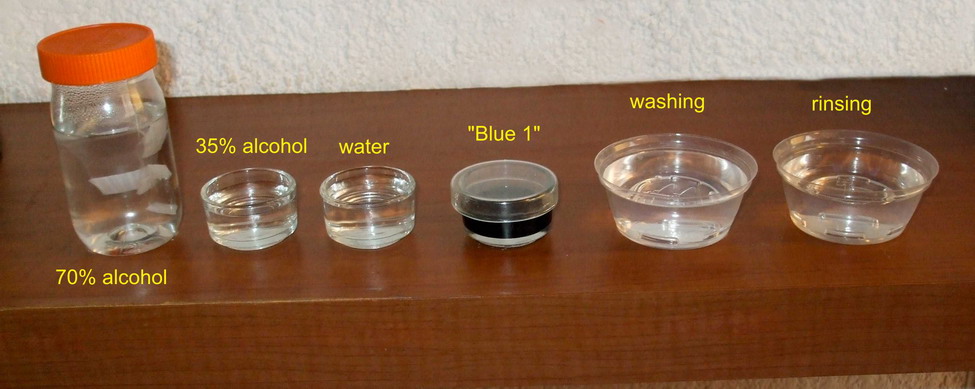
Fig 2
I mount in water, as I do all over this
series. See these example pictures.

Fig. 3 Clarke 4x obj
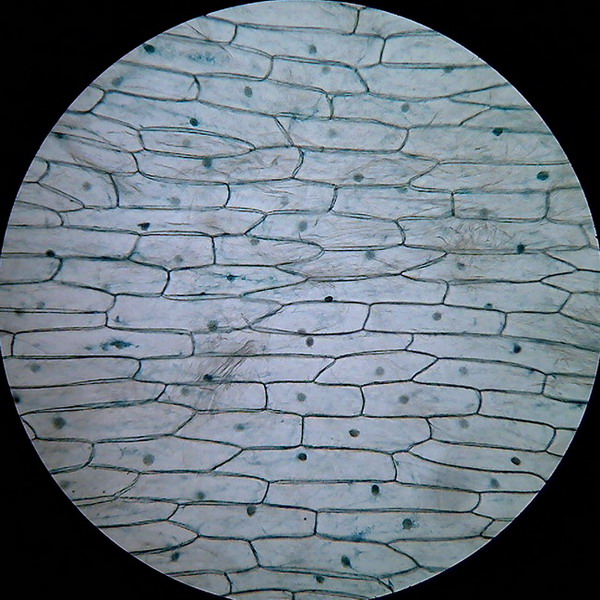
Fig 4
Clarke Blue 1, 10x obj.
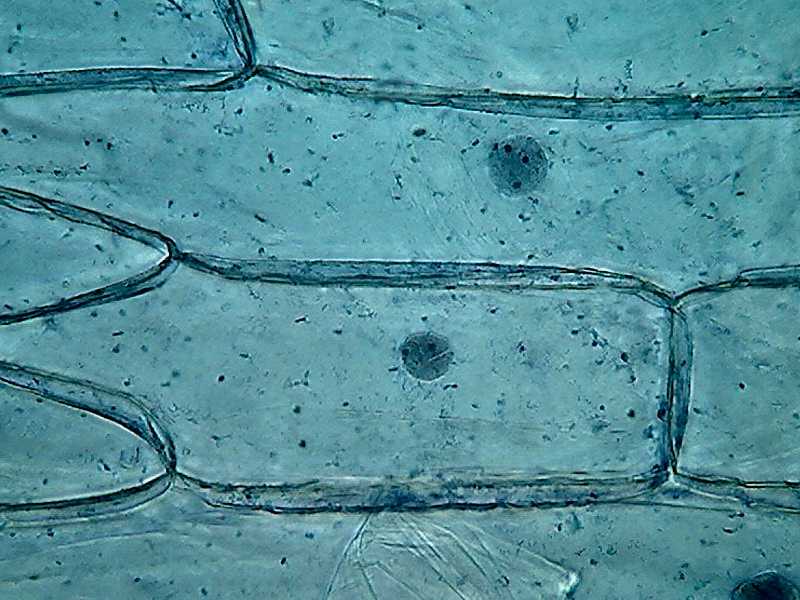
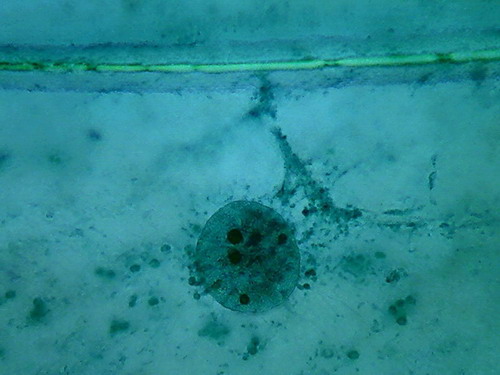
Fig. 5
Clarke Blue 1 40x obj
Most notable at this magnification, is
the inclusion in the mostly homogeneous cytosol of numerous dark granules,
which are identified at a higher magnification as small dark spheres, different
and distinct from the finer grains you see in the cytoplasm bands. Several
preparations, from different onions, show the same.
By its disposition and size it's a big temptation to think they are "Golgi bodies". But without other techniques at hand to certify this I only can dream about it. They are some fluorescent images that induce my dream, but...
|
|
|
|
Fig 6
Clarke "Blue 1" - Nuclei, 100x obj. Wetmount, Staining 5 min. See
the spheres in a, b and d, and the defined bands of cytosol sown with dark
granules in c. |
|
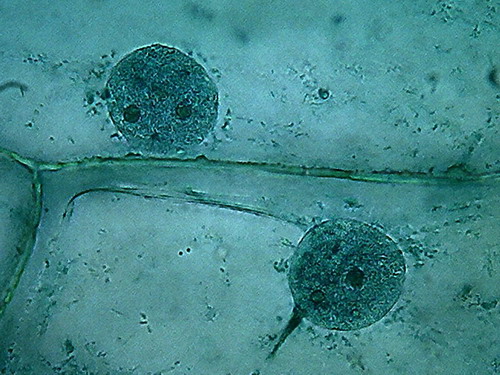

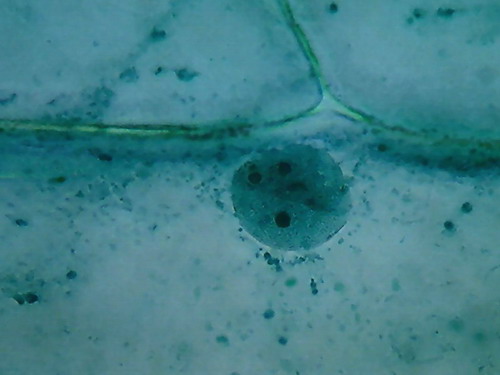
Chromatin
is finely granular, nucleoli look good. In a couple of images, the colour of
the nucleoli, verified by direct observation, tends to a dark reddish tint. In
the cytoplasm, cytoplasm bands are confirmed. Nuclei, however, appear as discs
in which they are noticed with difficulty the grooves which we know well from
other fixatives, and which are a normal characteristic in the onion, as
confirmed by this work http://www.plantcell.org/content/12/12/2425.full
Background
coloration
It seems that eosin is more or less easily at the
reach of amateurs. I buy it in a drugstore at Durango, and it seems to be sold
in Europe as a Pharmaceutical 2% solution as a disinfectant.
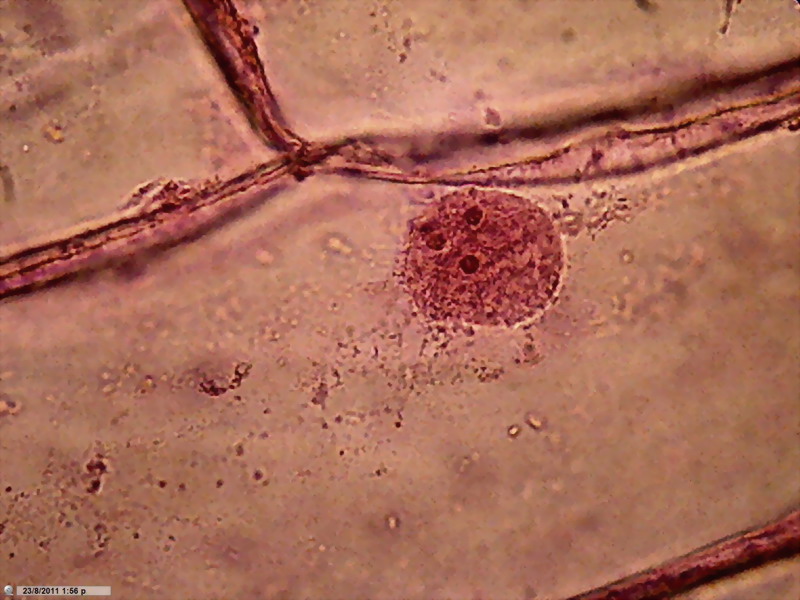
Fig. 7
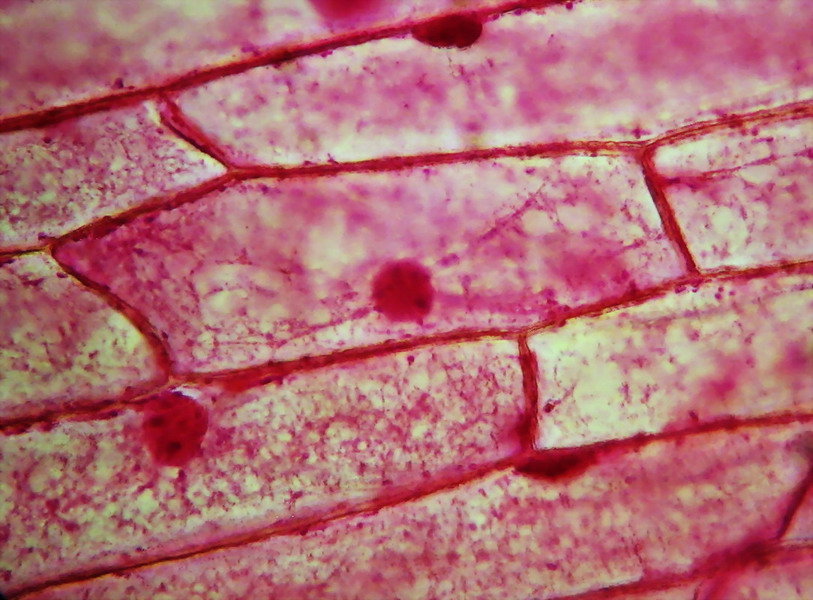
Fig. 8 - Fixation with Clarke and staining with
eosin shows, in some onion epidermis, a detailed cytoplasmic structure. In
picture above (taken through the 40x objective), we are lucky that there are
two cells focused on different levels of depth. The lower, to the left of
picture, shows the cytosol layer near the cell wall, forming a fine mesh of
delicate trabeculae. The other, located immediately above, displays a classic
median optical cut, with bands or trabeculae that cross the vacuole and bind
the nucleus to the parietal cytosol. An interesting detail that we saw earlier in
the test fixation with 96% alcohol, is the accumulation of cytosol and granules
in cell angles.
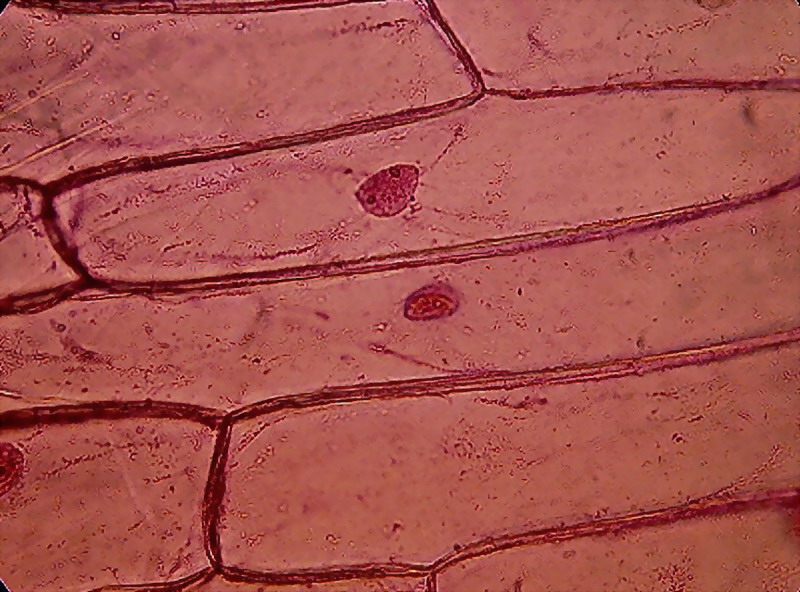
Fig. 9
However who will undertake the work of reviewing
them, will often see that many times before, I also presented evidence showing a
reticulated or trabecular structure. Fixation with iodine (see 1st. part) and
fixing with alcohol 96 (see. 4th part), as well as fixing with citric acid (see
fig 6 and 9 of the 3rd. part) showed glimpses of what the eosin appears to
confirm now in some skins, fixed
with Clarke.(fig 8)
But most
of the images with fixatives tested before show a rather homogeneous cytoplasm,
and fine or medium granules, mostly isolated, or gathered in spots of different sizes.
Many scientists, over many years had
complained about the difficulty to know if what they see in their fixed and stained
preparations had something in common with the live organism they started with.
Bolles Lee (the Bible) put it in this way:
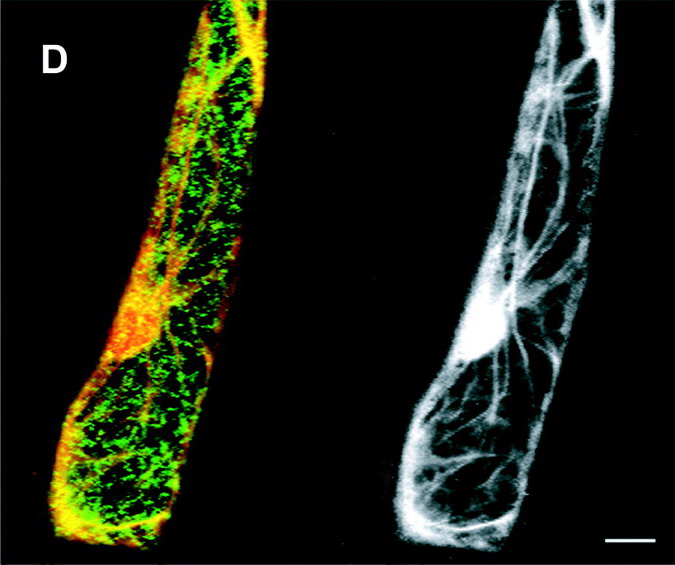
"Copyright
American Society of Plant Biologists.
http://www.plantcell.org/content/13/10/2283.full
The images portray the many paths actively
built by actin (a linear,
filamentous protein) bound to the cellular walls, coiled around the nucleus,
and crossing through the central vacuole of an "arabidopsis" cell. Physiological and
chemical studies had revealed that cytoplasm granules (mitochondria, Golgi bodies,
vesicles,
and other granular materials), travel
along these pathways driven by motors
of myosin.
This is a good explanation of the phenomenon known as
Cytoplasmic Streaming checked by kids, in school labs, from many decades ago,
for example, in elementary biology courses, watching the movement of the
chloroplasts in the cells of the leaves of "Elodea" or "Vallisneria".
Perhaps... Perhaps... This sounds disappointing for me.
MISSION ACCOMPLISHED!!