The use of Brillant Blue #1 as a nuclear dye useful for amateur microscopists, and notes on Fast Green FCF
A companion article to
The inner epidermis of the onion bulb cataphylls
(the onion skin)
2nd part
If not especially stated, pictures were taken with the Logitech 9000 WebCam Pro. When I say Oil Inmersion (OI), it implies simple oil immersion, only between the objective and the coverslip.
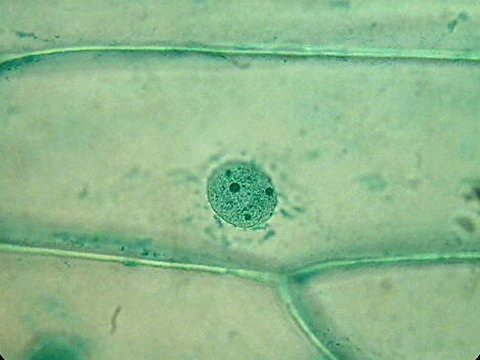
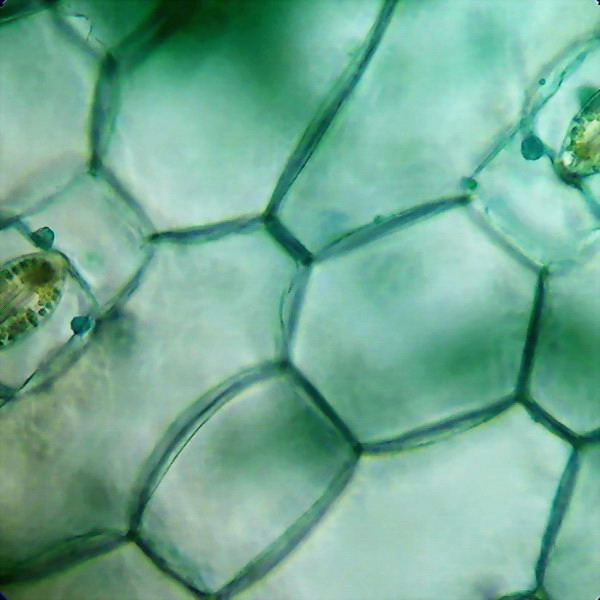
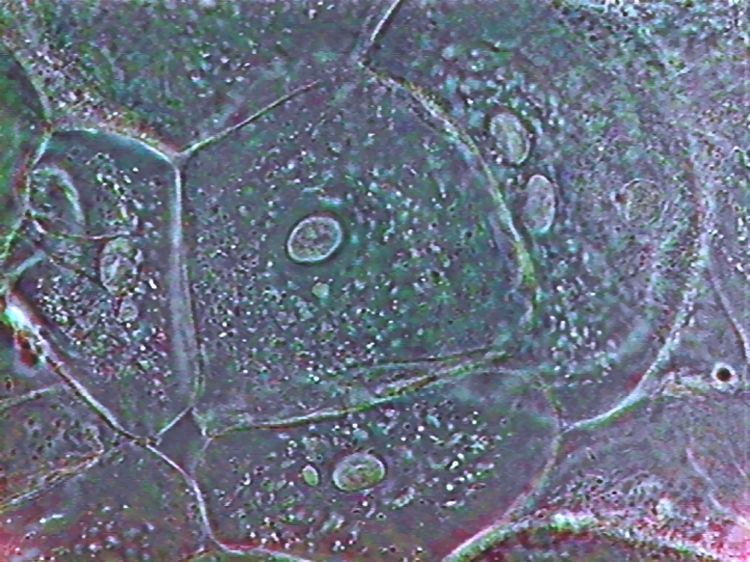
I start this page with an image taken from the first article of this series: the live onion skin cell without any stain:

100xOI, Canon Powershot A75. Roll mouse over for labels of features.
You can see the cell walls which have an inner lamella, which is the real cell wall, and a middle pectic lamella which is gluing the adjacent cells. The cell itself has a discoid nucleus. In the upper one you can see the included nucleoli, round and refractive. With intelligent and careful focusing can tell you that the nucleus is included in a layer of cytoplasm applied to the cell wall which is surrounding a central vacuole, filled with a liquid (the cell sap). The cytoplasm could be further subdivided in the cytosol, a dense but fluid portion which has many strands which traverse the cell sap to the opposite side layer, and many refractive inclusions which move actively through and with the cytosol. (This movement is difficult to see with the normal microscopes: DICs or Phase models do a better job). In the onion cell there are two types of inclusions: leucoplast, particles without color, relatively small; and larger particles, of most importance to cell metabolism, the mitochondria which have RNA and could be stained. A term inappropriate but often used for these organelles is "vesicles" or "granules" .
We try, by staining the cell, to better show, and form a better knowledge, of this complex structure.
If you are so young that you dont know what acids and bases are, to contact a teacher is the best start, before further reading this article.
Professionals use Carmine, or Safranin, or Orcein, or Hematoxylin, or Celestine Blue, or Methylene Blue, (all of them classified as basic dyes) to stain the acid portions of the cell, which are the nuclei, the mitochondria and other RNA inclusions.
To give a more brilliant and pleasing image, and an even clearer functional distinction with the rest of the cell, which is basic, microscopists stain it with acid dyes. In histology, acid red dyes like Eosine or Erithrosine are used as protoplasm stains, and so they function as counterstains for the blue or blue black stains like hematoxyline.
The histological dyes are not cheap, and are not sold in the small quantities that are sometimes needed by an amateur microscopist for a limited series of studies, to be applied also to a limited variety of subjects.
So, some of us have had recourse to other sources of dyes, which are conveniently sold as ready made solutions, in little quantity, at an affordable price.
One of the more interesting ones is Brilliant Blue #1
Brilliant blue #1 (not to be confused with Coomassie Brilliant Blue G or Coomassie Brilliant Blue R, Coomassie is simply a commercial denomination) is a dye, which the Internet citations register as one of the 7 approved food dyes (at least in the USA and its area of influence, like Mexico; it could be found also in Canada and in Spain and France, and most of Latin America; but I think it is banned in the UK).
It seems to be the least dangerous of all the food dyes. Indigotine (FD&C Blue #2, Indigocarmine, E132, CI 73015) must be better, but I have not found a source.
Brilliant blue #1 has many other names, I register here only three : Acid Blue #9, FD&C Blue #1, and Alphazurine. Its easy to find half a dozen more using your browsers.
Food dyes came in a gamut of reds and yellows, which pertain to the Azo dyes category, they are acid dyes. And they are all proven or suspects of toxicity in varying degree.
The blues are only 2 or at most 3 chemicals of which the Brilliant Blue #1 which is a triarylmethane is the most common in the pastry section of our supermarkets, due to the overwhelming presence of the McCormick brand. It is also classified as an acid dye ... but it has a different structure than the other azo dyes.
And is possibly the least toxic of all the synthetic food dyes.
All the 3 dyes sold here as food dyes are: a Red (declared to be a mix of Allura Red and Erithrosine), a Yellow (Tartrazine), and a blue (Brilliant Blue 1, plus Red 14).
And the Green? Notes on Fast green FCF
There is not a pure green pigment in my set. In 2004 I bought a box that has a pure green (Fast Green FCF), I have still now some one and a half milliliter of it. It was later declared a real carcinogen, and banned over the world.
My set has a green dye bottle. But it is a composed of the Brilliant Blue #1 ( from now on Blue 1) and Tartrazine. It is common that the commentaries on Blue 1 include a sentence stating that Blue 1 can be mixed with Tartrazine to give shades of green. It is not stated for use with any other yellow dye, only tartrazine. I dont know if this is only one of the burdens of many repetitive copies of texts and data, normal and very annoying on the Internet, or if this implies a special property of both dyes that can stack or combine in a physical or chemical manner to give an especially consistent green dye.
As an acid green dye the Fast Green FCF was proposed from the beginnings of the histological staining techniques as a counterstain to red nuclear dyes as safranin or carmine.
Dyes like light green or fast green, which stain everything the same shade and don't differentiate nuclei, are suitable as counterstains.
http://www.histosearch.com/histonet/Jan06A/RE.HistonetCounterstain-P.html
The tone of the Fast Green (at left) and the modern Green (at right), is very different. But really I think that the statement on Histonet does not do justice to the stains. Even in a monochrome way, onion cell nuclei are well differentiated, and even better are the nucleoli.
Obj.40x
The fast green clearly gives a better image of the nucleus. But the Blue+Tartrazine is not so bad. Both can be compared with the iodine tinged onion skin whose image gives also an identification of the nucleus not by substantial difference in color, but by differences in density and contrast of the nucleus.
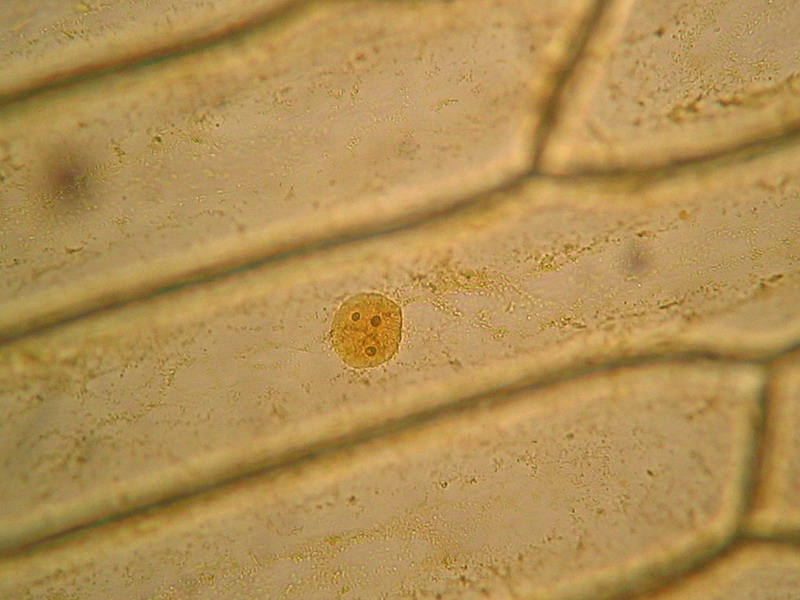
What we are searching for is a more contrasting difference between nuclei and surrounding cytoplasm and if possible a more detailed view of the nuclear structure. I think that the Blue 1 does this task quite easily. The following pictures show the tinting of cells of onion skin with a simple diluted aqueous solution of Blue 1. The green dyes (upper pictures) and the blue 1 were applied on cells fixed by hot water at 60ºC. See the companion article.
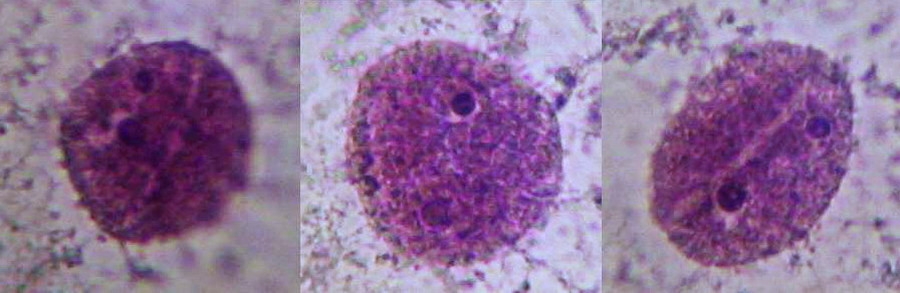
Nucleus, taken though the 100xOI obj. SX100is
These are the nuclei of somatic cells in resting phase. The nucleus is clearly delineated from the very clear surrounding cytoplasm, which shows stained mitochondria and delicate strands of cytosol. A clear granular texture of the chromatin is depicted, and nucleoli are sharply and deeply stained. The surface topography of the nucleus can be detected, more clearly visually than on the pictures of course. There are visible superficial grooves, more or less deeper.
Aptenia cordifolia
See http://www.microscopy-uk.org.uk/mag/artaug04/wdaptenia.html
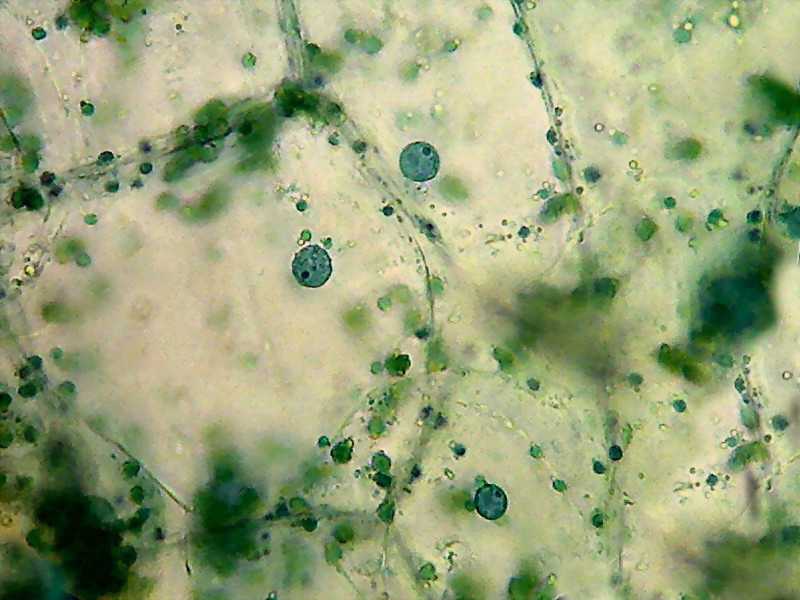
This is a second plant whose epidermis is more or less easy to detach. The epidermis has two kinds of cells. The normal ones, with small nuclei, and some bigger (4 or 5 times the surface area, and many more times the volume) that have proportionately bigger nuclei. These cells accumulate water, and are called bladder cells. Selecting the inferior surface of the leaf there are also many stomata.
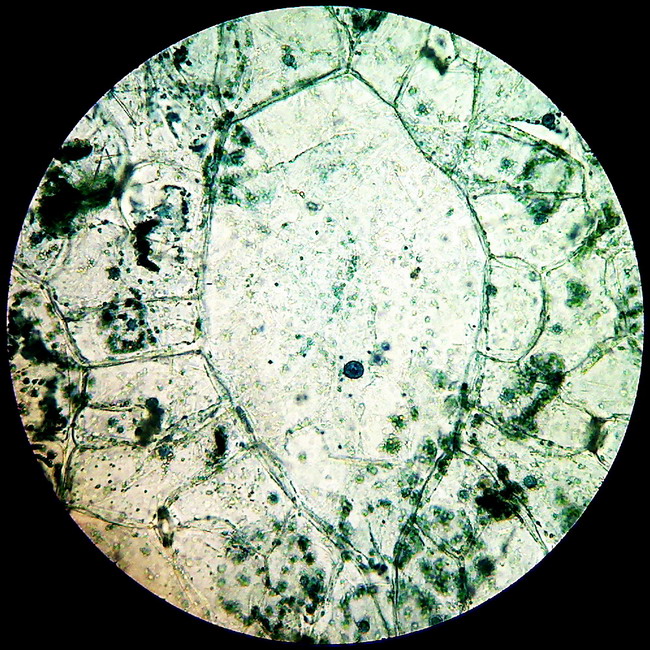
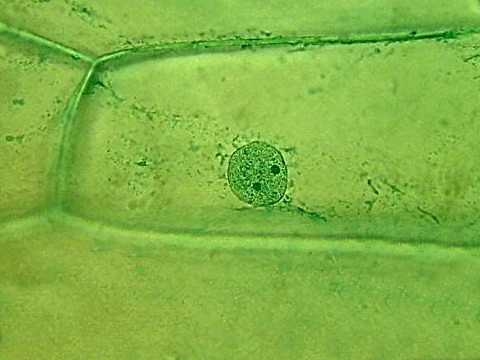
A Bladder Cell from the leaf epidermis of Aptenia cordifolia. See the smaller nuclei in the contour cells
Two nuclei from bladder cells, well stained, with a nucleolus deep stained, cytosol not stained at all, some chloroplasts have taken some colour. This last nucleus is in the upper cytosol layer.
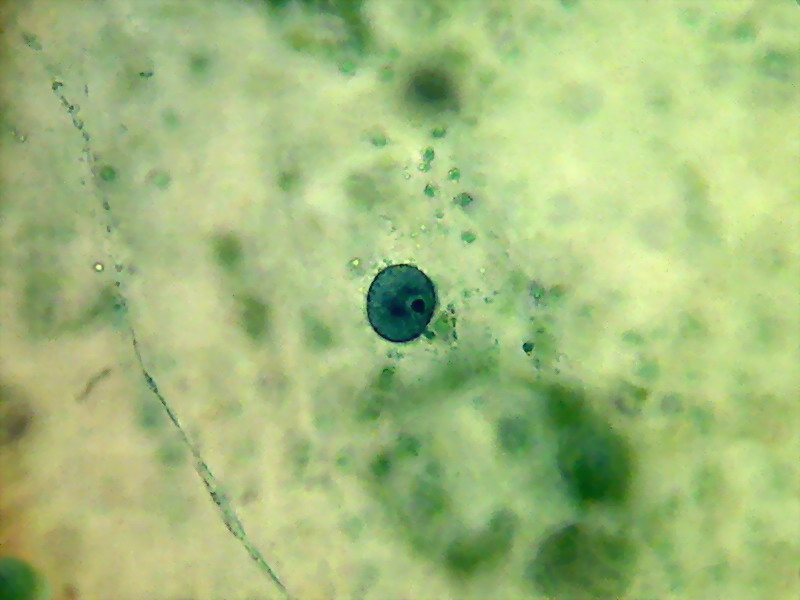
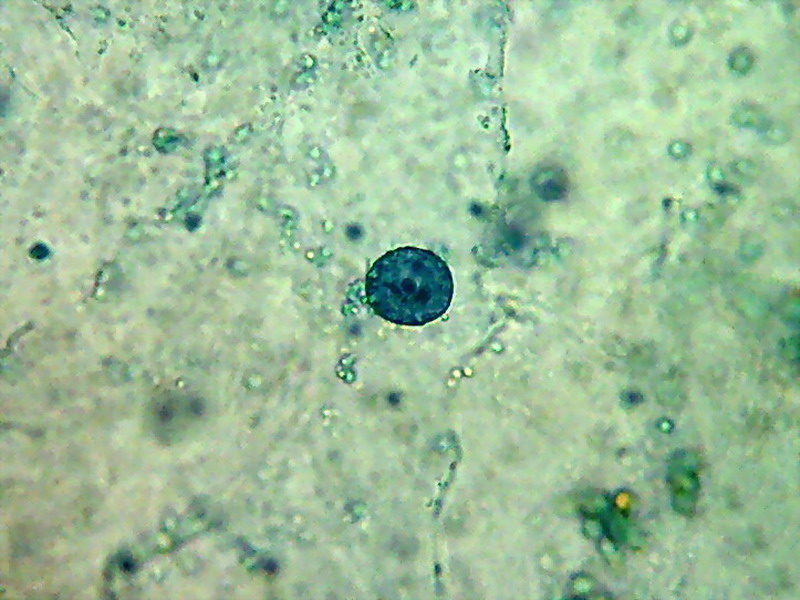
A bladder cell nucleus suspended at center of the cell
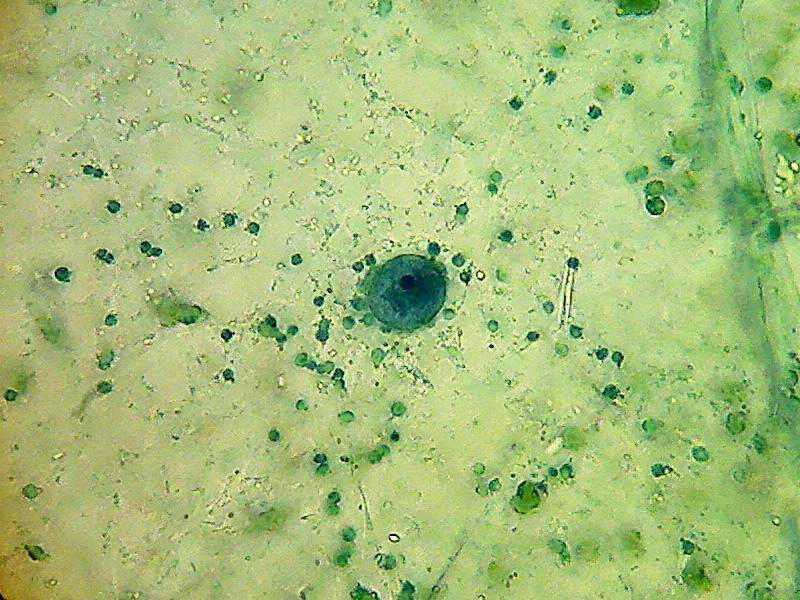
Three epidermal cell nuclei, the green masses are chlorophyll picked from the palisade mesophyll when the epidermis was peeled. The epidermal cells dont have chlorophyll.
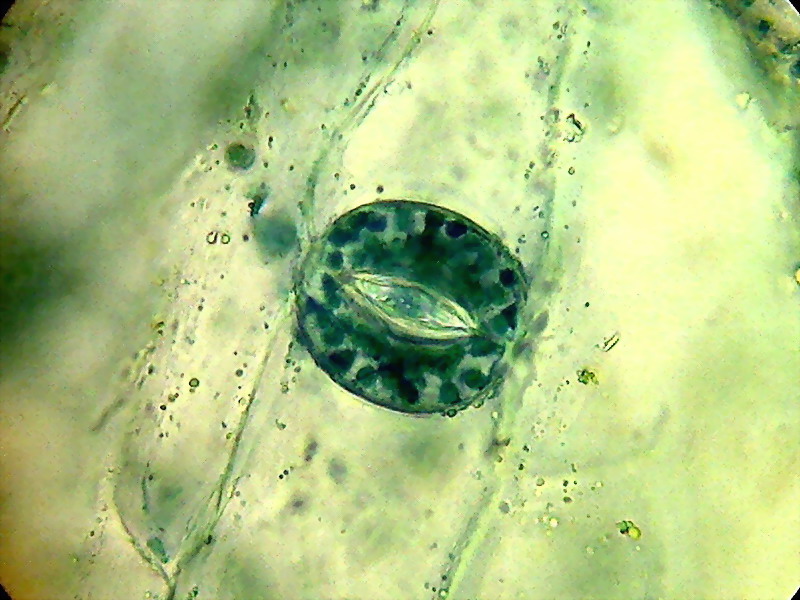
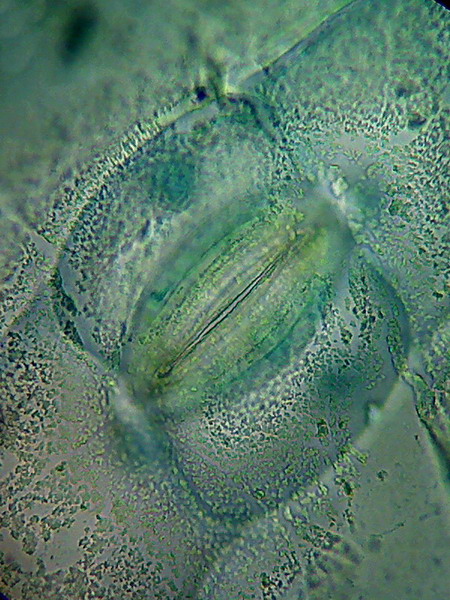
One stomata. Chloroplasts and stained nuclei in the guard cells. 100xOI
The epidermis was lifted with fine pointed tweezers, picking it from the borders of a very superficial cut. I put it in a drop of water on the slide and carefully drained the water. The epidermis sat on the glass and, with care, it can be manipulated. Two drops of alcohol acetic fixative were added, and all was left for 5 minutes under cover. Fixative was drained with care and the piece was washed twice with 70% alcohol. Alcohol was washed with 2 or 3 drops of water and replaced by a generous volume of working solution of Blue 1. After 10 minutes of staining, the dye was washed until it didnt leak any colour, and the epidermis was mounted in water under a coverslip, sealed with Nail Polish.
Tradescantia sp.
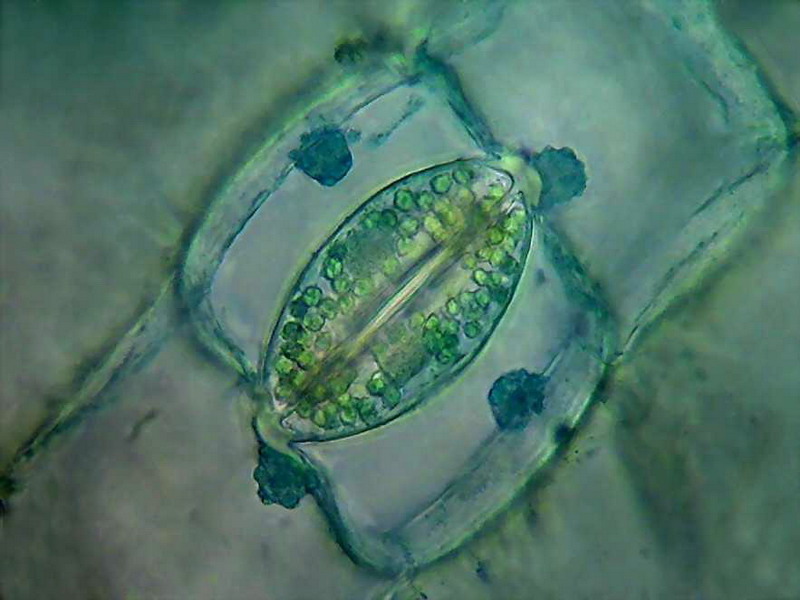
One stomata of Tradescantia. Only 25 seconds in the dye to avoid overstaining.
Nuclei of companion cells are morula-like because of many attached plastids, and are applied to the cell walls. The nuclei of the guard cells are hidden under the chloroplasts 100xOI
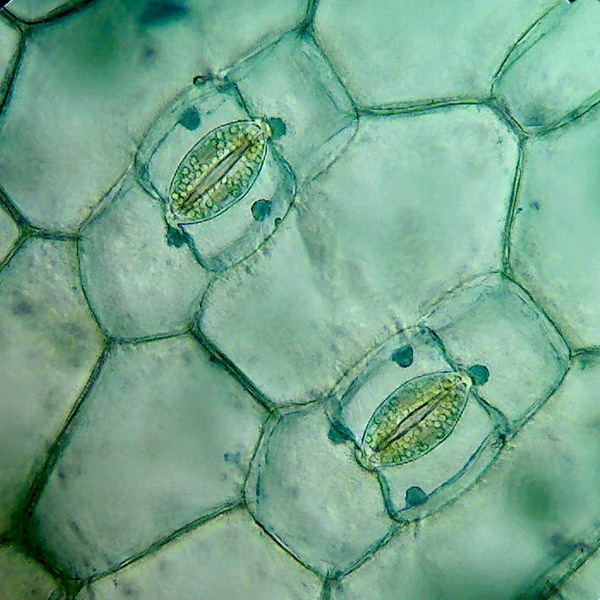
Left picture: Two stomata, the nucleus of each guard cells are deeper and they show as green shadows. Right picture: The epidermis between the stomata is build with epithelial polyhedral cells.
A closed stomata. This picture of the surface of the leaf, show remains
of the waxy cover of the epidermis, partially dissolved by the alcohols.
The three samples of plant tissues presented here (Allium cepa, Aptenia cordifolia and Tradescantia pallida purpurea) shows clearly that Blue 1 can be described as a nuclear stain, that gives almost no color to any other part of the cells.
Blue 1 in some animal test cells
I have
pictures, taken 5 or 6 years ago, of some protozoa and one gastrotrich stained
with Blue 1. They are not outstanding, and were taken with the 0.3 Mpx DC3 camera
included in my National Optical microscope.
- http://www.microscopy-uk.org.uk/mag/artmay04/wdstains.html
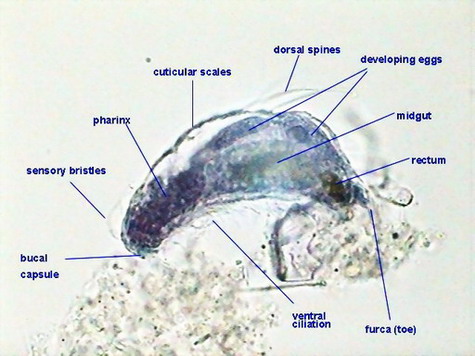
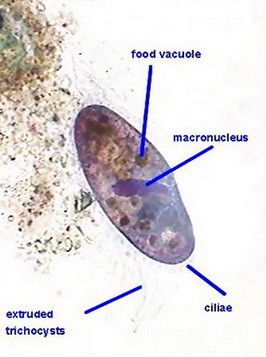
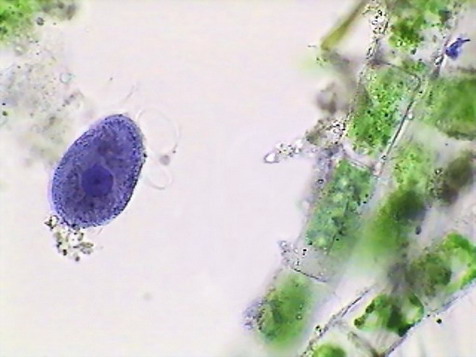
But the pictures of both protozoa show clearly the stained nucleus, and the larger paramecia shows a more clear, not tinged, cytoplasm. The image of the gastrotrich and the minor protozoa are more dubious, because both cytoplasm and nuclei are stained, but nuclei are well delineated in both cases.
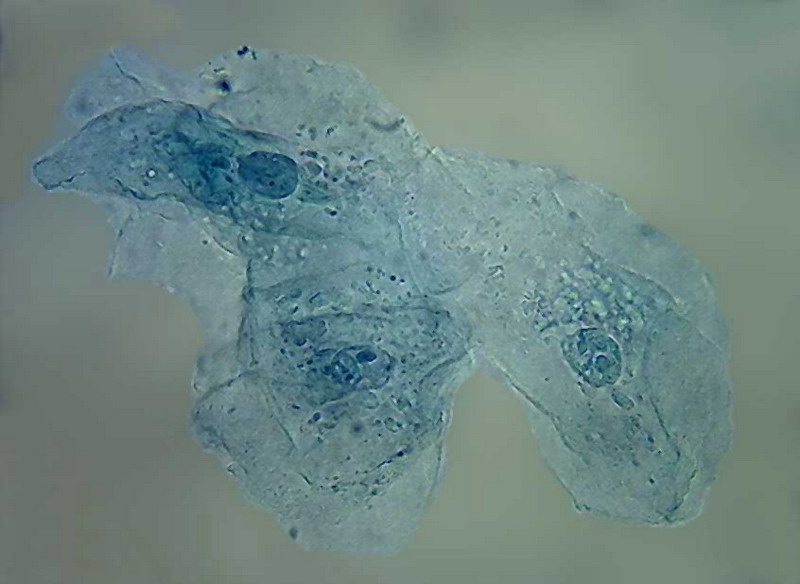
Nevertheless Chris Robinson, in correspondence to the Amateur Microscopy group, (post Nº 4926, Jul 20, 2010) using as test cells those from the inner of the cheek, says he had no success with nuclei coloration. He found that Allura Red and Erithrosine were the only useful food dyes because they can mimic very closely the effect of eosin as a counterstain.
I decided to try the same animal test cells. But I modified the protocol (simply because I am lazy and do not like to wait 2 or 3 hours to try my dyes).
At the center of a slide I put 1 drop of the Blue 1 dilution (0.6 ml food dye, 10 ml water). I add a drop of fixative and stir. With the blunt end of a coffee spoon I scrape the inside of my cheek, and transfer the invisible cell harvest to the dye drop. Put on a coverslip, drain any excess water. Attach with two drops of nail polish on two opposing corners of the coverslip, and go to the microscope. Cells are well seen at 400x and are even better studied at 1000x.
These are my results to date, which confirm Robinsons conclusions.
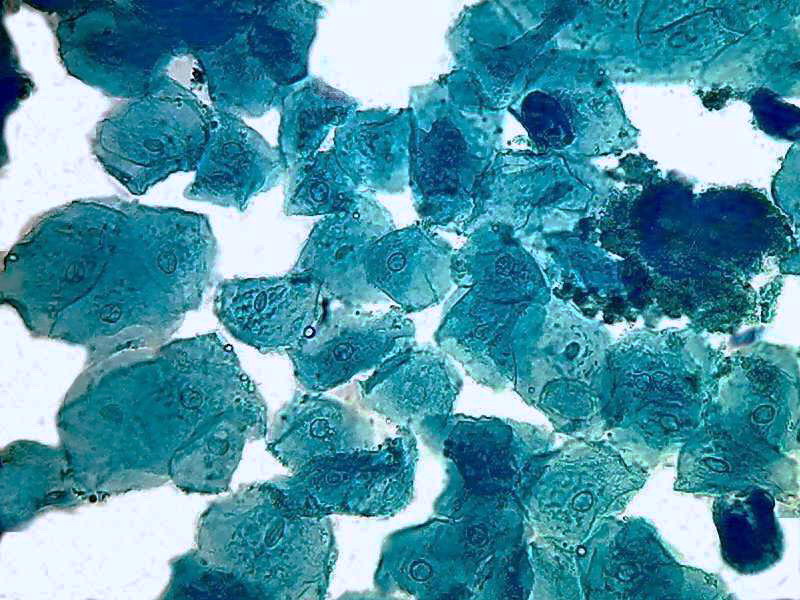
40x obj.
40x obj.
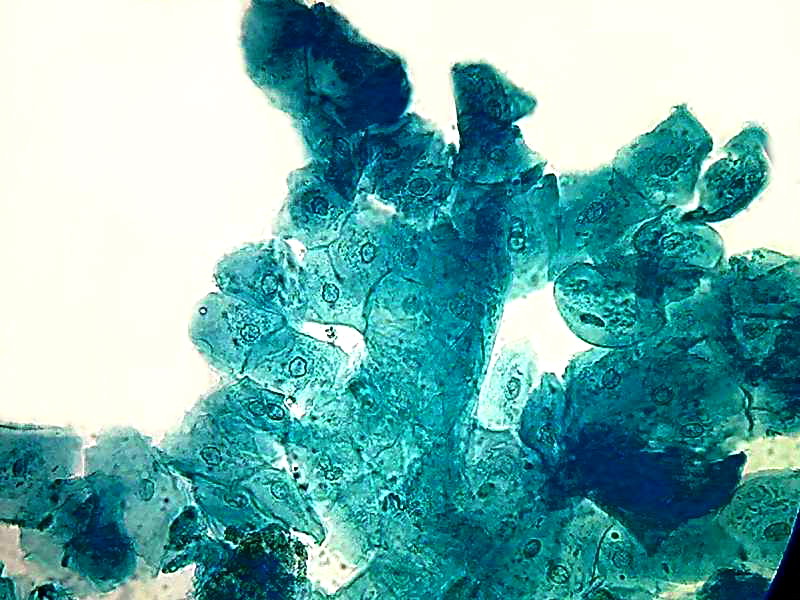
Two pictures, taken with the Logitech 9000 and the objective 40x, show a uniform color that corresponds to the expected trend of the B1 to colorize the proteins, as a typical acid dye must do. Nuclei do not have any special coloring. The same is seen in the image below taken with the objective 100x OI
100x obj.
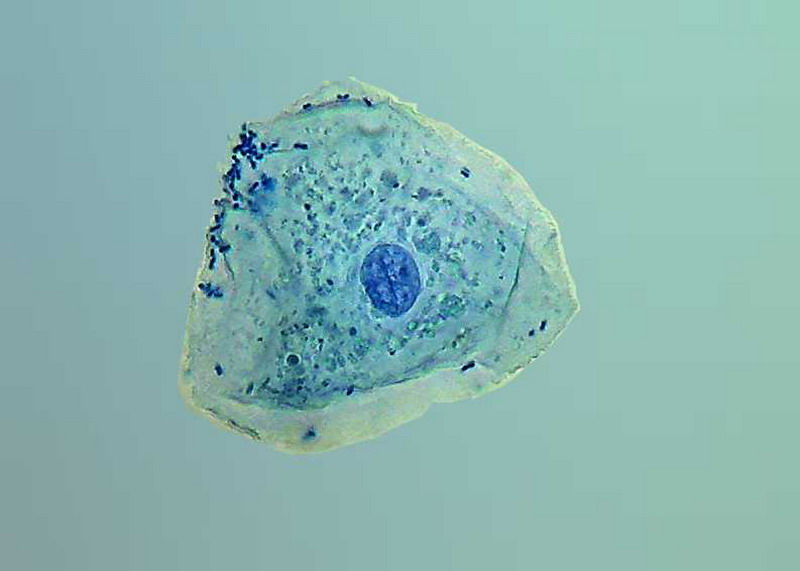
Another simple technique
Dont use Fixative. Put 1 drop colour, mix cells, cover.
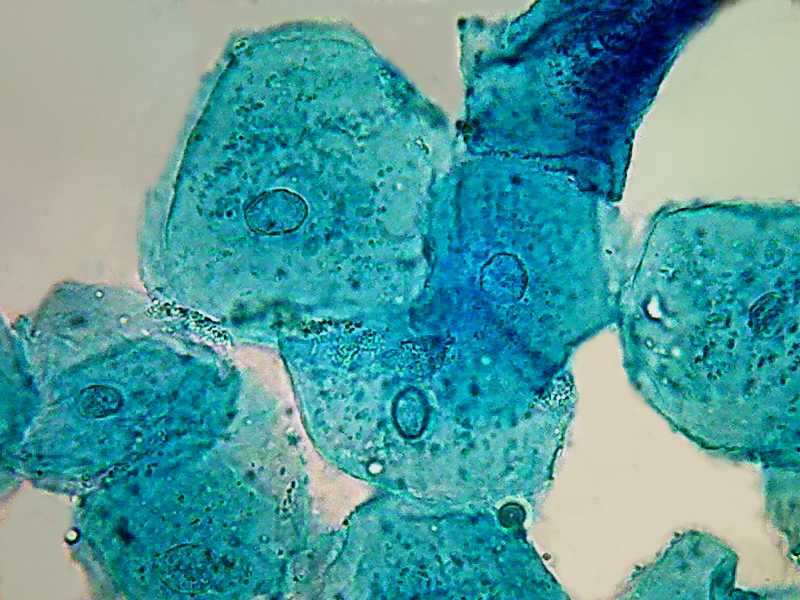
100x obj
The result is a monochromatic image, nuclei visible, but transparent. Bacteria are not tinged.
So there are two problems to be solved :
1) Why Blue 1 is a good dye for the plant cell nuclei?
I must leave the answer to some biochemist cytologist. I think it's a very interesting problem, but out of reach for an amateur. At least functional differences between the plant and animal nuclear membrane have been well documented. And probably this accounts for the different behavior of nuclear dyes.
The first investigations of the plant nucleus revealed some similarities and a surprising number of differences in the nuclear envelope biology of animals and plants. This review will focus on evidence that nuclear organization is fundamentally different in the other kingdom.
http://www.springerlink.com/content/d1gq9tdc2ahtfqnc/
2) How does Blue 1 stain nuclei of some animal cells and not others?
Knowing only the generalities of the histological staining, it is clear that many factors could be involved in the solution of the second question: fresh material vs. dehydrated, fresh vs previously chemically fixed cells; live vs dead or dying cells, variations in pH of the solutions, composition of used fixatives, composition of the staining solution (until now I have used no mordants, for example) and even working temperature. The ambient temperature in my lab for examples is rarely under 20, and mostly near 30 ºC.
To do an exhaustive research could be really a very time consuming job. Or a communal job to be carried out by a microscopists group.
When teaching, methylene blue is often used to demonstrate nuclear chromatin.
So, in a very small medicine cup I put 5ml of distilled water and add 5 drops of a 1% methylene blue solution I purchased at my aquarium store as a fish medicine. I adapted the former instructions:
At the center of a slide I put 1 drop of this dilution. With the blunt end of a coffee spoon I scrape the inside of my cheek, and transfer the invisible cell harvest to the dye drop. Put on a coverslip, drain any excess water. Fix with two drops of nail polish two opposed corners of the coverslip, and go to the microscope. Cells are well seen at 400x and are even better studied at 1000x.
The following pictures shows the coloured nuclei, on a clear blue cytoplasm background, because according to texts, the methylene blue colours not just DNA, but also the RNA dispersed in the cytoplasm. Of course bacteria applied over the cell membrane are intensely coloured.
100x obj.
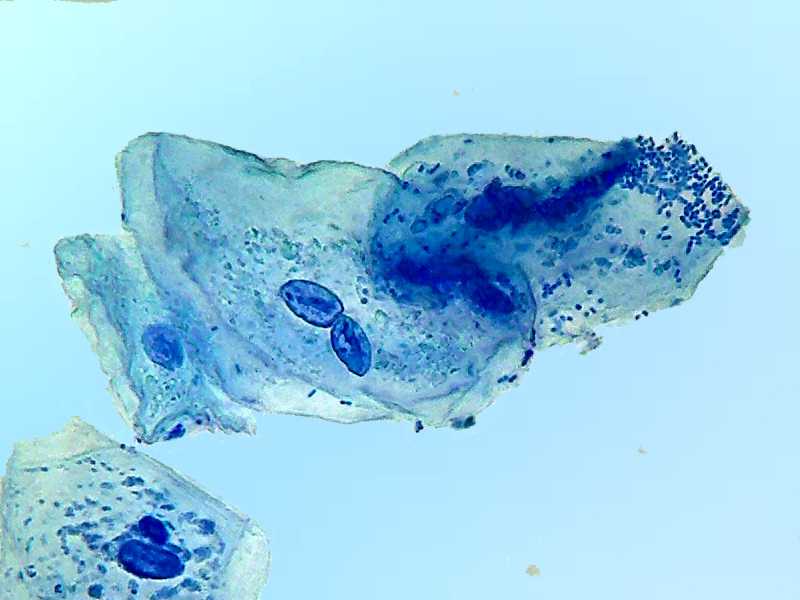
100x obj.
Unlike the Blue 1, the methylene blue made a beautiful job staining the chromatin of the nuclei ... and the bacteria.
But, really, those who want to see or show the structure of cheek cells do not require any staining ... It is very easy to show it with a simple oblique light diaphragm or even a black background stop.
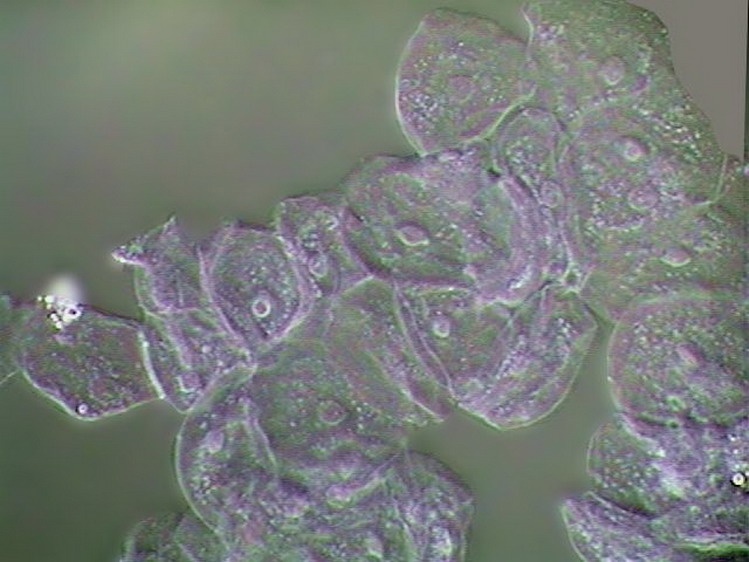
40x obj. DC3
100x obj. DC3
See http://www.microscopy-uk.org.uk/mag/artdec03/wdonion2.html
I was unable to found another source of animal cells easy to work with, with these dyes, without using a microtome.
This article will be maintained open, to add more information and images, which could be unveiled in other articles of this series. If you are interested, give it a periodic visit.