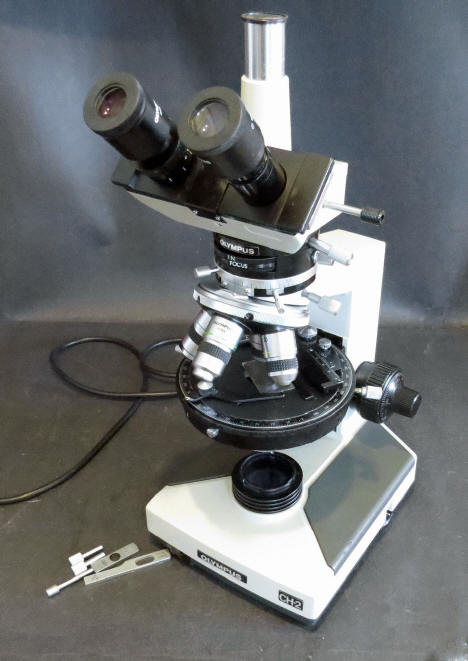
The Olympus CH2 CHSP Petrographic Polarizing Microscope
Greg McHone, Grand Manan, Canada
As a geologist who likes to renovate microscopes, I have an interest in polarizing petrographic models that are specially equipped to study thin sections of rocks and other earth materials. As you may know they are also useful for other purposes such as forensic geology, organic crystallography, and materials science, as well any typical brightfield work. Other Micscape articles describe and illustrate some of them, which you can find via named links in this text or by searching the Micscape index.
In addition, I am particularly fond of microscopes made by
Olympus after the 1970s, of which there are always several in
my shop and lab including a big BX50-P made in the
1990s. It took me a long time to afford, acquire,
renovate, and equip that one, which is the best microscope I
have ever owned for sure. But most people do not need a major
research machine like the BX50. A smaller, older, less
complex, and much less expensive microscope will do just fine
for most people for hobby and research investigations. This
article is about one that came my way recently. As usual, it
was a matter of making a good microscope using parts and
pieces salvaged from several bad ones. I will describe steps
to rebuild the instrument, and the parts that were needed.
They are labeled in the first photo.
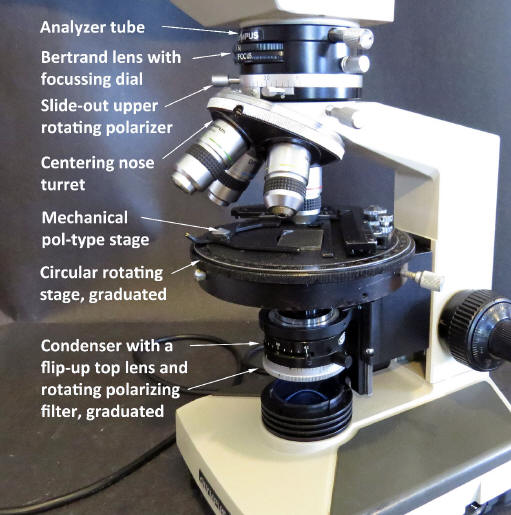
Photo right: Olympus CH2 CHSP after reconstruction, with special pol parts labeled.
Olympus Student Pol Scopes
Olympus produced a nice old-style student petrographic microscope from the 1960s called the POS, which I briefly described in this September 2008 article. It had a horse-shoe foot, mirror lighting, and single-objective clips with short-barrel objectives, all anachronistic today. But it was very well made and still listed in their 1996 catalog, along with the new BX-P (essentially my BX-50-P). A striking contrast!
However, the major modern-style Olympus "small microscope" was the CH model, which was developed in 1976 and continued after 1986 as the CH2. It resembled a smaller version of the bench-top BH/BH2 models including most of the same optics, and with a corresponding switch from a "warm gray" finish to "Olympus beige" around 1980. The CH/CH2 line was intended for use in clinical labs as well as student instruction, and for geology labs there was a CHA-P model to correspond with the BHA-P (the larger bench-top model for petrographic work). It must have come out after 1980 because I think it was always a beige color, but it used the BHA pol versions of condenser, stage, objectives, analyzer tube, and eyepieces as well as smaller 4x12 mm compensator plates. I have illustrated a CHA-P (with later long-barrel optics) on my Olympus microscopes website.
The CHA-P polarizing petrographic microscope is very rare; I have found only one and an instruction manual for it. I do not recall any of this model in the geology labs where I worked or visited from 1968 to 2008. Apparently they were not a stock item at dealerships but were a special order from the factory. The CH2 petrographic polarizing version, which came out after 1986, was based on the CHS version that used a 20 watt quartz halogen lamp rather than the 30 watt tungsten filament lamp of the CHT version. The 20 watt halogen lamp is directly beneath the field lens and provides a brighter light than the 10 watt halogen of the older CHA model, and more than the 30 watt tungsten lamp too. But it also puts out a lot of heat, which can be a problem for long periods of use. Olympus tacks on a P to the model name to designate the petrographic version. In the late 1990s Olympus replaced the CH2 line with new CX models that feature infinity optics and a fashionable new stand shape.
Parts and Pieces
An Olympus parts catalog with prices was issued in August 1992 for the BHSP, BHTP, and CHSP polarizing petrographic models. The CHSP system with 4x, 10x, and 40x objectives, binocular head, and modular petrographic polarizing parts (as opposed to a simple pol system with two polarizing filters added to a "normal" biological model) had a list price of $4,207 USD. Within that system, the intermediate tube with analyzer and Bertrand lens (part BH2-PA) cost $1,272. The same BH2-PA, WHK 10x eyepieces, and PO D Achromatic objectives were also standard on the BHTP model (system list price $5,467) and BHSP model (list price $9,897), but a BH2-CD condenser, BH2-SRG circular stage, BH-PRE centering nose turret, and CH-Bi45 binocular head were all modified at the factory for the CHSP model. These expensive parts and the trouble required to manufacture this microscope led to its relatively high sale price, which you may note was not all that much less than the large bench top BHTP model. Not to mention a long lead time to receive orders from the factory in Japan. No wonder if the CHAP and CHSP had low sales volumes. Yet, this is certainly a high quality microscope, very functional and desirable.
Thus my interest at seeing a CH2 on the popular internet sales site that sported a circular stage, centering nosepiece, and crosshair eyepiece, all hallmarks of a petrographic microscope. It had the trinocular version of the CH2 head, but no intermediate analyzer tube or lower polarizer. The buy-it-now price of $299.90 USD was cheap for a petrographic microscope, but this was in such rough shape that the seller advertised it "for parts only". It certainly looked like a basket case in the sale photos. The two DPlan objectives (4x and 10x) with it were also rough and not the pol versions, although they cleaned up well. However, standard DPlan and A achromatic objectives are usually about strain free and work well with polarizing applications. I no longer worry about the "PO" designation for using them.
It had the critical circular stage that I knew to be durable, and in my
spare parts bins I had
an
early-style Olympus intermediate analyzer tube, additional objectives,
WHK
eyepieces, and compensator wave plates. I also owned two CH2 stands with
various problems but still good for parts. With a decent potential for
renovation or reconstruction, I bought it.
Renovating Issues
The microscope
arrived packed pretty well with bubble wrap, but I could see
why it was listed with a warning of "parts only" condition.
The finish on the stand and every part on it had been badly
mauled by acid or some other destructive gas or liquid, with
bubbled paint, corroded plating, and rusted metal including
all screw heads. I cannot imagine how anyone could use it in
such a caustic environment, or why an expensive instrument had
been abused this way. However, the stage rotated smoothly as
did the nose turret, and the optical surfaces were not bad.
The lighting system worked except that the dial to adjust
intensity did not turn. I always try to restore projects as
near to "like new" as possible, but there was no way to get
this one very close to that. But it could still be decent and
functional. I took the microscope apart for cleaning and
fixing, starting with the electrical base.
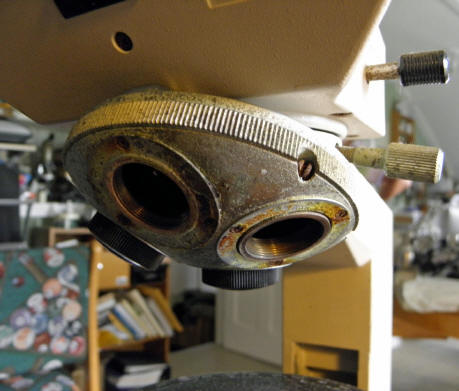
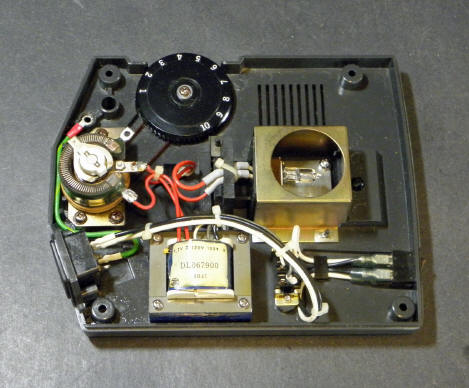
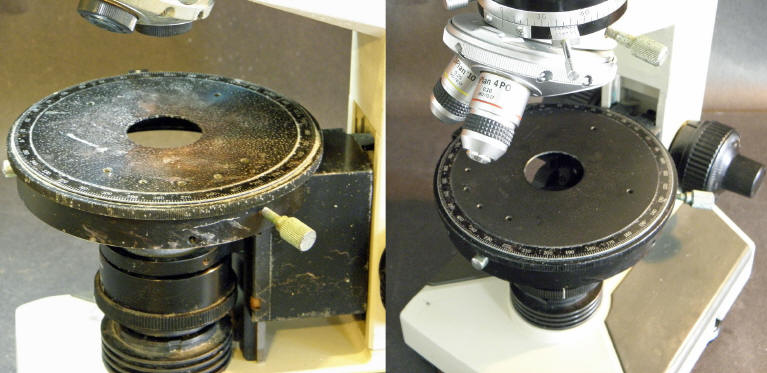
Photo left: Corroded centering nose turret.
Photo right: CHS lighting base interior.
At first I thought
the light intensity dial would not turn because the rheostat
was stuck, but I found that the problem was actually in the
axis where the dial is fastened to the base. I took the dial
off and removed corrosion with steel wool, then added a
bit of grease, and then it worked fine and turned smoothly. If
only all fixes were so easy! The plastic pulley band is the
most fragile part here, but this one was pretty good for its
age. The interior escaped most of whatever corroding fumes
damaged the outer surfaces.
The stand would
require a complete paint job to look decent, but with my tools
and ability it would be far from a real factory finish and
probably not a perfect color match either. Another serious
problem with it was the focusing mechanism, which no longer
functioned as smoothly as it should. It was an obvious
decision to substitute one of my spare parts CH2 CHT stands,
which appear to be identical except for the lighting base and
plate on the back. The parts came off the damaged stand and
went onto the better stand. Simply by installing the 20-watt
halogen base and swapping the name plates, my CHT parts stand
became a CHS pol stand.
Circular Stage
The next step was
to remove and repaint the BH2-SRG circular stage. The stage is
made in upper and lower sections that easily detach, and this
is a simple design that uses a greased surface connection for
rotation in the upper section. The modification made by the
factory to put a BH2 circular stage onto a CH2 stand was
immediately apparent, as you can see below. On the left is a
lower stage section made to clip the SRG circular stage onto a
standard BH2 stage holder (this one is missing one of the stage centering
bolts). On the right is the modified base section from the CHSP stand. The
standard ring-shape of a BH2 stage holder allows even the rectangular
biological stage to be rotated a fair amount by loosening a thumbscrew. But
the CH2 stage holder is completely different as it uses a 4-screw attachment
for its common biological stage. Also, the base section of an unmodified
circular stage would not sit low enough on the CH2 stage holder. The drastic
factory modification was to cut away a section of the circular stage base at
a width
to slip snugly over the CH2 stage holder, and drilled for the stage screws.
However only two of the normal four screws are used‚ a compromise, but
still secure enough.
And so far, so
good.
The stage surface
was in poor condition. I removed the top section and the
centering bolts, cleaned it, and smoothed the surface and
bolts as much as possible with fine steel wool. Then the outer
rim section with its graduated degree marks was masked off
with plastic tape, which can be stretched around curves. I
used good-quality flat black spray paint on this surface, and
after drying the tape was removed and the piece baked in a
toaster oven for a half hour at 225 °F. It made a smooth
durable surface on which thin sections will slide easily. I
used a semi-gloss black enamel paint to touch up the scars and
scrapes around the graduated edge and the round surface below
it. The photo below shows the stage before and after
repainting.
By chance I had a
prized pol-type mechanical stage, Olympus part C-FMP made to fit this
BH2-SRG circular stage, which is smaller than the ball-bearing BH2-SRP
circular stage that was an option for the BH2 models. It works well except
in certain positions it can interfere with (bump) the tips of longer
objectives‚ users need to take care about that. It appears in the photos of the
finished project at the top and bottom of this essay. I like
mechanical stages but many petrographers are just as happy to
move the slide around by hand, secured when needed by stage
clips.
Nose Turret
The centering nose turret
is attached by two screws to the stand beneath the head. It
should be four screws but two are spaced too far apart on the
stand to fit the turret. This is a standard BH-PRE turret with
3 of 4 objective holes centered via small spring-loaded side
screws (see the photo higher up), with the dovetail connector removed. Olympus provides
small thumb-bolt wrenches for the centering screws, but since
those tools are easily lost, two small screwdrivers will work
well enough. Once centered they stay pretty well. I do have a
spare centering nose turret which looks very pretty, but one
of the centering holes has a bad spring. The corroded turret
works OK so I decided to use it after cleaning and removing as
much rust as possible, then painting the curving outer face a
semi-gloss black and baking it like the stage. It is not as
nice as an original brushed-chrome finish (the part is
actually made of plated brass) but as I say, it won't be
possible to return this microscope to "like new."
Condensers
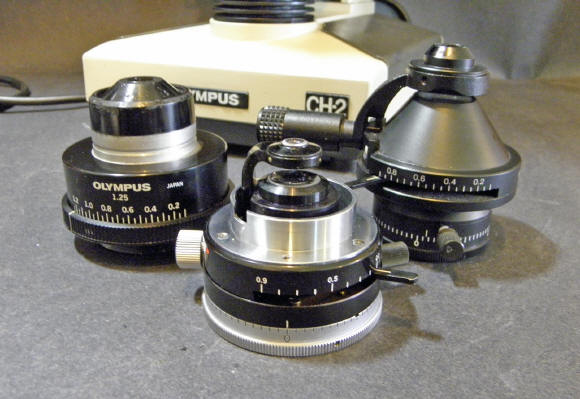 Left photo: Three Olympus pol scope condensers. The left one
is the CHSP condenser modified from a BH2-CD by the factory;
center front is a 1970s era BH-POC pol condenser with a
flip-up n.a. 0.9 lens and rotating polarizer; right rear is a
U-POC pol condenser for my BX-50P, similar to the BH2-POC.
Left photo: Three Olympus pol scope condensers. The left one
is the CHSP condenser modified from a BH2-CD by the factory;
center front is a 1970s era BH-POC pol condenser with a
flip-up n.a. 0.9 lens and rotating polarizer; right rear is a
U-POC pol condenser for my BX-50P, similar to the BH2-POC.
The CHSP came with
a BH2-CD achromatic condenser (n.a. 1.25) that was modified to
fit a ring holder with a larger 38.8 mm ring rather than the
old CH standard 36.8 mm ring. It has a metal tube neck with a
groove for the set screw of the condenser holder. This one was
in decent optical condition although the upper plastic
surfaces were pretty rough. But it has no flip-up top lens
that is very helpful to concentrate light for a good
conoscopic image. And no attached polarizing filter; instead
the CHSP used a simple pol filter placed over the field lens
(and the filter was not part of the purchase). In my opinion
this was a big step down from the nice BH-POC pol condenser
that was used in the 1970s to early 80s for both the BHAP and
CHAP microscopes.
But by chance that
older type of condenser came up on good old eBay. Although
rather expensive I did a "buy it now." It arrived in very
good condition except for a small mark or two on the pol
filter, which is nothing of consequence. It fits the 36.8 mm
ring of the condenser holder of my "new" CH2 CHSP stand so I
did not have to swap that part of the holder nor renovate the
old holder. I painted a red dot on the condenser holder to
show the proper location above a red dot on the condenser, so
that its pol filter is aligned properly at the zero
graduation.

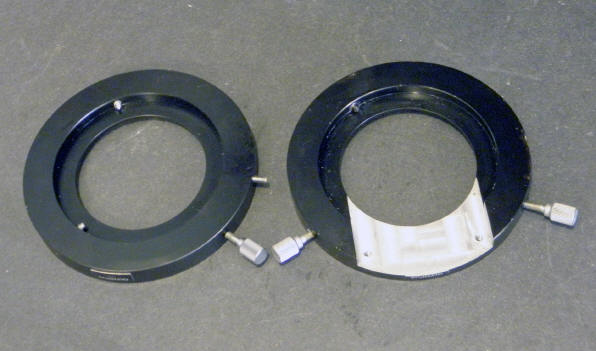
Analyzer Tube
Right photo: an
older BH-PA intermediate analyzer tube (left) and larger
BH2-PA tube (right), both with dial-in/out Bertrand lenses,
sliding analyzer filters, and graduated rotating polarizing
filters. Respective wave compensator plates are in front of
each tube.
Another part that
did not come with my CHSP purchase was its extremely fine (and
expensive) BH2-PA intermediate tube, which has the slide-in
analyzer (upper polarizer) and also a focusing Bertrand lens.
But I already had one, as well as an older and slightly
smaller BH-PA version from previous model years. That older
one has a slot to use smaller 4x12 mm wave compensator plates,
and I happened to have some of those too. I decided to save my
BH2 version for a future project and use the older version
here, even though it was not original equipment for the CHSP.
It works well and I think it is still appropriate for the CH2
line.
Trinocular
Head
The trinocular CH2 head that came
with my CHSP was not listed as an option in 1992, but it worked well despite
a lot of cosmetic damage. I spent extra time cleaning and smoothing the
finish. I doubt this is the original head because both eye tubes had diopter
focusing rings, and no slot for the pin that holds the crosshair objective
in line with the microscope axis. You do not need two diopter tubes when
using the WHK crosshair reticle eyepiece, and it has one built into the eyepiece for
focusing on the crosshair. Once that is sharp, you can focus
on the sample view for that eye by the microscope knobs, and
then use the diopter in the other eyepiece tube to focus the
view for its standard WHK 10X.
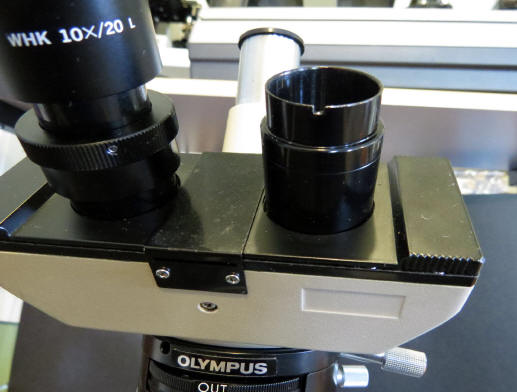
I had a binocular CH2 head for parts, and I took out its
straight right eyepiece tube along with the attached interior
prism, and swapped it for the right side diopter tube and its
prism in the trinocular head. Then I carefully filed a notch
into the bottom edge of the new eyepiece tube to fit the
eyepiece peg (photo to the left). I worried that I might have
wrecked the collimation or view alignment in this head by
swapping major part assemblies, but it looks and works fine.
Olympus doesn't need special strain free heads for its pol
scopes as required in many other brands, because there is a
quartz filter built into the BH/BH2-PA intermediate tubes that
removes extraneous polarization. The filter only allows
through the light that is polarized in the proper vibration
directions, which are not affected by the prisms as oriented
in the head. Very nice.
Large patches of
black finish were etched from the metal eyepieces. I swapped
the standard WHK 10x left eyepiece with a better one from my
collection, but I wanted to re-use the crosshair eyepiece so I had to
touch it up to improve how it looks. It is not perfect but
not bad either, and the optics are fine.
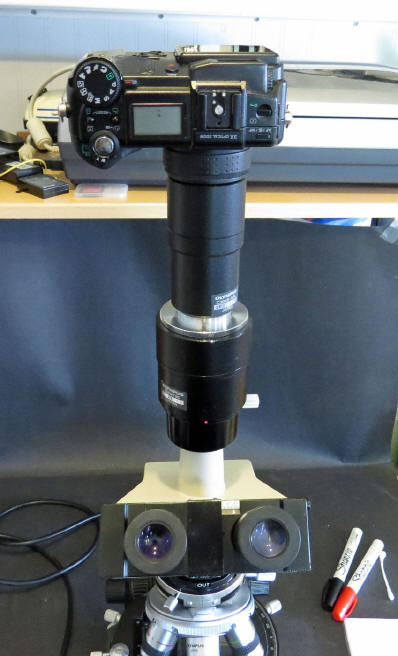 A Camera System
The great value for
a trinocular head is of course for photography. I have been
experimenting with small and relatively inexpensive consumer
cameras for my Olympus microscopes, as described in a previous
Micscape article on camera gear. One that works well on this
microscope is the Olympus C-5050 Camedia (5.0 MP). I like its
swivel view screen, infrared remote control, and high quality.
Olympus made microscope adapters for this camera, starting
with a C3040-ADL screwed into the camera filter thread, then a
U-PMTVC c-mount adapter connected to a flange adapter that
fits over the trinocular top tube (see the photo at left). For
a projection lens an older Olympus WF10x eyepiece is currently
inserted into this tube adapter, but in fact a BH2 type
Olympus eyepiece might work a bit better as it will make a
final correction for color aberrations.
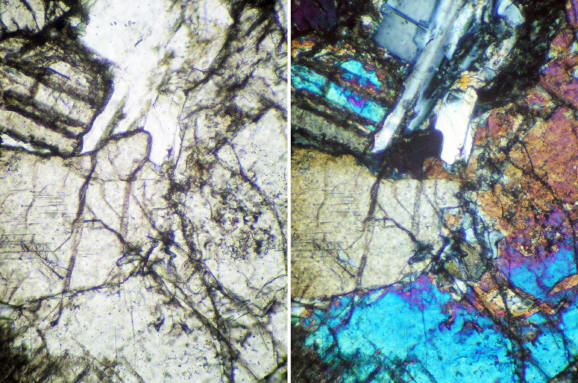
The photomicrograph images
(photo to right) are of a basalt thin section using this camera system, in plain
(single filter) polarized light on the left, and crossed polarized light
(both filters) on the right. Most of the
minerals are strongly birefringent pyroxene (augite) grains,
while the pale gray low-relief mineral at the top center is
plagioclase feldspar. The image is satisfactory for the most
important purposes of mineral identification, also for textures
and structures.
Pricing it Out
Perhaps you can now
appreciate why petrographic polarizing microscopes are so much
more expensive than standard biological versions of the same
models. It is because of all those special parts! List
prices in 1992 for the BH2-POC condenser ($785 but not what I
am using), intermediate analyzer tube BH2-PA ($1,272),
whole-wave compensator plate AH-TP530 ($231), circular
rotating stage BH2-SRG ($465), mechanical stage C-FMP ($511),
and quadruple centering nosepiece BH-PRE ($459) total an impressive
$4,182 in US dollars, which is the equivalent of $7,104 in 2014. And that
does not include the (strain-free) objectives, eyepieces including a
crosshair reticle type, trinocular head, and stand with an extra-bright
lighting system. I added two Olympus objectives from my parts box, an A 20x
and a DPlan 40x, which are a good match for this system and exhibit no
problems such as strain effects.
I could never
afford all this new, and maybe not even used except that I
maintain a "hobby fund" by selling projects and surplus parts.
My cost for the rough microscope and the replacement pol condenser
came to $525 USD, plus shipping and taxes. I do not know what the camera
system cost when new, but the pieces now would total about
$400. More to the point, it would not have been practical to
reconstruct this CH2 CHSP as it came, except that I have been
collecting parts for quite a few years and happened to have
the ones needed to make this into a good petrographic system.
And those parts are valuable. This microscope is not for sale,
but if it was it might fetch $1,600 to $1,900 USD (less than in "like
new" condition), or more
with the camera system, depending on interest in what I think
is a waning market. Or if I sold the parts and pieces
separately, several hundred dollars additional, but I would
rather build them up than tear them down. It is not a business
for me now, just a great hobby!
Feel free to contact me at greg "at" earth2geologists "dot" net with questions or comments.
J. Gregory McHone, PhD, CPG, Grand Manan, NB Canada
The
finished CH2 CHSP project microscope.
Microscopy UK Front Page
Micscape Magazine
Article Library
© Microscopy UK or their contributors.
Published in the September 2014 edition of Micscape.
Please report any Web problems or offer general comments to the Micscape Editor .
Micscape is the on-line monthly magazine of the Microscopy UK web site at Microscopy-UK
©
Onview.net Ltd, Microscopy-UK, and all contributors 1995
onwards. All rights reserved. **Any following links are redundant **
Main site is at
* The following links are redundant * www.microscopy-uk.org.uk.