|
Exploring the use of a Peltier plate with central hole (TES1-11903) as a cold (or hot) stage
for transmitted light microscopy.
by David Walker,
UK
|
Amended Nov. 16th 2020. The correct model number I now believe is TES1-11903 (on the unit) not TES1-11930 as originally stated.
In the August 2015 issue of Micscape I shared my trials of using a very cheap Peltier plate (TEC1-12706) to make a cooling (or heating) stage for hobbyist microscopy. The solid plate worked well for incident light microscopy where the subject slide sits directly on the plate. Cooling to below room temperature and to 0
ºC or less could be readily achieved.
Experiments to use one or two solid plates for transmitted studies was less successful, especially to achieve sub-zero temperatures which interested me in particular to study water freezing. A plate with a central hole should be better suited but at the time I remarked that the relatively few models available were expensive. I've recently sourced the TES1-11930 plate, 3 x 3 cm square with 5 mm central hole, about the
field of view of my 2.5X objective so ideal. Early trials with using this plate are shared below.
Sourcing. In principle they are available for a few dollars direct from Asian suppliers but I was unable to find a dealer e.g. via the Alibaba site who sold in single units and wasn't familiar with their accounting procedures. I opted to purchase for the higher price of £15 including shipping from a Chinese dealer on eBay UK.
Rather expensive but much less than the over £60 which some UK electronic suppliers charge for annular Peltier plates.
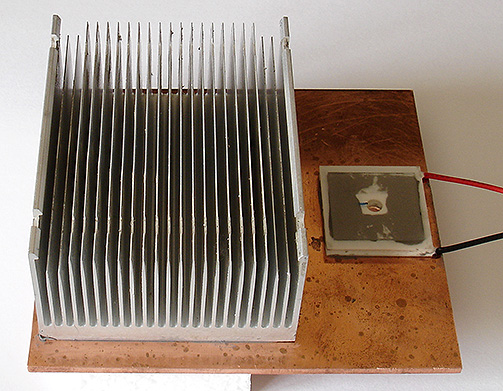
Current cold plate design. After some experimenting, the design below was adopted and very capable at quickly achieving 0 ºC.
|
Notes:
- Copper plate 2.5 mm thick (available on eBay), 5 mm hole drilled below the Peltier plate aperture
- TES1-11903 3 x 3 cm plate, hot side coupled with thermal paste to copper.
- A bench power supply is required, preferably with V / I displays and constant current facility, for the Peltier plate. I use the N93CX (see previous article).
- The plate is rated at 14V 3A, 24W but found that currents of 1A could freeze water quickly.
- Glass plate cut from a microscope slide acts as the subject slide, also thermally coupled to cold side of plate
- Heatsink currently in use shown. This may be overkill but trials with smaller heatsinks to date were not successful at efficient heat removal.
|
|
|
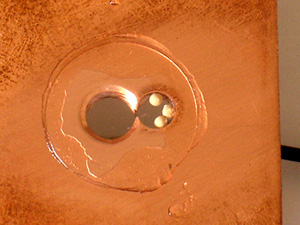
As for the previous Peltier plate studies, condensation readily occurs if working at temperatures below the dew point and needs to be controlled.
To prevent condensation on the underside of the subject slide which will be visible but out of focus in the subject field as well as affecting the lighting, a side hole was drilled with a slit connecting to main hole. This was filled with zeolite molecular sieve 3A and sealed using a coverslip and Vaseline. This dried the air to minimise condensation for short periods at least.
|
|
|
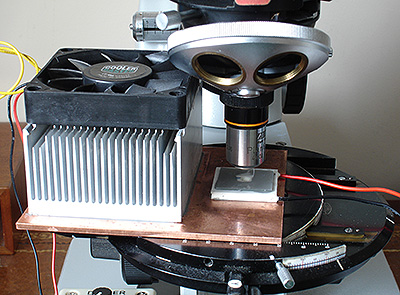
The cold stage in use on a Zeiss Photomicroscope III. It requires a large stage as shown with the ability to slide off-axis to support the unevenly balanced design.
Most of my studies are for short flash cooling where the fan could probably be eliminated. But the fan is well balanced and causes no detectable vibration for the low to medium power objectives.
The total height just clears the nosepiece turret when objective in focus.
|
|
Current trials. Although as remarked, condensation can be troublesome, it has furnished a subject to study that I've found fascinating i.e. observing the condensation of water from the air onto the cold plate and subsequently freezing. Stills from a typical study and a video are shared below. In due course, covered studies will be of interest where will need to prevent condensation on top
of the slip. A mini dry box around the slip and objective will be tried to hopefully prevent or at least minimise this for short periods.
Dew formation indoors, room temp. 68 °F / 20 °C, relative humidity 48%. Dewpoint ca. 9° C for these conditions (link to Wikipedia entry). Uncovered glass plate. Zeiss 6.3X planachro'. Canon 600D
movie mode (640x480), Zeiss Kpl-W 10X raised 9 mm as projection eyepiece).
Lighting green / blue quartered Rheinberg using a 60 mm LED ring light (for car headlights) on base of Zeiss Photomicroscope III (see this Micscape August 2016 article for method, after the work of Dr Kevin F Webb)
The stills sequences below are from a 6.5 minute video following dew formation to freezing. The cooling is dependent on the current which was increased as described during the sequence. Trials where the plate current was initially at temps. to induce freezing produced a solid less featured mass of ice because the condensation / coalescence phase shown did not occur. The full video is here (hosted on a Facebook 'Amateur Microscopy' group page thread. The initial frost formation starts after ca. 40 sec.)
|
.jpg)
2.4V/0.5A, t = 40 secs.
Microcrystalline frost initially forms along lines of glass plate surface texture. Possibly akin to the early stages seen in frost which slowly grows overnight on window panes.
|
.jpg)
2.4V/0.5A, t = ca. 1 min.
The initial frost melts quickly and dew starts to form.
|
.jpg)
2.4V/0.5A, t = ca. 1 min. 30 secs.
Dew droplets increase in size and coalesce.
|
.jpg)
2.4V/0.5A t = ca. 2 mins.
Further increase in droplet size.
|
|
.jpg)
3.6V/0.74A, t = ca. 3 min. 45 secs. 45 secs after current increased.
Further increase in droplet size.
I like the almost fractal appearance of the patterns formed.
If the current had been held at this value, condensation / coalescence would likely proceed until a continuous water film was formed on the plate.
|
.jpg)
4.7V/0.97A t = 4 min. 50 secs. 50 secs after current further increased.
Plate current increased so plate temp. at or below 0 °C.
Onset of the droplets starting to freeze, initially on droplet surfaces.
|
|
.jpg)
4.7V/0.97A t = ca. 5 min 40 secs.
Ice droplets freeze solid forming attractive internal patterns.
|
.jpg)
Power off at 6 mins. Still taken at ca. 6 mins. 30 secs.
The ice rapidly melts, seen here before completion.
|
Work in progress. My trials are at an early stage for transmitted studies. I may experiment with smaller heatsink / fan designs but the current setup works and on the Photomic' there's no real need to change. More compact designs may be required for smaller microscopes.
I purchased a used, cheap water cooled CPU heatsink where the pump and fan were separate. However, even the smallest models e.g. the Cooler Master Seidon v2 are bulky and the stiff short tubing does not seem to make it very practical for cooling on a microscope. I've yet to figure out if the pump and fan can be made to work if expecting logic control from a PC motherboard. This also seems overkill for the modest 24W TES1
plate described above, especially as have only been using a third of full power to achieve 0 ºC desired. It may potentially be of more use for cooling the TEC1 plates previously described if used at full power where up to 72W needs to be dissipated efficiently.
It has been fun (with some frustration!) to date exploring how best to use Peltier plates and a good learning experience which has combined some basic electronics, the physics of cooling and some microscopy together. I would be interested to hear from readers with successful designs for incident or transmitted use, especially compact designs suitable for the compound microscope.
©
Microscopy UK or their contributors.
Published
in the April 2018 edition of Micscape.
Please
report any Web problems or offer general comments to the
Micscape
Editor .
Micscape
is the on-line monthly magazine of the Microscopy UK web site at
Microscopy-UK
© Onview.net
Ltd, Microscopy-UK, and all contributors 1995 onwards. All rights
reserved.
Main site is at www.microscopy-uk.org.uk
with full mirror at
www.microscopy-uk.net
.