
By Ian Walker. UK.
All Photography using the Zeiss Axiostar with achromat objectives and Canon G6 digicam.
A fun look at some common crystal slides under the microscope.
Introduction.
Last month Micscape contributor Paul James discussed a variation of oblique illumination [off axis circular oblique lighting, ObCOL for short] the outcome of which I think gave beautiful images from his live subjects. I followed Paul's guidelines for the technique with my scope but I couldn't quite achieve the same results; this is no reflection on Paul's methodology just my particular circumstances. Independently, I was also using a form of oblique Rheinberg illumination together with crossed-polars so I was interested in his method. From making various cardboard disks with different diameter arcs cut in them [simulating a phase annulus] from experiments with Paul's ideas I started to think about using these instead with crystal formations which seemed a good subject since they tend to be layered to greater or lesser degree which could be interesting with colour oblique illumination and I was intrigued to find out whether common preparations like vitamin C or cholesterol acetate could be given a fresh interpretation. All the images you see here are using objectives from 2.5x-10x, it never ceases to amaze me how many different ways we can photograph these common slides and I thought it would be a bit of fun to give them all titles. :)
I think one of the main points I am trying to make here is the adaptation of contributors' ideas on Micscape and other sites and modifying or adapting them to suit your own particular microscope or favourite subjects...this is the fun of microscopy.
Early Experiments.
Note that this is not ObCOL as Paul describes it, firstly from his discussions higher power objectives like a 20x are probably more appropriate and secondly I am not trying to combine a certain amount of dark-field illumination and oblique illumination in the same manner as Paul was illuminating his soil amoeba. My disks have become much larger so outside and inside of the arc of bright-field illumination it is completely dark-field but note this can provide an oblique effect with the microscope if the arc is placed at one edge of the field of view getting less as the arc is placed in the centre. The idea behind this method is in a slider type system that Zeiss use for the Axiostar and I have made a number of dark-field stops for different objectives, [as in Fig 1.]. If these are not centred I can achieve oblique illumination to varying degrees but it always appears similar to the phases of the moon from a thin crescent upwards depending on the offset. With this oblique illumination I can move an arc of brightfield light with a dark-field surround within the complete field of view and under some circumstances this can give a different effect from standard oblique. I would say [after some experimentation] that standard oblique using an offset dark-field stop will give the same results in about 90% of cases but [just occasionally] some structures will behave sufficiently differently to make it worthwhile. The actual radius of the arc depends on personal preference but the objective used and its numerical aperture will govern its size, the smaller radii arcs being more suited to the lowest power objectives.
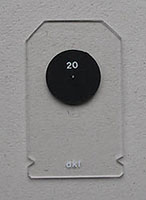
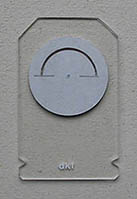
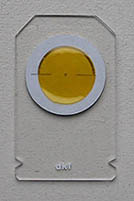
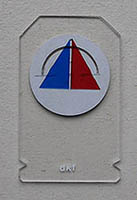
Figs 1-4.
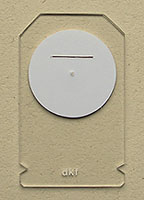
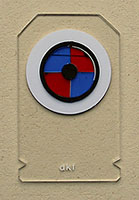
Initial experiments were a direct derivative from Paul's article with one of the basic dark-field disks shown in Fig 2.
The above images show from the left, [Fig 1.] my home made slider for the Axiostar in this case fitted with a 20x dark-field stop which could be used for creating oblique illumination with lower power objectives if offset from its centred position. Next, [Fig 2.] we have the new dark-field stop with an arc 1mm wide cut out of it for the illumination technique discussed here, this can be moved in and out of the slider holder to provide differing amounts of oblique illumination. In [Fig 3.] the same disc with a yellow acetate placed over for special effects and lastly, [Fig 4.] with red and blue acetates. In the last picture note I have left a thin gap between the blue and red acetates; this allows some unfiltered light through which is useful if the illuminating bulb is run at a low level giving off an amber coloured light suitable for bringing out detail like the cholesterol acetate images below. Only a small portion of the arc is likely to be seen looking down the eyepiece tube with the eyepiece removed and this varies with objective, the apparent width of the bright-field arc of light also changing [much wider with the lowest power objective]. Typically using the red and blue acetates shown placed above we would see an arc of unfiltered light, red, unfiltered, blue and then unfiltered giving a complex illuminating source which can bring out different detail in subjects like crystals when also used with crossed or partially crossed polarizers especially with the arc placed at the peripheral of the field. Simply rotating the disk a few degrees left or right so the acetates face at another angle and then change the amount of cross polarization will change the image dramatically. Many of the best images of crystals can be achieved with only modest amounts of crossed polarization which can also help with light levels for imaging if you only have a low power bulb. The Zeiss is fitted with a low voltage 20 Watt halogen lamp and with this technique I am usually running between 30-60% of its maximum brightness but occasionally nearly 100% is needed. The Canon G6 has built in automatic noise reduction below a certain shutter speed and if you are looking for a camera suitable for microscopy this can be useful feature to look out for. I keep the field and condenser diaphragms wide open for all the low power objectives just occasionally reducing one or the other slightly for a special effect or to improve contrast a little.
Final Adjustments.
Further to using an arc cut in the dark-field stop - a straight cut can be used as this is also much easier to make with a sharp knife ands has now become my preferred stop for this technique. This gives even more choice of illuminating angles using my slider and as the disk is moved in and out with overlaid coloured acetates, endless variations are possible. Also the arc of light seen with the eyepiece removed with the lowest power objectives like the 2.5x and 5x becomes less obvious, indeed almost becoming straight so the extra time needed to create a series of arced cut disks for different objectives is not required. Tests done with crystal slides with the arc of light moved from edge to centre of the field and a straight cut show the same effect. Using this disk with a Rheinberg filter or coloured overlays alone can give a rather amorphous background colour but when combined with crossed-polars and an appropriate subject can provide interesting results, especially when slight rotational changes are made altering the percentage of the different colours in use. Note the materials I use for the Rheinberg filter etc are in themselves effected by crossed-polarized light so as they are rotated even more permutations are inevitable.
Figs 5-6.
[Fig 5.] Straight cut version of the dark-field disk and on the right, [Fig 6.] with a small Rheinberg filter overlaid. You can see the variations that are possible by rotating the disk and/or the Rheinberg filter coupled with moving this within the field of view. Together with other coloured acetates the possibilities are endless. Underneath the cardboard disk there is another circle of thicker cardboard which sits in a matching hole in the Perspex slider allowing smooth rotational changes.

Fig 7.
Above, [Fig 7.] is a diagrammatic interpretation looking down the eyepiece tube with eyepiece removed of the many typical positions, combination of colours using different acetate overlays and angles you could adopt using the above dark-field disk shown in Fig 5, of course the background will be black and the colour illuminated within the slot cut into the disk. Where there is a gap signifies that the acetate overlays are not fully covering the slot in the card which allows some unfiltered light from the illuminating source to get through. I cannot show some images directly from my scope unfortunately because I don't own the 30mm diameter Zeiss phase telescope.
To keep the dark-field slider separate from the polarizer the polarizer is placed directly on the lamp housing where I can make quick and independent adjustments although any larger dust particles collecting on it can be obvious, if you only have one filter accessory tray you might like to try the same. Since I don't use fully crossed-polars much with this technique the quality of extinction from the polarizer-analyzer is not too important allowing you to use some other polarization material to put on top of the lamp housing temporarily if your normal polarizer is rather too small to allow a sufficiently wide beam of light sitting directly on it.
The outside diameter of the cardboard disk will normally be fixed by your filter tray diameter being typically around 32mm for a swing-in type like the LOMO or older Zeiss standards whereas the radius of the arc or distance from the centre to the straight cut will have to be found by experimentation since this will vary considerably with different microscopes and objectives but with my Zeiss Axiostar I have found a radius of 10mm for the arc design or a distance from centre to the straight cut of 6mm about right for my 2.5x - 10x objectives. A different technique will be needed depending on whether you are using a slider slot like mine or swing-in condenser accessory tray like the LOMO but the with careful adjustment the effect should be the same. For me it is easy to get the right amount of oblique correct but more fiddly adjusting the rotation of the acetates on the disk, for swing-in trays you can make the arc or straight cut appear in different quadrants of the field of view easier by simply rotating the disk before swinging it into place. As I said in the introduction I thought up some titles for the images just for a bit of fun...
Some samples from this technique including a few notes.
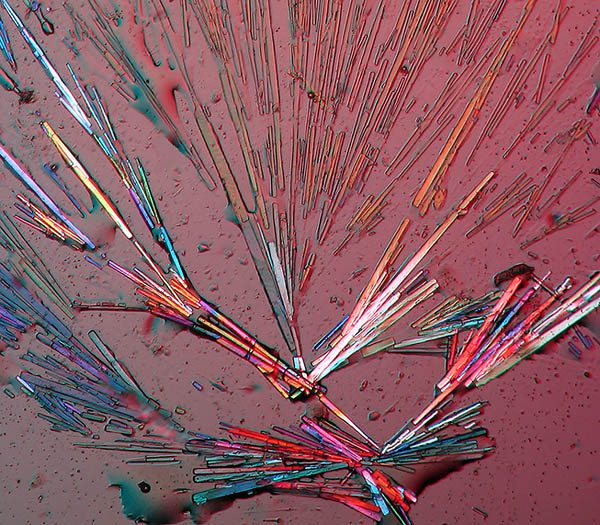
5 vitamin C images, a commonly found slide preparation, [ascorbic acid].

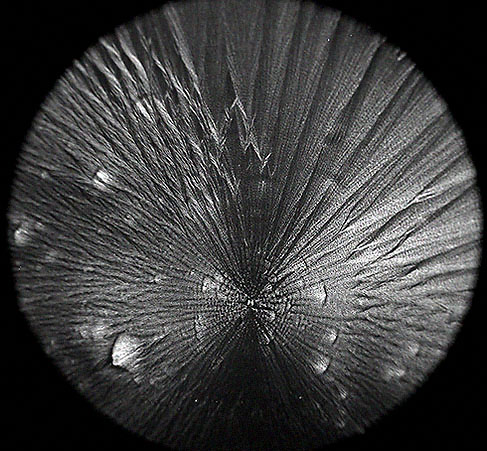
'Volcano in a starry sky'.
A ' 3D' look from partially crossed-polars, oblique illumination with red and blue overlay acetates [Biosil slide].
'Tree and comets'.
With careful adjustment of illumination, coloured acetates and crossed-polars we can achieve 'alien landscapes' and for older people reading this in the UK...I've lost the soup dragon.[Biosil slide].
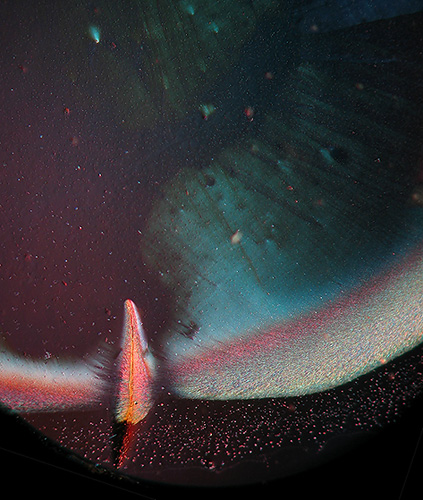
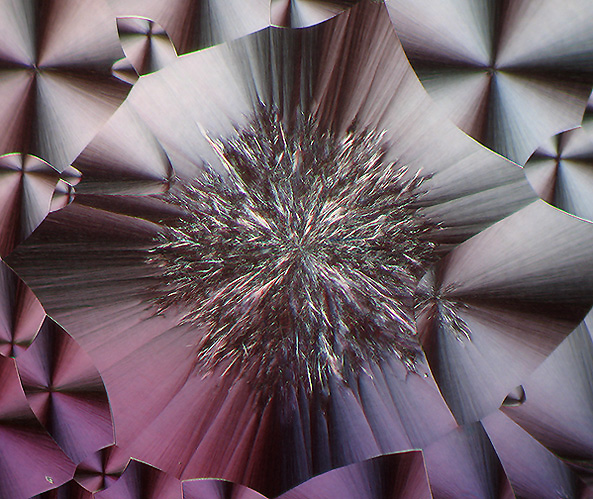
My favourite, 'flying over Mount Doom and the lava flows', I can almost feel the heat!
Partially crossed-polars, large amount of oblique illumination, 3/4 red and 1/4 blue overlay acetates. [unknown mounter].

'Apollo' I.
Crossed-polars and oblique lighting, Taken in black & white. [unknown mounter].
'Infinite Zoom'.
Crossed-polars and oblique lighting, Taken in black & white. [unknown mounter].
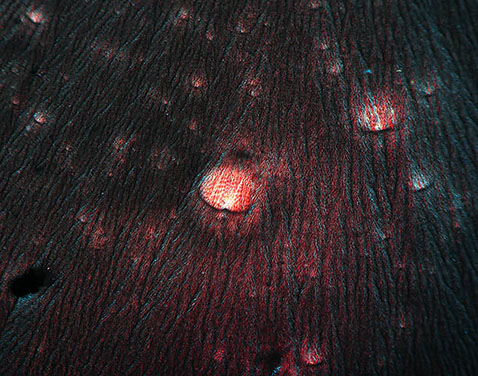
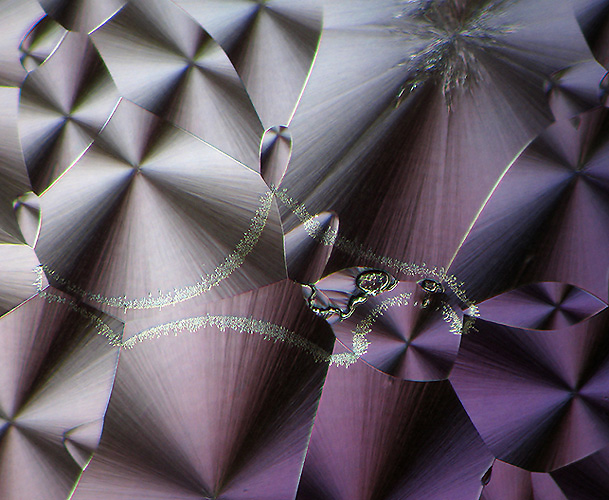
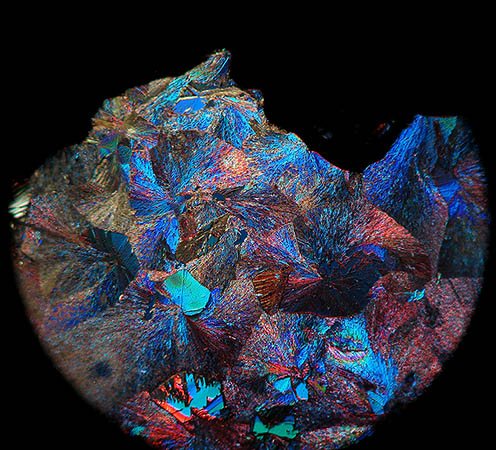
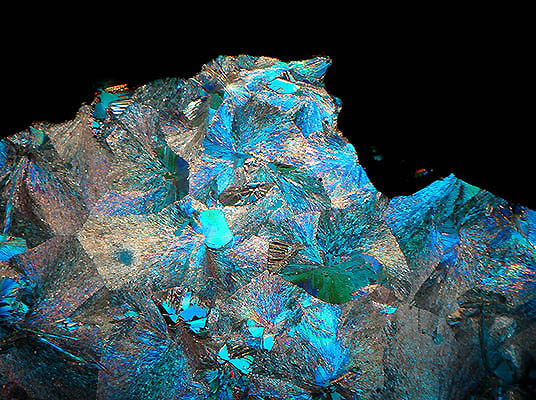
Another common slide preperation, 5 cholesterol acetate images.
'Glittering Diamond', note how the 'diamond' seems to stand clear of the background.
By leaving the blue filter off the lamp assembly and turning down the lamp to a low level we can bring in gold and silver hues seen above and below.
[Biosil slide].
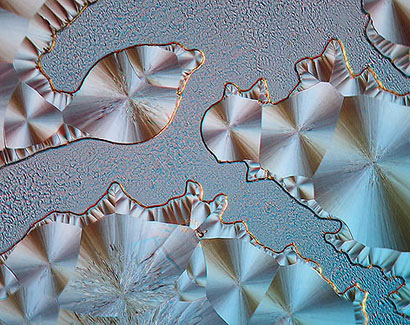
'The Strange Plateaux' I & II.
Here beautiful gold structures seem to emanate from the 'plateaux'.[Biosil slide].

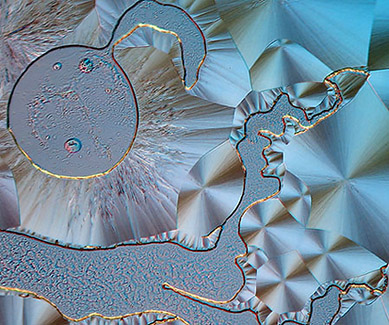
'The Strange Plateaux' III.
A slight rotation of crossed-polars and increasing the blue acetate overlay and a new look.
'Gold And Silver'.
Note the molten gold effect within the delicate structure. [Biosil slide].
Other Substances.
'Japanese Fan'.
Almost a 'liquid look' with good relief on the crystals. [Copper chloride, Biosil slide].

'Sun Rising'.
Here a diffused circular border using medium zoom on the G6 suits the crystal structure.
Crossed-polars, illuminating light turned down with no blue glass filter attached to create gold effect in the 'sky'. [Paracetamol, NBS slide].

'Snow storm over the river basin', try looking at this across the room from your monitor!
Partially
crossed-polars, oblique illumination with part of the arc kept clear creating
'snow' effect together with partial overlay of blue acetate.
[Resorcinol,
NBS slide].
'Crystal Mountain' I.
[Tartaric acid, unknown mounter].
'Crystal Mountain' II.
[Tartaric acid, unknown mounter].
Links: Paul James [UK], December 2004 Micscape article: Off axis circular oblique lighting [ObCOL].
Thanks go to Paul James for his original article without which I might not have come up with my own adaptation.
If you have enjoyed looking at these images you may be interested in one of my previous articles for Micscape, The Strange and the Beautiful.
the end.
Comments to the author, Ian Walker, are welcomed.
Please report any Web problems or offer general comments to the Micscape Editor.
Micscape is the on-line
monthly magazine of the Microscopy UK web
site at
Microscopy-UK
© Onview.net Ltd, Microscopy-UK, and all contributors 1995 onwards. All rights reserved. Main site is at www.microscopy-uk.org.uk with full mirror at www.microscopy-uk.net .