Issue:
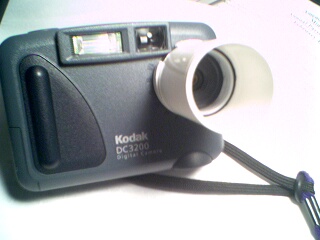
This article is a compendium of three issues:I purchased a Kodak DC3200 digital camera, which is on the lower end of the price scale ($150 US), and lacks many features of the more expensive cameras. However, for photomicrography I don't need a lot of features, just a good chip. In this regard the Kodak is good value, for a megapixel image (1152x864).Photographs of the common fur mite A collection and temporary mount technique Notes on digital photography with the Kodak DC3200
The Problem:
The family's pet rat developed a skin problem; developing thin patches of fur, and scratching till the skin was irritated. My cousin is a veterinarian, and suggested checking for mites. He supplied me with the technique for collecting and mounting them.Collecion and Mounting:
The collection process is simple and straight forward; take a 1-3 inch piece of Scotch brand "invisible" tape and press it against the rat, particularly around the ears, base of the tail and inside of the legs. Our rat was quite cooperative with this procedure. The tape collects loose hairs and other particles, but does not stick hard enough to be disturbing (to the rat).The issue with mounting is to make the tape transparent for observation. This is achieved by smearing a thin layer of mineral oil on a microscope slide, then placing the tape on top of this, sticky side down (you will be looking through the tape). Then apply another layer of mineral oil to the top surface of the tape.
That's it - you are ready for observation. Be careful when handling the slide to not get mineral oil everywhere, especially watch that you don't lower your lens into the oil (as you are not using a protective cover slide).
Observations:
At this point it is a matter of "scanning" the slide to see what you have caught. I used low power when scanning, then increased the magnification when I found something interesting. The mite was fairly obvious, as its movements caught my attention.
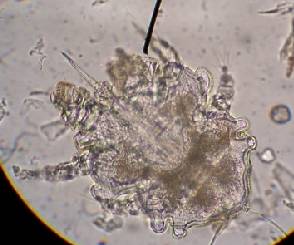
100x in "Good" mode e.g. photo quality (cropped). The head is to the top left.
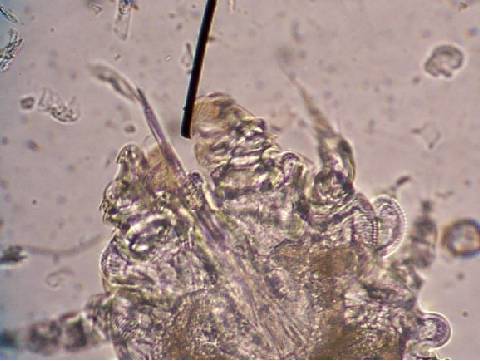
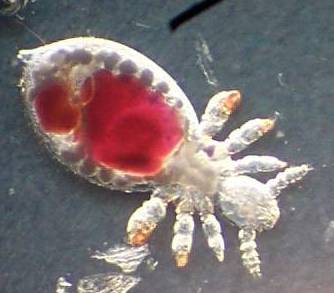
100x in "Good" mode with 2x digital zoom (cropped). Note the piercing mouth and grasping claws.
This is not a mite, but another small creature (louse?). 100x "Good" mode 2x digital zoom (cropped).
Photography:
Technical issues:
The limitations of a 640x480 image (with the Intel PC Camera) were beginning to grow on me. This resolution just didn't capture the rich detail I see visually, or could capture with regular photography. Having more pixels, the Kodak captures more detail (twice the resolution). It does however have its down side. With the Intel camera plugged directly into the PC, I can focus the image 'real size', rather than the small (40.64mm) LCD. At times what appears to be a good focus turns out to be fuzzy when viewed on the PC. The lack of a tripod mount, and manually pressing the shutter make consistent focusing difficult.Another plus for the Intel is the ability to capture an AVI file, then go back and select the desired image from the series of frames. With the Kodak there is only the still image. Capturing video is good for live observation of events that quickly pass. With the Kodak, there is a several second lag time between pressing the shutter and when the image is captured. For quickly moving critters, I can never be sure of capturing what I see (at the time I press the shutter). The Intel also allows color/light correction via the PC, which the Kodak lacks.
The Kodak camera has three pixel settings "Good" (640x480), "Better" and "Best" (1152x864). While lacking an optical zoom, there is a digital zoom when in the "Fair" setting; which is the equivelant of cropping a "Best" image down to the "Fair" size. I find myself normally using the "Good" setting with the digital zoom (unless I want a large "wallpaper" image for my PC, or intend to custom crop the picture).
Alignment:
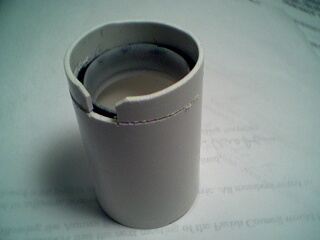
The hardest part of using the Kodak is aligning the camera lens with the microscope eye-piece. If not correctly centered, you either have no image, or will have a partial image with color flares. The Kodak 3200 lacks a tripod mount, or remote shutter; so all my pictures require hand-holding the camera and manually releasing the shutter. To aid in getting a good alignment, I made a PVC pipe adapter that clips over the camera lens, and fits over the microscope. The PVC is a piece of sink drain tail pipe. It is not an exact fit for the camera (a bit small), so I cut a "T" into the side; which both allows for expansion, and acts as a spring clip to hold the adapter in place. Since the PVC is also larger than my microscope eye-piece, I shimmed the inside with a piece of felt and a ring cut from the top of a 35mm film canister. The ring has a slight flare, which helps to center the ring over the eye-piece. This still takes a bit of juggling, but not much.The microscope used for these pictures
is my monocular Bausch & Lomb (see photo in my previous
article)