Making your own paraffin sections @ home
(part 3)
by
Yvan Lindekens, Belgium
Rotary versus sledge microtome
ß
Sledge microtome types
ß
Brief description of the
Reichert-Jung Hn-40 sledge microtome
ß
Setting up the microtome to section
unproblematic samples
ß
Sectioning unproblematic samples
ß
Setting up the microtome to section
hard(er) samples
ß
Sectioning hard(er) samples
ß
Cleaning and lubricating the
microtome
Rotary versus sledge
microtome
In part 2 of the series we cut sections using a rotary microtome. This is a very fast and easy way to divide unproblematic paraffin embedded specimens into thin sections. But the rotary microtome has its limitations.
One of them being the difficulty to section harder specimens or samples containing harder components. It wasn’t a problem at all to cut the samples mentioned in Part 1, except for the black elderberry stem: that one was, due to the wood content, impossible to cut on a rotary.
Looking at the way a rotary microtome works, this is rather obvious: as the knife can only be attached onto the microtome in such a way that its cutting edge is placed in a position perpendicular to the movement of the specimen, a lot of force is needed to cut the latter, sometimes resulting in crushed or compressed sections or tissue components.
Have you ever tried to cut a roast by only placing a knife on it and simply pushing it downwards? No: I don’t know how you do it, but I cut my roast with a nice long sweeping stroke, using the knife’s edge at full length or at least a large part of its cutting edge. That’s similar to the knife movement of a sledge microtome when harder samples are to be sectioned.
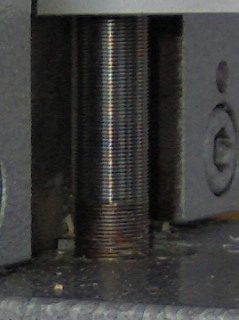
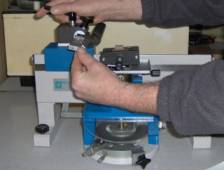
There are only a few rotary microtomes which have the possibility to attach an adjustable knife holder, thus giving the knife the slant (called the “declination angle”) which enables a large(r) portion of its edge to be used to produce a sweeping stroke on cutting the specimen. The picture below shows that type of a knife adapter on the Leica/Jung 1140 motorized rotary microtome. Although these modified rotary microtomes can’t replace a real sledge microtome, they definitely come very handy for those specimens just a tiny bit too hard to give really good sections when cut on a rotary. They are also very practical to cut celloidin sections.
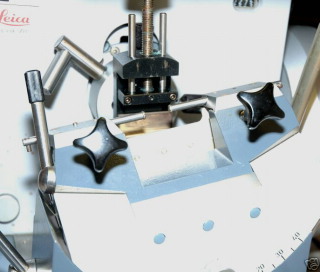
Picture1:
adjustable knife holder on a Leica/Jung Autocut 1140 microtome, offered for
sale on eBay.
Picture
kindly provided by Wim Van Gelderen, Holland (http://greenmicroscope.wordpress.com)
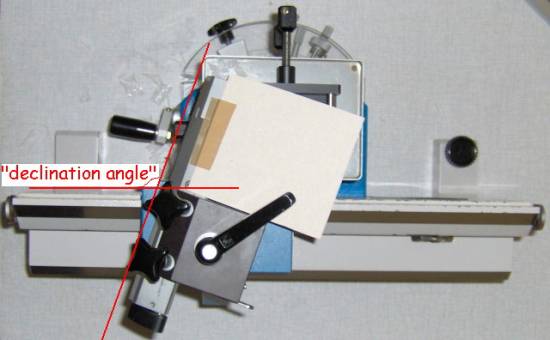
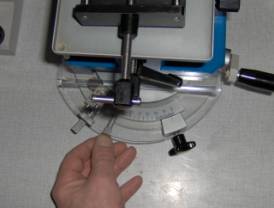
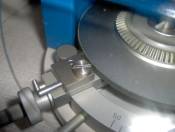
Picture 2:
adjustable “declination angle” in the Hn-40 sledge microtome. During sectioning
some sections are collected on the paper taped onto the blade holder, see the movie
below
If specimens containing harder structures surrounded by softer tissues are cut on a rotary, the harder components tend to scatter. Due to the cutting movement, tissue fragments are dragged along the section, tearing it - more or less - apart. This is a typical problem in some objects, i.e. in longitudal sections of young maize stems or in sections of earthworm when the ceteae are cut. Those problems can partly be overcome by embedding the specimen in a matrix harder than the hardest tissue component, but that’s easier said than done.
In general, the higher the melting point of the paraffin wax used, the harder it is. Paraffins with higher melting points (up to 70°C) are on the market, but difficult to obtain by individuals.
There are other embedding methods apart from paraffin providing a harder matrix, but these have their own problems and some of those require other microtome types and knifes.
Sledge microtome types
There are several types of sledge microtomes. “fixed object, moving knife” and “fixed knife, moving object” is one way to divide sledge microtomes into two basic types.
When we take the principle behind the specimen movement into account we can make another division into two types: there are microtomes in which the specimen feed is based directly on the properties of a screw with a very fine thread and those in which the specimen feed is based on the travel of the specimen on an inclined plane (“Thoma-Jung method”).
“Fixed object, moving
knife” and “Fixed knife, moving object”
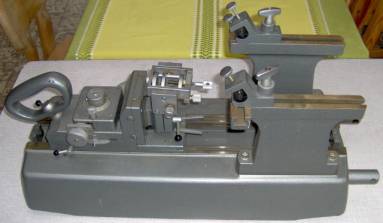
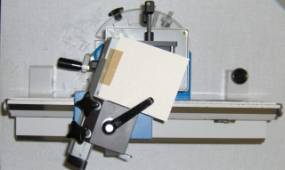
The first type is probably the best known: the paraffin block is mounted in a specimen clamp, the heavy knife block (the “sledge”) containing the knife is sliding on a few slides. The Reichert-Jung Hn-40 described below is such a type of microtome.
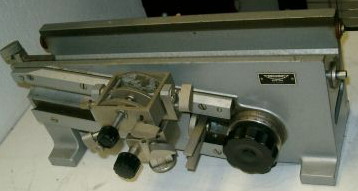
The “fixed knife, moving object”-type of sledge microtome is rarely seen in amateur labs. These are heavy and large microtomes, designed to cut large(r) and hard(er) objects. This type of microtome includes the current Leica SM 2400 and the older Leitz 1300 and 1400. These are capable of sectioning specimens up to about 10 cm * 15 cm.
Picture 3:
the Leitz 1300 large base sledge microtome
For even larger microtomes such as the Reichert Polycut and the “nec plus ultra” in extremely large specimen sectioning, the Reichert-Jung “Tetrander”, manufacturers return to the “fixed object, moving knife” principle. You can see a Polycut here and a Tetrander here. These are sold second-hand in the US for some US$ 10 000 and more, depending on their configuration. With such a microtome it’s possible to section an entire human brain or lung sample. Frankly, I never saw one of these except in pictures.
Specimen movement: direct
specimen feed and the Thoma – Jung method
The direct specimen feed is what the name implies: the specimen clamp is raised (and lowered) directly by a screw with a very fine calibrated tread.
Picture 4:
direct specimen feed using a fine threaded screw in the Leitz 1300 microtome
In the Thoma - Jung method the specimen clamp is moved upwards on an inclined plane mounted on one side of the microtome. Horizontal movement of the specimen clamp is accomplished indirectly by a screw with a very fine thread, pushing the object clamp upwards the inclined plane.
This system isn’t to difficult to produce in large series and works well, but it has one drawback: the feeding mechanism changes the position of the specimen in relation to the length of the slides, thus compromising the ability to produce the same long and even cutting stroke throughout the sectioning of an entire specimen. The picture shows an old Thoma – Jung sledge microtome made by Reichert.
Picture 5:
specimen feed according to Thoma-Jung. The specimen clamp is moving upwards the
inclined plane during sectioning.
Picture
kindly provided by Monika Busse, Germany.
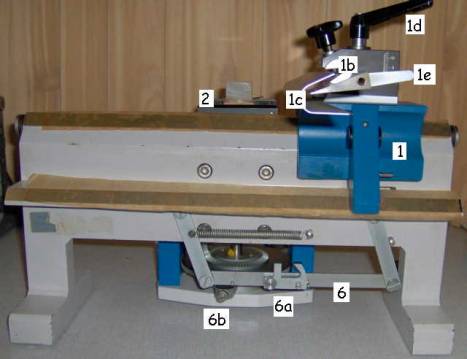
Brief description of the
Reichert-Jung Hn-40 sledge microtome
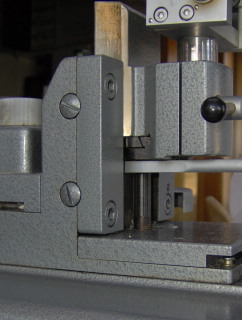
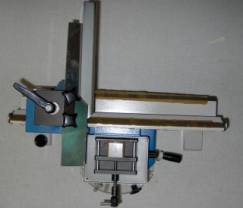
The Hn-40 is a “fixed object, moving knife” –type sledge microtome. In this microtome a large and heavy metal block (about 4kg), carrying the knife holder, is sliding on a few slides on the microtome’s body. There are 3 slides of which one (n° 3 in the picture below, left) is placed far outside the specimen clamp region, thus providing maximal stability. The knife holder has 5 contact points with the sliders, as can be seen in the picture below on the right.
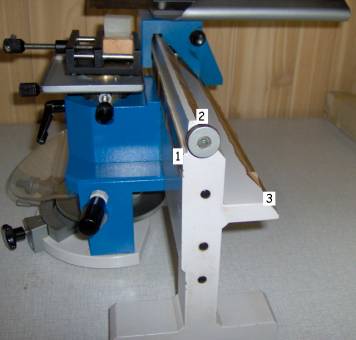
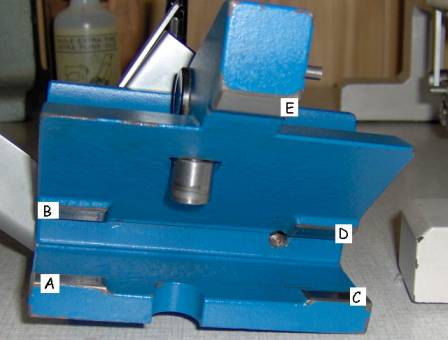
Pictures 6
& 7: left: front side of the Hn-40, 1 – 3: slides of the microtome. Right:
A – E: contact points of the knife block
One of the beautiful things in this type of sledge microtome is that the combination sledge– slides is self polishing. During section cutting the slides of the microtome body and the contact points of the sledge are polishing each other. They’re growing so to speak towards each other over time, just as happy couples do. Even in a cold block of steel there’s something romantic.
The consequence of this is that it isn’t a good idea to buy a sledge microtome frame and a sledge separately.
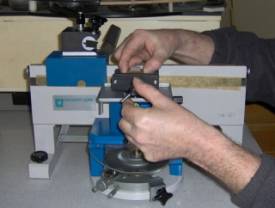
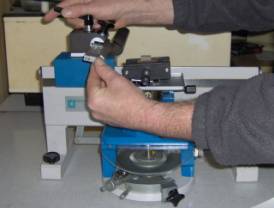
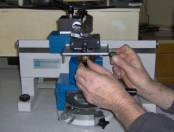
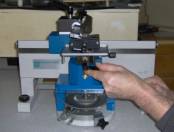
It may sound silly, but on first sight it’s perhaps not that obvious what is the front side of a sledge microtome and how the device (and the operator) are to be positioned to use it. Well, when you’re right-handed the microtome is used as in the picture below: section cutting is done by pulling the sledge towards you. When you’re left-handed, you’ll have to turn the microtome and cut sections pushing the sledge away from you.
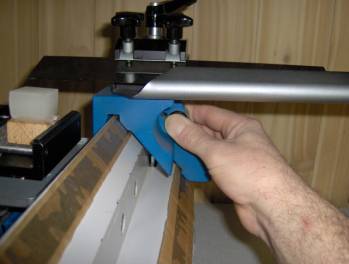
Picture 8:
hand position using the sledge microtome. Notice the oiled paper covering the
slides when the microtome is not in use. This is a precaution to prevent rust
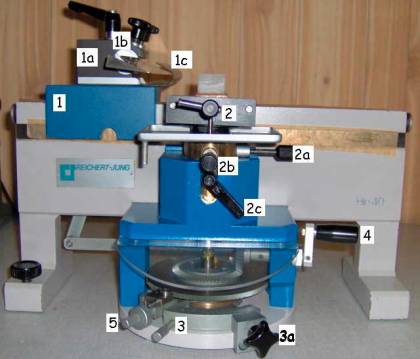
Pictures 9
& 10: Hn-40. Left: left side view. Right: right side view
1. Sledge with:
a. Knife holder block
b. Adjustable knife holder
c. Knife guard
d. Sledge locking handle
e. Cutting angle setting handle
2. Specimen clamp with:
a.
Specimen
clamp orientation dial
b.
Specimen
clamp orientation dial
c. Specimen clamp locking handle
3. Section thickness dial and:
a. Section thickness locking dial
4. Coarse specimen feed dial
5. Specimen feed engage/disengage dial
6. Automatic specimen feed mechanism with:
a. Lockable/unlockable specimen feed clamp
b. Application point for the specimen feed clamp
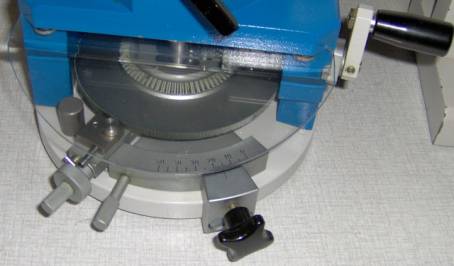
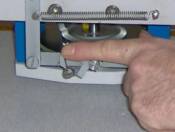
Picture
11: detail of the specimen feed mechanism
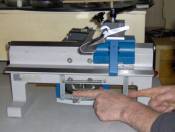
So the sledge slides on the three slides of the microtome body. At the very beginning of the stroke there’s a handle. When the sledge touches that one, the calibrated toothed wheel of the feeding mechanism is turned and the feeding mechanism raises the specimen. When the sledge containing the knife passes the raised specimen, a thin slice is cut.
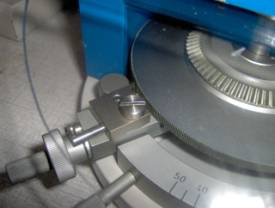
By far the most important feature of the sledge microtome is its ability to set the declination angle of the knife, making it possible to cut a far broader range of specimens than the rotary. Even some fresh samples (wood!) can be cut with it.
Setting up the microtome
to section unproblematic samples
As you can see above, there are a lot of handles and dials to consider so we’ll take it step by step. As it is somewhat difficult to explain every step in the process for me (I’m not a native English speaker), I made lots of pictures during the setup process of the microtome. Although it looks like a lot of work to set up a sledge microtome, once you are used to it, it only takes a minute.
I don’t suppose it will be that much of a problem to recognize the equivalent screws and handles on your own microtome from another make.
|
|
1 Starting position of the microtome: * Knife removed * Specimen feed engage/disengage dial (5
in picture 9/10) set in the disengage position (L) * Automatic specimen feed mechanism clamp
(6a in picture 9/10) set in disengage position (R) |
|
|
2 First add the paraffin table containing
the trimmed block in the specimen clamp of the microtome. Close the clamp tight, but don’t force
it. Never use tools on a microtome except when the manual says to do so. Remove the oiled paper from the microtome
slides (or do this later, timing is not critical but in any case: remove it
BEFORE THE MICROTOME KNIFE IS BROUGHT INTO PLACE!) |
|
|
3 Place something simulating the microtome knife
in the knife holder of the microtome to ease orientation and height
adjustment of the specimen. I’ve used an empty disposable blade holder. Use the coarse specimen feed dial (4 in
picture 9/10) to adjust the height of the specimen. Raise or lower the
specimen clamp until it’s a few millimeters under where the cutting edge of
the knife will be when it’s brought in position. Final height adjustment will
be done, if necessary, when he knife is in place. |
|
|
4 Orientate the specimen using the X and Y
specimen clamp orientation dials (2a and 2b in picture 9/10). If necessary readjust the height of the
specimen in relation to the microtome knife to be placed. When all adjustments are made, lock the
specimen clamp using the specimen clamp locking handle (2c in picture 9/10). Final orientation will be done, if
necessary, when the knife is in place. |
|
|
5 Unlock the sledge by turning the sledge
locking handle (1d in picture 9/10) counterclockwise and adjust the
orientation of the knife. For unproblematic paraffin blocks the
knife holder/knife should be orientated perpendicular on the slides of the
microtome. When done lock the sledge again. |
|
|
6 Set the section thickness by unlocking the
section thickness locking dial (3a in picture 9/10), turning the section
thickness dial (3 in picture 9/10) at the right thickness and finally lock
the section thickness locking dial again. A section thickness of 8 – 10µm is
a good starting point. |
|
|
7 If you haven’t removed the oiled paper
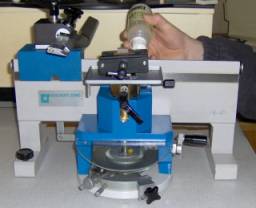
from the slides yet, do so now. Put some oil on every slide of the
microtome. Only use a small amount of oil: 2 or 3 drops per slide is enough.
Too thick an oil film between the slides and the sledge will result in uneven
sections. Sledge microtome oil is sold by the big
names, but in my experience a good grade sewing machine oil or some light
“household oil” works just as well. Move the sledge a few times back and
forth over the entire length of the slides to spread the oil. |
|
|
8 Put the microtome knife in the knife
holder. Be careful not to touch the knife guard with the cutting edge of the
knife. Don’t tighten the screws to hold the knife completely yet as otherwise
it will be impossible to set the cutting angle. Set the cutting angle using the cutting
angle (“inclination”) setting handle (1e in picture 9/10). For a first trial
set it to position “2” or “4” corresponding to a clearance angle of about 2 -
4°. The harder the specimen, the smaller the angle should be. Tighten the screws to hold the knife
completely. |
|
|
9 Slowly move the sledge/knife towards the
specimen. Have a look at the position of the specimen in relation with the
knife. Height okay? Orientation okay? If not: correct this (steps 3 and 4
above). |
|
|
10 First set the automatic specimen feed
mechanism clamp (6a in picture 9/10) in the engage position, than set the
specimen feed engage/disengage dial (5 in picture 9/10) in the engage position. Carefully check the microtome for the
last time prior to sectioning. Make sure all dials and handles are tightened
well. The microtome is now ready to start
sectioning. |


Sectioning unproblematic
samples
There are similarities between section cutting using a rotary and section cutting using a sledge microtome set up as described above: in both cases, the knife is positioned perpendicular to the cutting movement, the difference being that with a rotary the specimen moves towards a static knife and with a sledge the knife moves towards a static sample. (Let’s forget for a moment the large base sledge microtomes.) So the limitations of the rotary also apply to the sledge when it is used this way.
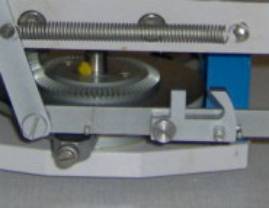
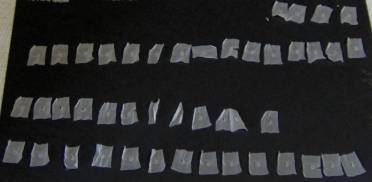
Furthermore, it’s difficult to cut long ribbons with a sledge: as the knife on which the last section of the ribbon sticks moves, the ribbon (consisting of sections only loosely connected to each other) disintegrates easily or it crushes somewhere underneath the knife. A solution of a kind is to tape a piece of stiff paper onto the knife, the paper acting as some kind of a ribbon support. But even then it’s difficult to cut ribbons longer than let’s say some 10 cm. With a rotary, even an unexperienced microtomist can cut easily ribbons of some 20 or 30 cm.
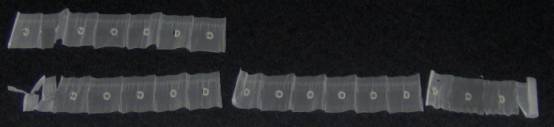
Picture
12: short ribbons cut with a sledge microtome
Nevertheless, the sledge microtome, used this way, has some advantages compared to a rotary microtome, the most important being that it’s easier to control the cutting movement with a sledge microtome compared to a rotary. Once you get use to it.
Trimming the paraffin block and mounting it on a paraffin table is done exactly the same way as described in part 2 of the series except from the fact that it’s a good idea to leave the specimen surrounded with some more paraffin wax. As it’s only possible to cut short ribbons with a sledge it’s better to leave some more paraffin to handle the sections. In the case of difficult to cut samples (such as paraffin-embedded wood) even short ribbons are impossible. In that case individual sections have to be handled.
The remarks given in part 2 of this series with regard to cutting and clearance angle apply here too. The “0” setting of the microtome knife holder should correspond with a clearance angle of about 0°. That gives at least a clue on setting the knife’s angle.
If everything seems okay it’s time to start section cutting. Move the knife towards the specimen and back again until (partial) sections begin to appear. It’s important when cutting sections on a sledge microtome to use the entire length of the slides. That way they won’t show wear on part of their length after some time. With the Hn-40 it’s mandatory to move the sledge to the very begin of the slides as only then the specimen feed mechanism will work. In the small movie I made to illustrate the technique that’s easy to see. In it the elderberry stem sample is sectioned.
Sledge microtome movie (1.9 MByte avi with DivX codec)
Setting up the microtome
to section hard(er) samples
|
Step 1 to 4: see the schedule above |
|
|
|
5 Unlock the sledge by turning the sledge locking
handle (1d in picture 9/10) counterclockwise and adjust the orientation of
the knife. For paraffin blocks containing harder
samples the knife holder/knife should slant as in the picture. The slanting
angle (“declination”) depends on the hardness of the sample: the harder, the
larger the angle. When done lock the sledge again. |
|
Step 6 to 10: see the schedule above |
|
Sectioning hard(er)
samples
The biggest advantage of a sledge microtome is also its greatest disadvantage: as there are a lot of settings on this type of microtome, there’s a big chance one (or more) of those is (are) set the wrong way, resulting in poor sections or no usable sections at all.
Cutting harder samples, especially wood transverse sections, is not the easiest thing to do. As a matter of fact: more often than not it’s a real challenge for one's skills as well as a test for one's nerves. In my experience, the best way to act is first to try to cut the best possible sections at the beginning of the block when the specimen isn’t reached yet – or only partially - and to use those settings as a starting point to cut the specimen.
The most important parameters when sectioning with a sledge microtome are: cutting/clearance angle of the knife, declination angle of the knife and cutting speed, all those in relation with not only the specimen’s characteristics, but also with the properties of the environment where sectioning takes place (temperature, humidity…).
Of course most of the above goes for all section cutting, but on cutting wood the tolerances are very narrow: the difference between “impossible to section” and “sections reasonably well” is often not more than a degree or a millimeter more or less… So the best I can do is to give some hints:
|
Section thickness: |
Set for wood at 10 µm or more. Wood can’t be sectioned at the “normal” section thickness, at least not when embedded in paraffin wax using a regular sledge microtome. |
|
Cutting/clearance angle of the knife: |
The harder the sample, the smaller the clearance angle has to be set. In general it’s best to set the clearance angle as small as possible to begin with: 0 – 2°. Too obtuse a clearance angle will result in scattered sections or the entire section will curl up. |
|
Declination angle: |
The harder the sample, the greater the declination angle has to be set, BUT: too large a declination angle will cause the sections to curl up excessively. |
|
Cutting speed: |
The harder the sample, the slower it has to be cut. |
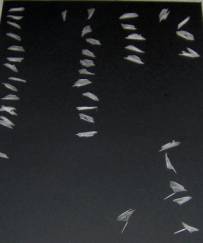
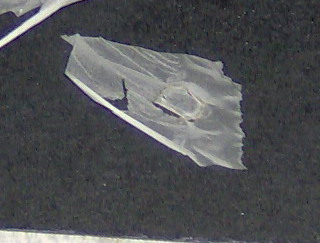
Pictures
13 & 14: left: trial sections made while adjusting the microtome. Right:
after some adjustments: nearly there…
If the sections curls up and it seems impossible to achieve a better result by changing settings: try to guide them with a small camel hair brush while cutting. If this doesn’t work: observe a few more sections closely: is it the entire section that curls up or is it only the specimen region in the section curling up and “taking the surrounding paraffin with it”?
In the first case possible causes are: clearance angle too obtuse, inclination angle too large, paraffin too hard, room temperature too low, cutting speed too slow… Give it another try to correct if possible.
In the second case: one of the causes mentioned above, or the very nature of the specimen (too hard…).
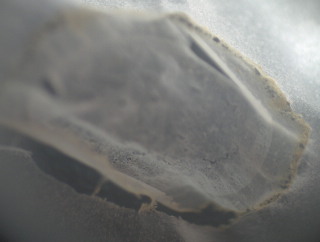
Pictures
15 & 16: a common problem when cutting transverse section from wood
samples: the section breaks loose from the surrounding paraffin matrix and it
curls up more or less. This can be a cutting artifact or due to the nature of
the sample.
A possible remedy: soak the paraffin block, cut side downwards in a mixture to soften the sample. Special formulations are available on the market, but Calberla’s fluid (equal volumes of ethyl alcohol about 90%, glycerin and water) can be used too, as well as something that’s available in about every household: one part of ordinary fabric softener mixed with 10 parts of water. Soak the block in one of these for a few hours up to a few days and try sectioning again.
Keep in mind that some samples are impossible to section unless one has access to specific equipment to do so, unless the samples are treated according to the protocols used by wood microtomists or both.
Wood can be softened prior to sectioning by using such aggressive techniques as soaking in hydrofluoric acid. I wouldn’t recommend that in a household environment.
I suppose other techniques in use in that specific field of microtomy can be adapted to home use. It doesn’t seem that difficult to adapt a wall paper steamer to steam a block of wood in order to soften it enough to cut it (the outer cell layers can be used to make maceration slides). But I have no experience with that, my main field of interest being zoology and histology. I would be very interested in your results though, if you want to try it!
Cleaning and lubricating
the microtome
After sectioning, the microtome has to be cleaned and lubricated.
First of all: remove the knife, whipe it carefully with a cloth moistened with a drop of xylene or toluene and put it back in its case.
Remove all paraffin and specimen shavings using a camel hair brush. If necessary use a cloth moistened with a drop of xylene or toluene to remove paraffin stuck to the microtome.
Remove the knife. Clean the slides of the microtome and the contact points of the sledge with a cloth moistened with a drop of xylene, toluene or some cleaning petrol (translation of the names of those earth oil derivatives is very difficult. I mean the solvent as used by dry cleaners to remove fat stains from clothing or by mechanics to degrease metals. Here it is called “wasbenzine”, “benzine C”, “essence de nettoyage”, “essence C”…).
Put a few drops of oil (I use household oil for that too) on the slides and cover them with some oiled paper (used to wrap spare parts prior to delivery, ask your local mechanic or garage. They have to pay to get rid of it…). Put a few drops of oil at the appropriate places and add the sledge. Cover the microtome with a dust cover of some kind, a plastic garbage sack or something. Check it regularly or even better: use it as much as possible. The more it is used, the better it gets.
A microtome, being a precision instrument, has to be looked over by a “real” expert every once in a while. It’s not that bad an idea to have it checked, cleaned and greased thoroughly once a year when it is used extensively. That’s not cheap (costing here about 100 Euro per microtome), but I consider it an investment.
I’m currently working on an illustrated guide on at least the most common microtomy problems and remedies. It will cover the rotary, as well as the sledge microtome (comment from a friend, a histotech: “Nice. How many thousands of pages will you need?”). I’ll try to finish that one by next month and I’ll add it as an addendum to this series. Next month or somewhat later J.
Next time we’ll stain and finish the slides. Finally!
All you
need to add some color to the picture