A tour around the Zeiss Photomicroscope III
With some notes on the Photomicroscope range and the pros and cons of a large research stand cf. a student stand like the LOMO Biolam.
A hobbyist's perspective by David Walker, UK.
The author has been using the popular LOMO Biolam microscope as a hobbyist for almost thirty years but a few years ago had an opportunity to acquire a Zeiss Photomicroscope III ('PM III') in a basic transmitted light configuration. The variants of the three Photomicroscope models crop up for sale quite regularly, so presented below is a tour of the PM III with a few thoughts on owning this model from a hobbyist's perspective and its use compared with a typical smaller stand. There probably couldn't be a much greater difference in the 'microscope model spectrum' between the PM III and Biolam, and the author has found it very instructive learning the pros and cons of both.
Paul James wrote an excellent illustrated article on his Photomicroscope I in the July 2001 Micscape, including an internal view of the complex optical array and the 35 mm film arrangement. Many design features of the photomicroscope i.e. substage, stage, focussing, Optovar mag changer are essentially the same or similar across the models I - III and many are discussed in Paul's article; the models differ mainly on how the camera and lamp control are implemented.
The Zeiss Universal and Photomicroscopes have a very distinctive size and shape and unlikely to be confused with any other model in the Zeiss range. Within the range though, examples are sometimes misidentified in online auctions. The table below is an attempt to summarise some key differences between the three models; the Universal is included for completeness. As others have commented, the most instantly recognisable feature to split the photomicroscopes is the number of meters on base: no meter - PMI, one meter - PMII, two meters (and distinctive film speed dial at front) - PMIII. No meters and no internal 35 mm camera canister visible on right of limb - Universal.
|
Feature |
Universal |
Photomicroscope I |
Photomicroscope II |
Photomicroscope III |
|
Transmitted / incident / fluorescent configurations |
Yes |
Yes |
Yes |
Yes |
|
Selectable light filters in base |
No / Yes* |
No |
Yes |
Yes |
|
Internal 35 mm camera |
No |
Yes |
Yes |
Yes |
|
Light intensity control / voltmeter |
On external power unit. |
On external power unit. |
On external power unit. |
On scope base. |
|
Camera exposure with external control unit |
Not applicable (N/A). |
Automatic after film calibration. Option to manually set/release on scope. |
Automatic |
Automatic |
|
Film speed setting |
N/A |
No, film calibration required. |
On external power / camera control unit. |
On scope base. |
|
Light / Exposure indicator meter |
N/A |
No |
On scope base. |
On scope base. |
|
Camera controls (shutter) |
N/A |
On external power / camera control unit. Manual on limb. |
On external power / camera control unit. |
On scope base. |
|
Film advance |
N/A |
Automatic after manual shutter cocking on limb. |
Automatic |
Automatic |
|
Flash module facility |
N/A |
'Microflash' unit option. |
'Microflash' unit option. |
'Computer flash' unit option. |
Sources for Table data:
Downloadable public domain manuals for Universal, PM I, II and
III; in addition for PM III - own example; for PM I -
Paul James' article and personal comms.
*Updated Dec. 28th 2007. Thank you
to Spike Walker who tells me there were four models of Universals.
History: The author hasn't found any info' on the timeline of the Photomicroscope range (and would appreciate any info' on dates), but if the two figure number on the back of the manuals is the publication date, these may provide some guide as to a typical production year for each model: PM I - 1963 and 1964 manuals, PM II - 1970 manual, PM III - 1975 Zeiss advert of their microscope range in 'Guide to scientific instruments'.
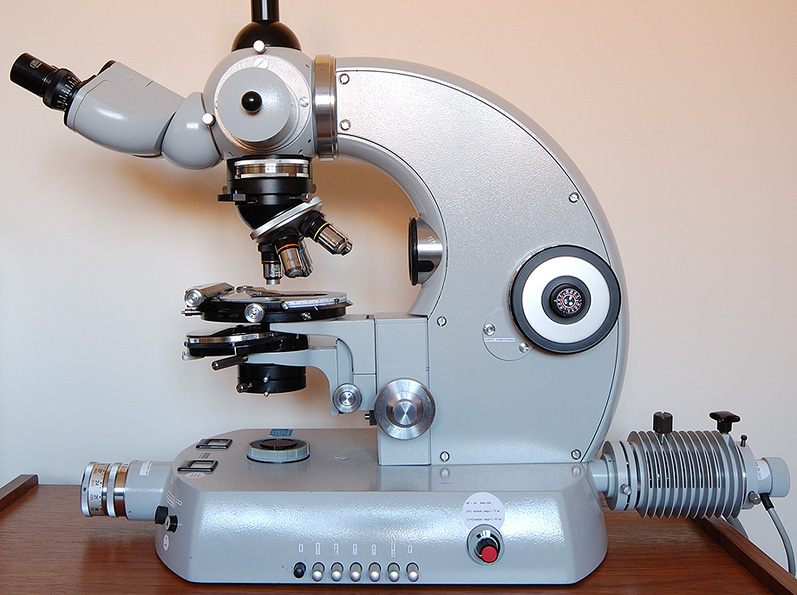
Zeiss PM III (above): Although a bulky microscope the
curved sweep of the limb makes it less dominant on
a table. The wide flat base is quite handy for
keeping slides being studied off the bench. Size
(includes lamp, film speed extensions except
accessory top tube): 24 x 11 x 17 inches
(dxwxh).
This side of the limb has the plug-in filters
(green, 4 neutral density, blue), the lamp
control and the film canister. By using
combinations of the neutral density filters, light
transmittance from 1.5% to 100% light can be
selected in increments of a factor of two. A frame
counter, and memo for type of film used is on this
style of film canister. A push-in pin lower left
of film canister allows multi-exposures on one
frame.
This example has the 12V, 60W tungsten lamp which
the author has found more than adequate for most
work. The lamp has a swing in diffuser in addition
to diffuser under microscope base (see below). A
12V, 100W halogen lamphouse is a common
alternative. The focussing stage and substage is
by visual inspection of manuals a similar (same?)
design as used on Universal / earlier
Photomicroscopes and the Zeiss WL. A phase
condenser is shown.
The head includes an Optovar mag changer/Bertrand
lens, and push-pull beam splitter for directing
light to binocular-built-in camera-accessory top
port. (See
Paul James'
article.)
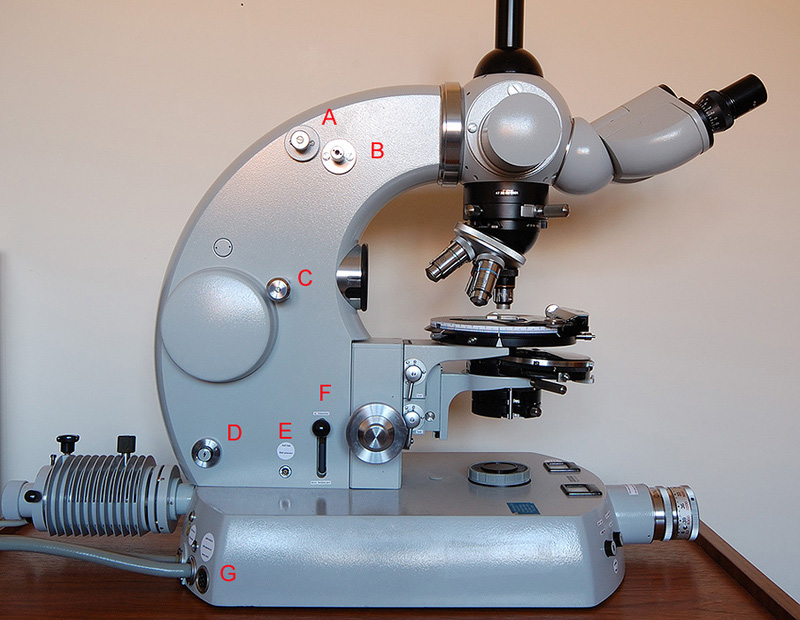
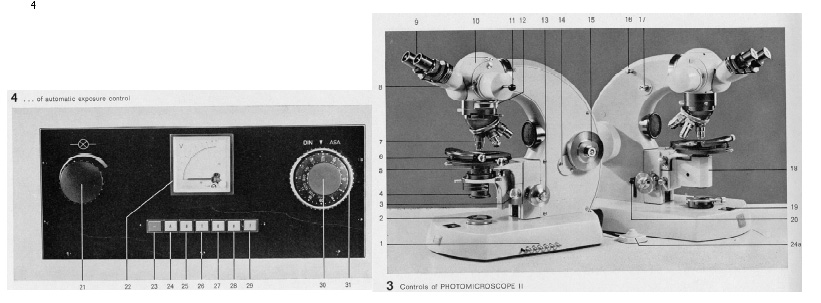
The features this side (from manual) are:
A - spot or integrated exposure selection,
B - cable release, all light goes to film if used,
C - changes duration of flash appropriate to film,
D - flash ready illuminated button,
E - for lead to flash generator,
F - transmitted or incident light selection, latter
requires appropriate epi- accessories,
G - socket for remote control either by a 'pedal switch'
or 'pulse generator'.
The 'computer flash' module is shown in the manual but
don't recall seeing one advertised. A simple beam splitter
on the field diaphragm can serve well for dual tungsten /
flash work (a simple design suitable for the PM III is
described
here).
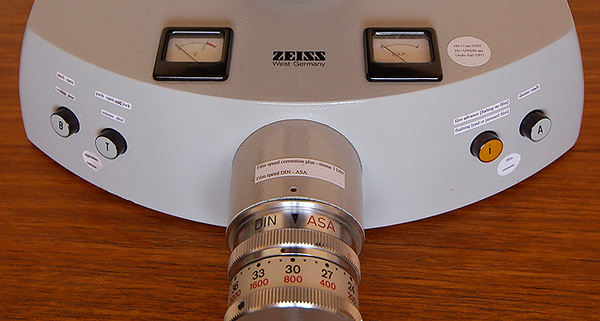
The PM III has a distinctive film
speed control dial (above left), a secondary dial allows smaller ASA /
DIN increments. This is quite vulnerable to knocks in
transit so worth checking OK if an example purchased. The
four camera control buttons, left to right are standard
camera 'B' and 'T' shutter control, 'i'
multi-function and 'A' exposure button.
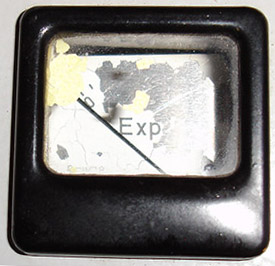
Voltmeter and exposure indicator meter on left and right
of base; the latter (uncalibrated) provides info' on
progress of exposure and likely shutter speed range for
the current light level. Shown left above after repainting as
the paint had badly flaked off this example's meter (right
above), but my brother Ian stripped the meter and painted
/ re-inked scale in similar style (using a photo of
meter kindly provided by Steve Durr, a fellow PM III
owner).
Footprint - don't forget the power supply: Like many research scopes, the photomicroscope has a considerable 'footprint' and weight so a potential purchaser needs to ensure there is a suitable table and working area, particularly in a domestic environment. The power supply of the II and III models are very large but they have key differences that can impact on the overall footprint as shown below. Reducing the footprint from model II to III was apparently a design consideration as a 1975 Zeiss advert for the PM III notes '... and now even more compact with all the electronics and controls built into the base'.
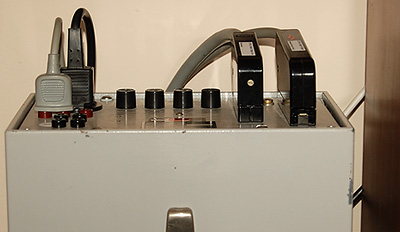
The PM III power supply (above) has no voltage / camera controls (unlike the PM I and II) and the rubber feet permits it to sit vertically under a desk at the back. Two multi-pin cables and the lamp power supply go to the scope. There are voltage outlets for 6V, 12V. The power supply is very solidly built (Size ca. 6 x 9 x 16 inches hxwxd).
|
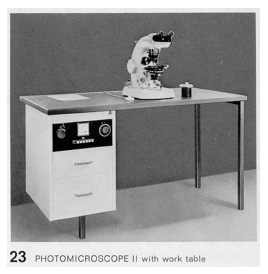
Above: Zeiss Photomicroscope II
and power supply for comparison
with I and III. The features on
the microscope limb differed
between the three models,
especially between I and II / III.
See manuals for details. Image source: Zeiss Photomicroscope II manual (1970?). |
|
|
Right: Zeiss Photomicroscope I and power supply for comparison with II and III. The external power supply / camera control was relatively compact for the PM I as was designed for the 6V / 15W lamp. Higher intensity lamps were available but would need their own power supply. The PM I has quite different control features on this side of the limb compared with models II and III. These are: a silica gel canister to keep the photometer dry; additional two setting mag changer for image size on the film plane; shutter speed dial. Image source: Zeiss Photomicroscope I manual (1963?). |
|
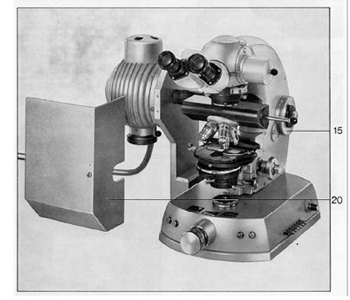
If a potential user was anticipating adding
certain additional lighting options to a
photomicroscope, the considerable increase in depth
and/or width of the unit needs consideration! The
author's domestic desk only just fits the PM III with
12V 60W lamphouse depthwise.
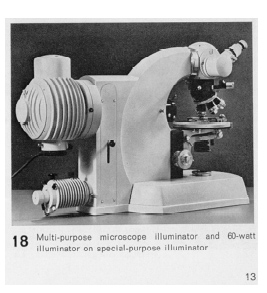
Left above: the 'special purpose illuminator' shown on
a PM II. A high intensity multi-purpose lamphouse and
12V / 60W lamp are switchable, ('bolt-on' item not
needed for just the latter lamp alone).
Right above: epi-fluorescence unit shown on the PM
III, this gets my vote for the ugliest implementation
of additional lighting!
Image source: Zeiss Photomicroscope II manual and
Epi-fluorescence III RS manual.
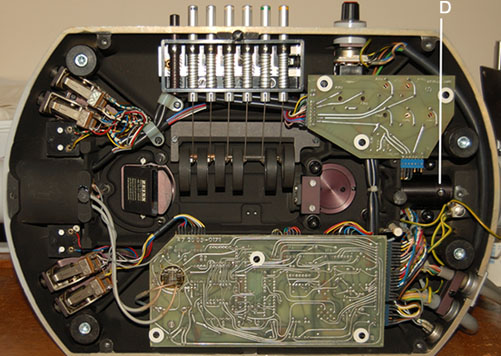
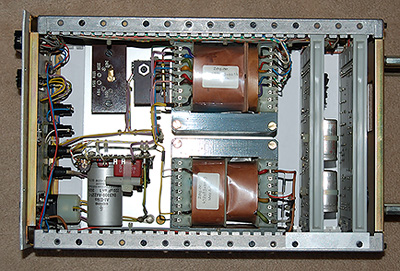
Photomicroscope III base: 'No user serviceable
parts inside' as the saying goes, but heh,
microscopists are curious! The
bottom plate readily unscrews. The push-in filter
assembly is clearly seen. The lamp intensity control
electronics are top right.
The front camera controls are relay activated* and the
cylindrical soldering loom inside the ASA speed
selector housing is a marvel (not seen above). Hopefully the long term reliability of this
complexity is good! (*Thank you to Martin Canny who tells
me his later model of a PM III does not use relays.)
'D' marks the Allen nut to swing in the additional
diffuser (a hole in bottom plate allows access but not
always easy to mate the Allen key), shown on removed
optical tube on the right.
Miscellaneous notes
Objectives: The distance 'd' from objective barrel to focussed
subject is 45 mm for Zeiss objectives 'since 1950' (Ref. Zeiss 'Optical
Systems for the Microscope' p. 12). The focus range of the Photomicroscope
doesn't readily take short barrel pre-DIN optics e.g. the LOMO range
(d = 33mm) with stage in its usual position unless an objective extension collar is used.
At least two designs of extension collar are available, a variable and fixed
length design. I bought a well made variable extension brass extension collar to do this from eBay but didn't
find it very secure. A fixed 12 mm extension collar custom made by another eBay
seller was much better. The tube length increase may introduce aberrations
for sensitive objectives.
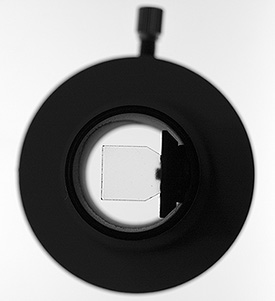
Condensers:

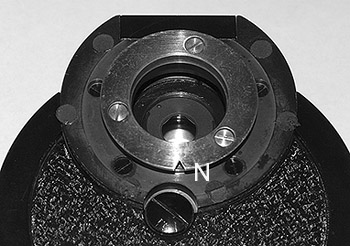
On the PM III condenser mount (above left), the locating pin
(P) to prevent phase/DIC condensers rotating in the mount is
at the rear which mates with a notch on the condenser dovetail. If
sourcing condensers independently of the stand as the author has, the notch
and pin position may not match, presumably depending on the condenser's vintage
and/or stand it was sourced from. (A PM I and PM II manual possessed, shows
the centring screws at the back and locating pin at front, i.e. the reverse
of the PM III).
If the author's experience with phase condenser above right
is typical, the notch doesn't
have to match the pin as it moves fully back in its mount
on the PM III. The phase ring is free running so doesn't twist
the condenser. To be sure, I've added small discs of very
thin foam (light baffle for camera, the dark grey discs in
image above right) just to add a bit of friction. May 2008 addition
- I've now taken these off as raises condenser slightly and potentially allows
the condenser to be focussed into slide.(Some dovetail designs may be rotatable after removal to correct this although
the author's two aren't; others had dovetails with notches front and back so wouldn't
be a problem. The Abbe condenser that came with this stand has a notchless
dovetail.)
Polar work: the turret head has an inset for a Polaroid analyser and a second slot for a retarder at 45ş, a polariser can sit on the field lens or filter tray. So even without Zeiss polar kit, homebrew qualitative polar is straightforward, coupled with the rotating stage which the Photomicroscope is often supplied with.
Delamination: The microscope frame optics on the author's example are in excellent condition but some of the supplied objectives weren't (unless a seller, private or dealer, is very thorough, delamination can be overlooked). Spike Walker has an excellent overview of this problem of Zeiss optics of this era on his Ultraphot Shop site (as well as a discussion of the DIC options for Zeiss microscopes). The present author's comparison of a delaminated and a perfect lens of same design is in this article; some of the image quality may be brought back in software for damaged objectives.
Purchasing notes:
Cost isn't necessarily a
deterrent to owning a Photomicroscope cf the smaller Zeiss
stands. Because of their bulk and limited appeal, ('boat
anchor' I believe is used in the radio ham fraternity for
equivalent kit), Photomicroscopes and Universals can
sell in a comparable price range to smaller stands, in
Europe at least.
A Photomicroscope III in good condition sold for ca. Ł400 in
UK last year on eBay without objectives. Stripped stands can
be Ł50+ and useful sources eg for spare focus blocks and base
components. Suitable lamps, substage kit and optics come up
frequently as many components are shared across the Standard /
WL range of the same era. The achros and planachros of this
era sell for quite modest prices as widely
available.
The Photomicroscope III is a complex stand
mechanically, optically and electronically so a private
purchase can be a gamble. The author's example was dealer /
service agent sourced with a 6 month guarantee, so if the
photo side is important it may be worth the extra a dealer
will charge.
For safety, especially if a private purchase, it may be advisable for the external power supply and
internal electronics to be checked by a qualified
person (my brother Ian, an electronics engineer
checked out this example).
Shipping: Ideally personal collection is advisable if possible,
as research stands can be a victim of their own weight if
courier shipped and requires careful packing to ensure no
damage. All modular parts can be removed and packed
separately; stage, substage, condenser, beam splitter head,
binocular head, optics, lamp and the power supply packed
in a separate box.
Why own a large research microscope?
I suspect that I'm not the only hobbyist where
ownership of an older large research stand (whether it be a
Zeiss, Leitz or other maker) isn't entirely based on rational
arguments! Perhaps an overused but valid analogy
is enjoying the traditional engineering,
driving feel and lines of a classic old car despite
its foibles and certain impracticalities.
If space, portability and design simplicity are important
criteria for choosing a stand, the Photomicroscope
wouldn't be high on the list! Smaller stands like the Zeiss WL
and the various Standards of the same era can perform most of
the transmitted / incident light techniques with appropriate
accessories including DIC and fluorescence.
The long term reliability of the electronics and
photometer in the PM III is uncertain, although the author
only uses the 35 mm option occasionally. If the internal
camera or complex limb optics of a Photomicroscope I, II or
III fails you still have what effectively is a Universal
stand! (From inspection of Zeiss' cutaway drawings I believe
the image path is only sent 'round the houses' in the limb for
the internal photo mode; the top accessory port and bino'
optics are limited to the beam splitter head).
Little 'n large: Photomicroscope v. LOMO Biolam
When I first started using a Photomicroscope, I thought
the Biolam outfit would be sidelined; how wrong I was. The
Biolam sits proudly next to the Photomicroscope and use
both regularly. In case of interest, below are my own
preferences for each stand:
LOMO:
- Studies at high mag / resolution eg. diatom studies.
Although the mechanical stage and overall stand stability is
far better on the Zeiss, I like the optical simplicity of a
LOMO stand i.e. subject -> objective -> eyepiece ->
camera cf. the complexity of the Zeiss (Telan lens in
nosepiece, Optovar, beam splitter...). LOMO's better
objectives with their Zeiss Jena design pedigree, give Zeiss
(West) optics a good run for their money in the
resolution stakes if not flatness of field.
- I prefer the LOMO fine focus at the highest mags, it is a
lightly loaded mechanism with little vibration transfer from fine
focus to
stage. If using small sensor digital cameras on a microscope e.g.
for diatom studies, the sensor 'crop' effectively increases the final mag
(not 'empty mag') when the image is viewed on the computer screen and is a critical
test of any focus / rigidity issues—albeit possibly beyond the visual
and 35 mm imaging requirements a stand was designed for. But the LOMO Biolam
and some other stands I've used under the same conditions seem to have a better
overall image stability in this respect at the highest mags. From one example of the
PM III it is hard to decide if attributable to
one or more factors like wear with age, need for servicing tweak or stand design
but may be a typical example of a PM III stand bought in this era.
The focus on my own example of the PMIII is the most frustrating design
aspect. The focus supports a heavy stage and condenser with their mounts.
If the coarse focus tension isn't set quite high, the stage
will creep. I'd be interested in hearing
from fellow Photomicroscope / Universal / WL owners as to whether this
creep is typical.
Update: July 2011: Thank you to a Photomic owner who has had his serviced by Zeiss, who tells me if working correctly and properly serviced the focus should not creep when tension is set low. This suggests my example is worn or needs servicing.
- Home brew mods: the external mirror design makes dual flash
/ tungsten easy to setup and also multispectral studies (near
IR, near UV, monochromatic deep blue) by changing the lamp
bulb for suitable LEDs.
- Objective flexibility i.e. pre-DIN or DIN of any vintage for
160 mm tube (parfocality issues aside).
Photomicroscope III:
- Low to medium mag studies because of the evenness of
built-in lighting cf. the quite poor evenness of light offered
by the external LOMO lamps for the Biolam.
- 35 mm photography: not surprisingly this stand excels at it,
parfocal, built-in camera, auto-exposure, one button push
exposure.
- multi-technique transmitted light studies without
condenser changeout, the phase condenser allows phase, some
darkfield (or DIC if you can afford it), COL, brightfield,
oblique and homebrew polar is easy to add.
- Digital SLR work, the spare top port and large mass of the
stand makes for a good stable stand for direct coupling of a
DSLR (in the author's domestic environment a huge
external support for the camera is not practical.)
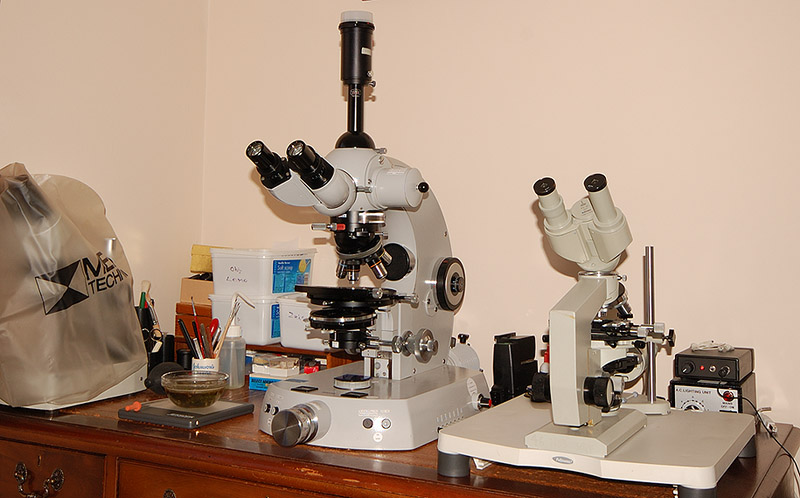
The author's current setup in a spare bedroom. The LOMO Biolam gets just as much use as the Photomicroscope. A computer is out of shot on the right for direct imaging to a PC for either microscope. The footprint of a small student stand like the Biolam with external lamp, PSU and table to bring its height up can be comparable to that of a large research stand!
I enjoy using the LOMO in parallel with the Zeiss because it is rewarding getting the most out of simple kit and working around a student stand's limitations. In comparison, the Photomicroscope was designed for 'turn the handle' reliable microscopy as a research stand. It's hard to quantify the pleasure of using and being a custodian of an old classic research microscope whether it be in this case the Photomicroscope or other classics from makers like Leitz.
Comments to the author David Walker are welcomed.
Acknowledgements
and Sources: To compile the comparative data on the models
above and for greyscale images, the author was heavily reliant
on manuals for the Photomicroscopes I and II (any errors in
interpretation and compiling above notes appreciated) and for
Paul James for sharing his experiences with the
Photomicroscope I and for his
Micscape article on
this model.
The older model manuals are available online (see below)
and the author thanks contributors to the
science-info.net
site and for Yahoo Microscope forum members for scanning /
donating copies and for Gordon Couger for hosting them.
Thanks also to Ron Neumeyer for access to an early copy of
the Photomicroscope I manual which contained additional info'
to a later copy.
Thanks also to Mike Samworth for valuable comments post publication
and to Spike Walker for valuable info on the Universal and Photomicroscope models,
post publication.
Selection
of online resources relevant to the Photomicroscope:
Carl Zeiss
Photomicroscope I by
Paul James, Micscape
2001.
An excellent illustrated
tour and review of the model I and the author's experiences on
using it. Includes image of internal limb and use of the
camera. A number of features are common / similar to
the III.
Zeiss
website Zeiss
generously make microscope and related accessory manuals
freely available for many of their current and older models
available on their website (follow 'Microscopes', 'Support',
'Instruction Manuals' links.) For the Photomicroscope III
these include manuals for transmitted light, incident light,
epi-fluorescence unit, 60W lamp, 100W lamp.
science-info.net
This site hosted and
administered by Gordon Couger has a continually growing
collection of non-copyrighted manuals for older microscopes
kindly submitted by enthusiasts. Zeiss manuals include the
Universal and older Photomicroscopes. Of particular note and a
recent generous addition (Nov. 2007) is the rare 'Optical
Systems for the Microscope' - Zeiss' 97 page in-depth review
of all aspects of optics for their microscopes in the
Standard / Universal / Photomicroscope fixed tube length
era.
Microscope forum Ron Neumeyer kindly offers an early copy of the Zeiss Photomicroscope I manual on his valuable microscopy resource site which complements the later one on above site.
Steven Durr's home page Steven shares his wide variety of interests including 'My microscopes' link where he discusses the microscopes owned including a Photomicroscope III. Also superb galleries of photomicrographs.
'Droplet - amateur microscopy of the protozoa' Piotr Rotkiewicz's website includes excellent annotated images of protozoa and also a page on his microscopes which includes a Zeiss Photomicroscope III which he describes as his 'workhorse'.
Dr David Webb's homepage Includes illustrated step by step tutorials on the use of the Zeiss Photomicroscope II, which forms part of the courses run at the Universty of Hawaii at Manoa. (Thank you to Dr. Webb for permission to link to these university course pages.)
Micropolitan Museum of Microscopic Art forms Wim van Egmond's renowned imaging includes those taken on a Zeiss Standard and a Zeiss Photomicroscope.
Published in the November 2007 edition of Micscape. Revisions April 2008.
Please report any Web problems or offer general comments to the Micscape Editor .
Micscape is the on-line monthly magazine of the Microscopy UK web site at Microscopy-UK
©
Onview.net Ltd, Microscopy-UK, and all contributors 1995
onwards. All rights reserved.
Main site is at
www.microscopy-uk.org.uk
with full mirror
at
www.microscopy-uk.net
.