A new method for fixation and coloration of the
trans-vacuolar bands in cells of the onion epidermis
Photographing the streaming with the traditional
light microscope
Walter
Dioni Cancún,
México
To round off this
series without having to redirect the reader too often to earlier parts for the original images, I reuse here some media already presented. Unless otherwise stated, the images were
captured with a Logitech QuickCam Pro 9000 webcam, adapted for photomicrography
according to my articles published in MICSCAPE from February to April, 2010
In the eight part series "The inner epidermis of the onion bulb cataphylls" (Micscape, March to October 2011) I reviewed various methods at the amateur level and using a classic light microscope to investigate the structure of onion
cells.
In the last article I identified a simple, cheap
fixative based on iodine plus acetic acid (iodine-acetic/10)
which produced excellent results, showing in detail, in preparations fixed and
stained by iodine, not only the well known classic structure (cell wall,
cytosol, nucleus), but even the trans-vacuolar bands seen in live video footage of physiologically active cells.
I haven't found on the Web, published examples of
images similar to those which I included in the October article. This new article
presents a method that has given me good results by staining with a more
traditional stain rather than with iodine but still fixing with lugol-acetic/10.
THE ONION LIVE CELL
I include here a link to the video, and some video stills, which show the structures that we try to fix and stain.
Streaming in an onion cell
(Editor's note: The above is a YouTube version for maximum cross platform compatibility. The author's master video is a larger video box, of higher quality and can be downloaded here for offline viewing and best viewed full screen, 13 Mbyte avi file. Use the right mouse button to click blue video link and save file locally.)
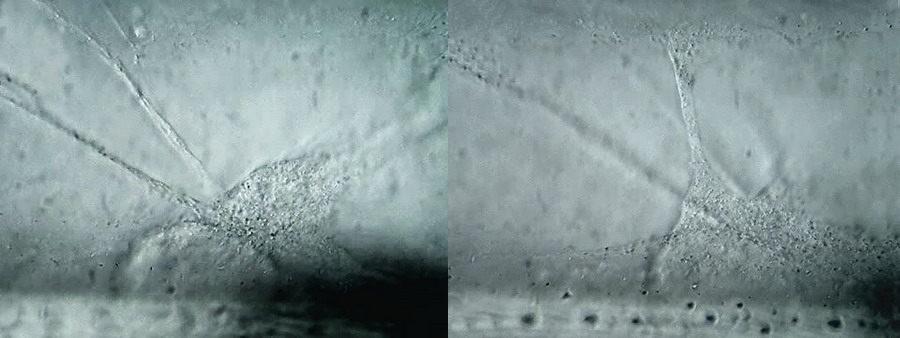
1
- 2. Two stills from the video. Parameters used for the video were: camera Logitech 9000, video set to
HD-960x720px, 100x OI objective. 10x eyepiece. Simple immersion, Circular Oblique Lighting (COL). This stills were captured from the video using Avidemux 4.0.
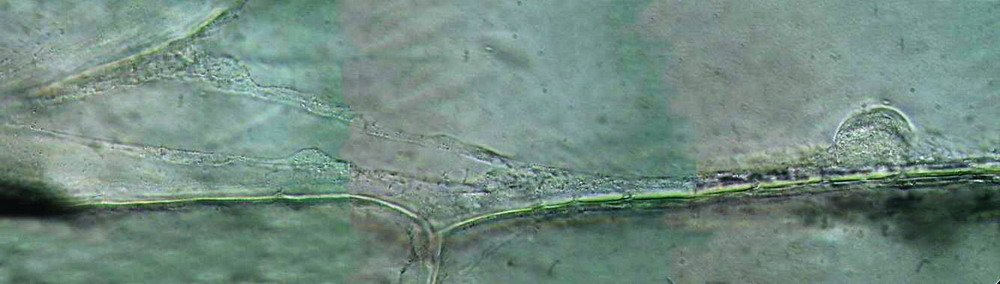
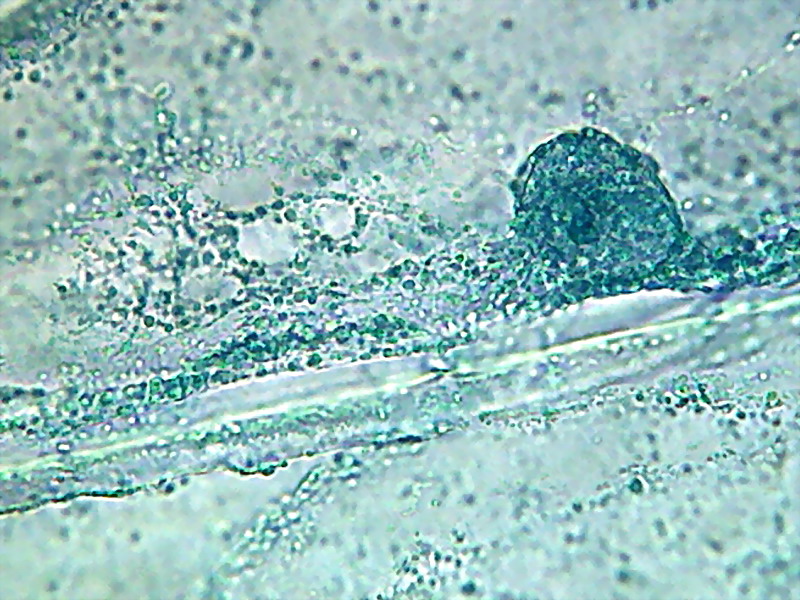
3 - This in vivo still was taken
with oblique illumination at 1000x, creating a small panorama using PhotoPaint
with 3 assembled pictures (the original has 600x 2400 px)
As shown below,
the fixation with acetic acid acidified Lugol lets you capture stills of
onion epidermis showing very similar morphological details with the
images of living cells taken with a DIC microscope (discounting the
different quality of the optics and special contrast technique).
FIXATION WITH lugol-acid/10
The Lugol-acid/10
is prepared according to the following formula:
KI 1.0
g
Water (distilled) 99.0
ml
I2 0.5
g
Acetic acid 1.0 ml
Dissolve the KI in 80 ml of warm distilled water, add
the iodine and fully dissolve it. Dont reverse the order. Add acetic and
complete the volume to 100ml. But I have a ten fold solution that I dilute at
will, when I need it.
I think that the images previously obtained are the result of the
speed of action of the iodine, which avoids the disintegration of the
tonoplast, i.e. the membrane that defines the cell vacuole and wraps the cytoplasmic
bands where the streaming moves, while maintaining true cell structure and size of the granulations flowing in the cytosol, and therefore the
three-dimensional structure. Or is there another explanation?
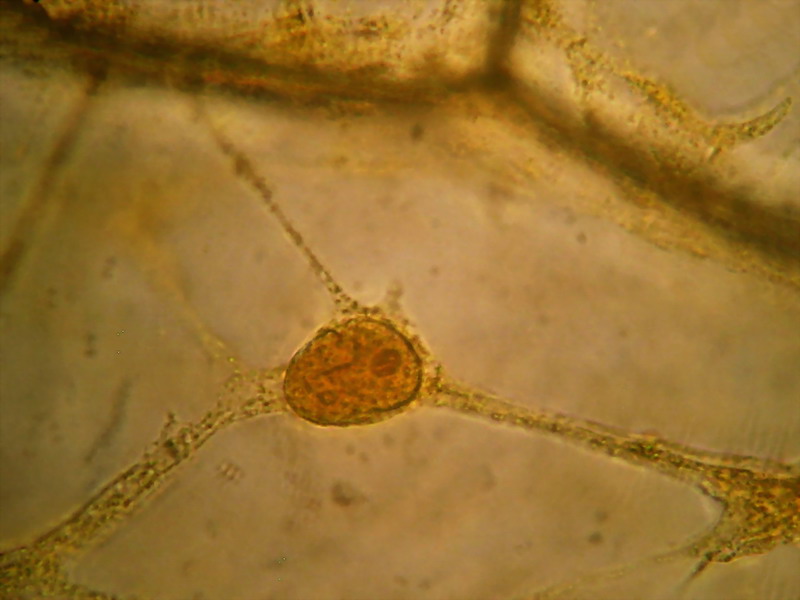
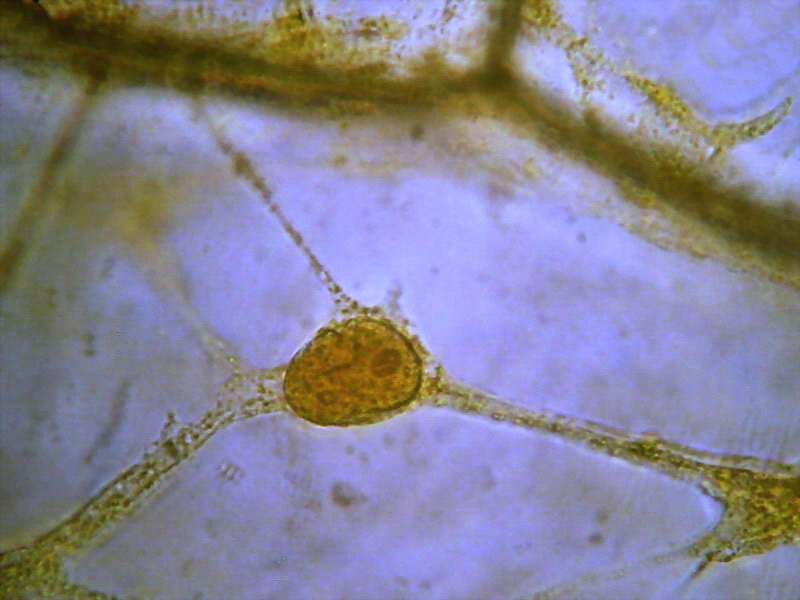
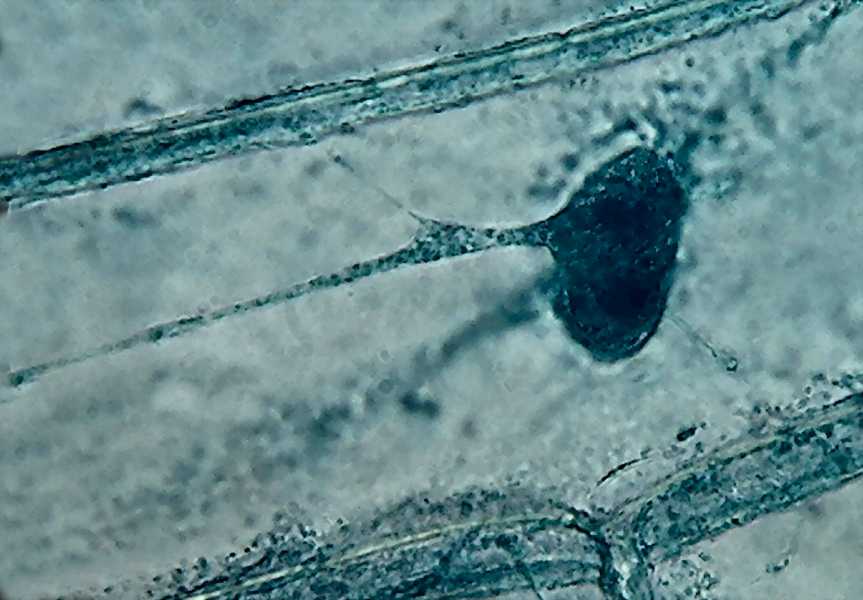
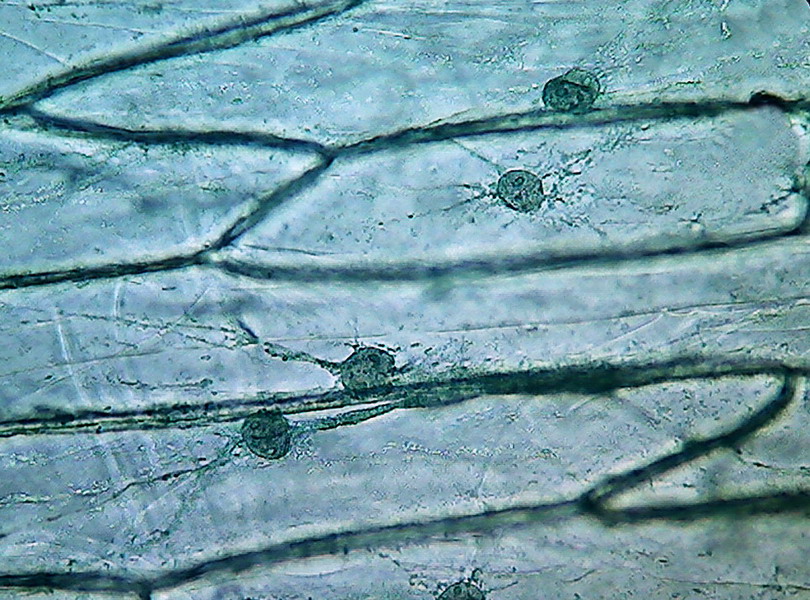
4 - 5 - These two images clearly shows the
three-dimensional character retained by the fixation, with the nucleus supported at the
intersection of 3 trans-vacuolar bands. Secondary bands "sink" into the
"vacuolar medium. The cell walls are of course hazy. The second image
has been edited to eliminate the yellow background of the vacuolar
medium.
But, apart from the fact that the uniform yellow stain
of the preparations is not very pleasant, although it is entirely
acceptable for educational demonstrations, iodine does not provide lasting
preparations; even for the medium term. On the one hand this is because iodine is
bleached by light and moreover, if you try to make a
permanent mount, the alcohols that are generally used for this purpose dissolve
it and discolor the tissue.
I thought that
decoloration could be useful, as alcohol can be in itself a fixative (a
post fixative in this case), it would not damage the cytosol already set by the
iodine, and once this was washed with alcohol, the cell would maintain its
structure and could be coloured in a traditional form.
I therefore tried the following protocol, using as a colorant
the brilliant blue # 1 (Blue 1, a
dye normally used for food) whose use I justified in the article:
http://www.microscopy-uk.org.uk/mag/artmay11/wd-Brilliant-Blue-1.html
Fix with Lugol-acid/10: immerse for only a few
seconds**. Wash with 30% alcohol
for just a few seconds until the epidermis is discolored. Wash in water for a minute. Immerse
in brilliant blue # 1 for 20 seconds. Wash
in distilled water, Mount in
water on a slide, and Cover.
**the times I give here are only indicative. The
onion bulb you use, the dye batch, etc. are important factors so each user needs to optimise their own protocol.
The best microscopy images will be seen with the 40x and 100x objective.
An unexpected and interesting detail was that Blue 1 acted with great speed and
intensity, producing a blue tone more profound than that produced without the
prior action of iodine. Compare these times with those used with other fixatives throughout
this series.
Note: Given the speed
of handling, I also successfully tried to cut the onion skin (usually a
square of 1.5 x 1.5 cm) from its supports (see the April article where I explain my way of manipulating
the epidermis) placing it on the slide, and applying
reagents and washes with drippers. Handling was easy with the only requirement
to retain the epidermis with a mounted needle when tipping the slide to
drain fluids.
Use of Mordants
In the dyeing of textiles (from which techniques
were derived many of the earliest histological staining methods) the
action of mordants is well used. These are products that chemically modify the substrate,
giving it a greater affinity for the dyes that are used later.
http://en.wikipedia.org/wiki/Mordant
Not all biological substances accept a mordant but this can be a useful feature. If you
check on the Web, you will find that an iodine mordant is the
basis for the well known technique of bacteriological coloration (Gram stain)
due to Dr. H.G.J. Gram, which was
developed in 1884 (Wikipedia). Nothing is new! Old microscopists knew 'everything'!
In bacteria, the characteristics of their cell membranes divide them into two groups.
When a smear of bacteria are stained with Crystal-Violet, all are stained blue.
If they are treated now with iodine, and later the stain is washed with alcohol,
bacteria that accepts the mordant retain the dye; the so-called Gram+ (or
Gram positive). Cells called gram-negative (Gram-) are those whose membranes are
not sensitized with iodine and lose the dye. It will be colorless or tinted in
pink by a contrast dye (Safranin was originally used) as in the following
picture:
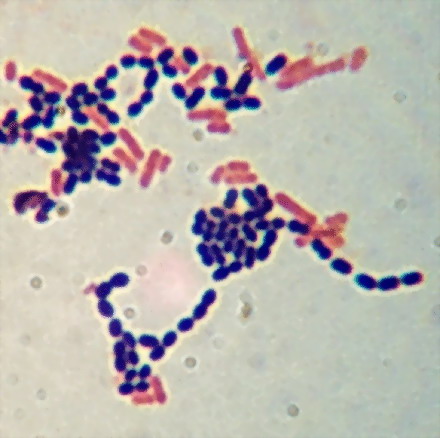
6 -
Image taken from the manual of laboratory practice
http://www.austincc.edu/microbugz/gram_stain.php
The mordant action of other substances
(e.g. the currently prohibited mercury dichloride HgCl2) was what turned many
of the histological fixatives normally used, to those
with histological colorations that textbooks qualified as "brilliant".
The
difference in tone, the intensity, and speed of the Brilliant Blue # 1 staining,when using iodine, indicates that this is acting as a mordant, (compare with the times I needed to apply after other fixatives used in the previous articles.)

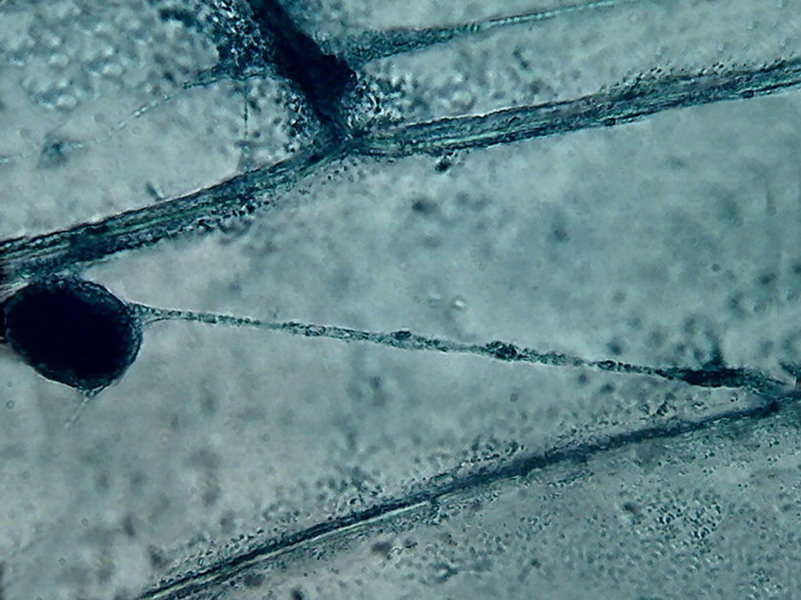
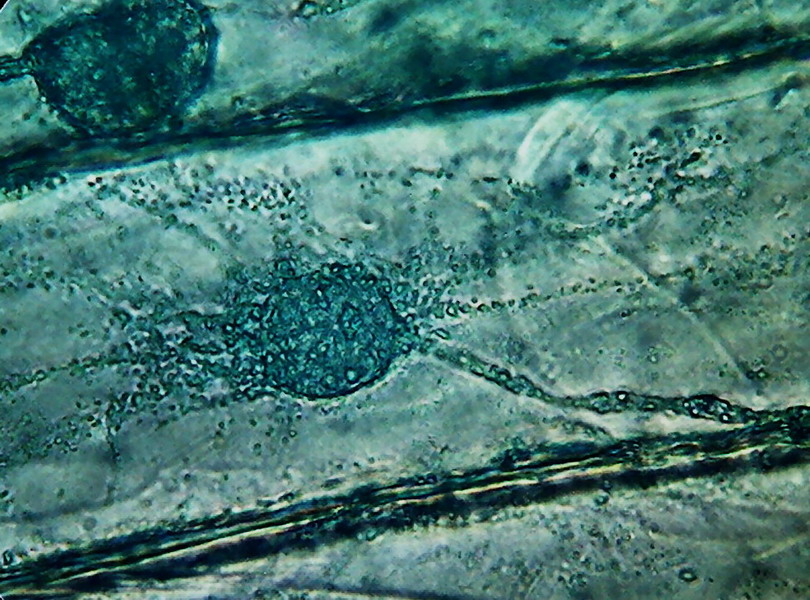
7 - 9
- Observe the delicate fixation of the cytosol and the granules and vesicles,
that Lugol-acetic/10 produces, which shows images similar to those seen
when watching the streaming in the living cell; as well as the deep color
obtained, and the accentuated three-dimensional appearance. (Each picture is a
3 images stack combined with CombineZ.)
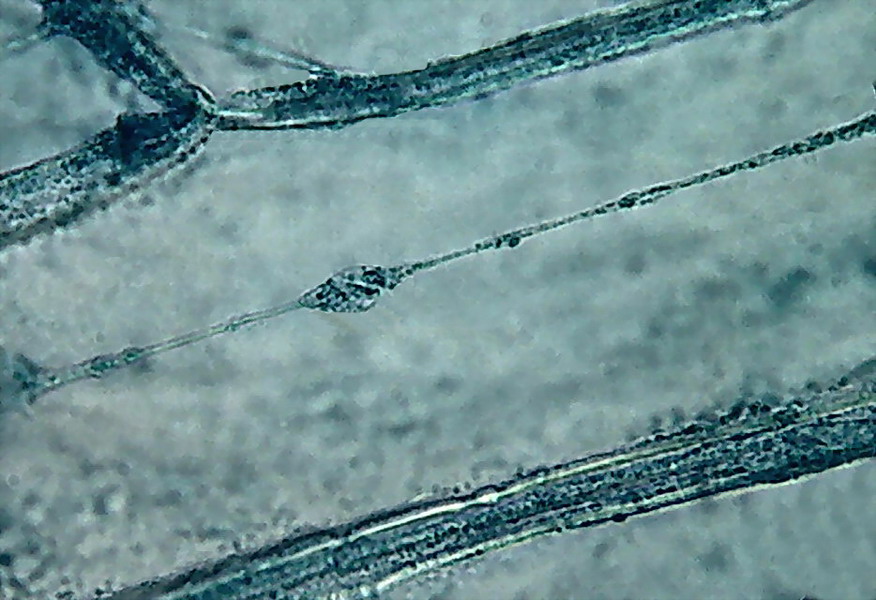
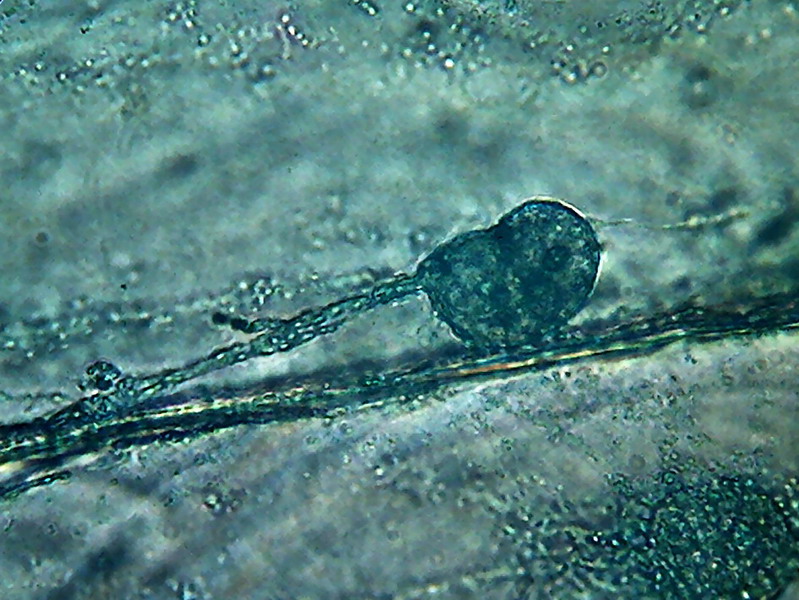
10.
Further evidence of the fine fixation, strong color, and three-dimensional
differentiation which is obtained with the technique. A single image.
The delicate filament was contained entirely within the depth of focus of the
100x objective, suspended in the fluid of the central vacuole.
This
form of preparation produces a very complete cell fixation of the cytoplasm.
The nucleus is too dark, but the cytoplasm shows a very good structure. Note
first, the layer of cytosol along the cell wall, full of colored granules,
the medium filled central vacuole of course, and the trans-vacuolar
trabeculae (bands, strands) of cytoplasm, shown as other much more elaborate
and costly techniques (e.g. DIC or epifluorescence. e.g.) would show them.
The
physiological status of the different cells of the same skin produces multiple
different images. In the same sample there are cells in repose, very active
cells, and all the intermediate grades. And you could have a skin that has only
sluggish cells. Only
a few actually show some more or less complete and active cytoplasmic streaming images that merit
a video study.
For
those who try to watch live streaming, this short excerpt from instructions to a
college practical lesson can help them to be patient:
"... and
then by using the 40x objective examine individual cells until one showing cytoplasmic streaming is evident. (bold is mine)
Pg
17, and see fig 17 from the book 'Teaching plant anatomy through creative
laboratory exercises' by R.
Larry Peterson, Carol Anne Peterson, Lewis H. Melville (I cite this from a
Google Books excerpt)"
So
far my experience is that few live samples can provide a three-dimensional photographic
record that is demonstrative. It is symptomatic that there are none on the Web,
and I imagine that neither in publications nor papers, there are images similar to those displayed
above.
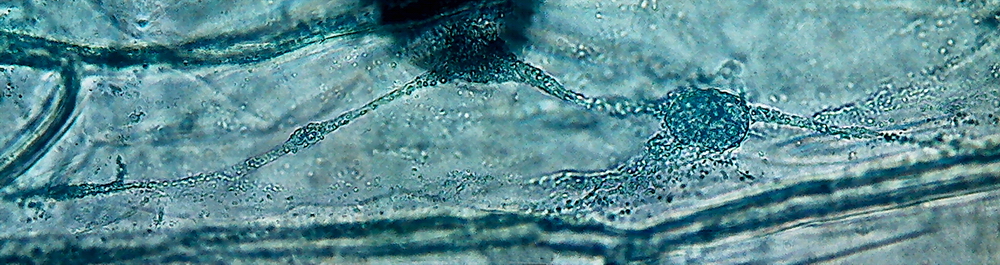
The images below are not so effective in showing the features as the above examples, from a white onion, two months later.
11 - Image at 400x. The next images
are 1000x images in oil inmersion.
12
13 - The granules are especially large and a strange angular shape. I
used for these pictures a dye which I denominate VB1. (It is Blue 1 at a 1% solution
with 1% of acetic acid. It has a better durability. The pure B1 solution is
often infected by huge quantities of a large bacterium, or by the mould Aspergillus sp.)
I have not seen examples of living onion cells imaged with DIC that show these features. This is unlike Tradescantia
sp., which as the image taken by Franz Neidl shows and presented in the previous article, (which I still consider to be the best of its genre), this technique can display the cellular
dynamics which we discuss here. Even with the difficulties involved in selection and
mounting of the stamen hairs, Tradescantia has provided for at least the last 150 years, the best documentary evidence of cytoplasmic streaming. There's also a beautiful
series of images with DIC, which shows mitosis in living plant cells. This site is
an essential visit:
The
onion is not so lucky. There are only (on YouTube) five
beautiful videos, in phase contrast, which I
link to here showing
streaming similar to that seen in my video above:
And another
one filmed in brightfield, which is very similar to mine, and is dated two
years earlier.
Although
much scientific attention has been paid to the epidermis of the onion
cataphyll, published studies of the morphological and physiological
characteristics of the cells and their components, using the light microscope with phase contrast, or DIC, or even through the transmission electron microscope, do not show capture features of cytoplasmic streaming. There are also few examples from the amateur microscopy community.
15 - Note in this picture the large size of
the vesicles and their different colours