 |
|
(PART 2 - Field of view / Resolution) |
|
||||
| Many critters we observe have some microscopic details, but the animal itself is often larger than the field of view of our lowest power objective. Taking one picture of the whole specimen is not possible. It's almost impossible to decrease the magnification because objectives below 2x are very difficult to find. The problem is increased if, like me, you have a CCD video camera with a 1/3 " CCD sensor and no lens; only 1/5th of the normal field of view is used by the camera. A good solution would be to buy a 1" CCD device but its price is highly dissuasive ! |
| Unfortunately, affordable
low power objectives use only one lens and often have poor quality. Resolution
can be enhanced using a more powerful objective with the inconvenience
that field of view is still reduced. So how to resolve this dilemna: Do
you like to assemble puzzles? If yes, I have a solution. Personally, I
like puzzles when they only have less than 10 pieces! The solution is to
take some pictures of the subject with a higher magnification objective,
overlapping slightly each field of view, then to reconstruct the subject
from the picture elements with software.
It's also a means to obtain a larger field of view even if the subject is completely in the field of an objective. In my case I have a good 6,3 x objective and I prefer take pictures with it and rebuild the subject rather than take a whole picture with my 2,5 x objective. |
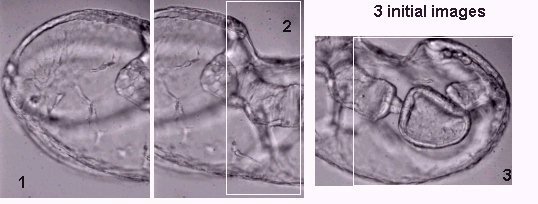
| An example is this long, long, long...arrow worm (Chaetognath) below: why would you want to take only one picture of a such creature! The final image is rebuilt with 5 pictures (time to make the montage is less than 15 minutes). |
|
|
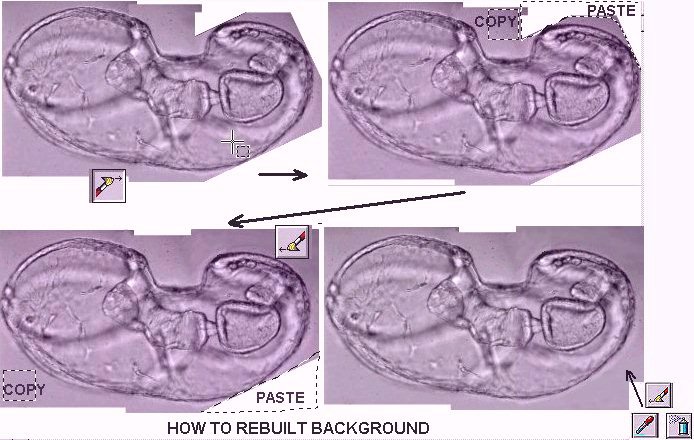
| In image processing software,
standard functions which are useful are: COPY/CUT, PASTE original selection,
and some tools to finish a montage.
Some advice: Open the first image in a large canvas, for example in the upper left corner, or into the canvas centre according to the series of picture elements. In this first example you can COPY portions of the additional images you want to add, using RECTANGULAR SELECTION area or FREE SELECTION (i.e. follows the natural outline in subject). If possible, follow DARK lines or DARK zones because edges are less visible. Don't forget to identify marks or details common in 2 consecutive pictures! CUT or COPY then PASTE it in accordance with the continuity of shapes. When you are pasting, an image copied to the clipboard is no longer visible on screen: only the frame outline appears or a dotted shape. So before PASTING place the next image in continuity with the previous and mark (on screen, by adhesive paper) a corner of it. Place a corner of the dotted frame exactly on the paper mark. If the result is no good, UNDO PASTE and retry, moving the mouse a little. (It's more difficult to explain than to do it.) |
 |
| You can use
a little PUSHBRUSH to smear colors and to hide a demarcation between the
two adjacent pasted regions: push the brush in the same direction as structures
on the subject - horizontal if structures are horizontal, oblique if they
are so.... Finish the work with a little blur if necessary on the border,
with BLUR TOOL.
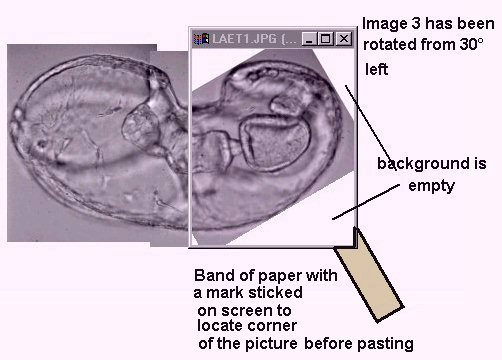
Another trick: it's easier to treat pictures when the subject axis is horizontal or vertical. It's possible (and often you have no choice...) to manipulate images with oblique axes but you will have a little more work to rebuild subject backgrounds. Try creating an image and you will understand! (Note: backgrounds may be rebuilt by copying from other areas of the picture and PASTING in 'white' areas.) |
|||||
 |
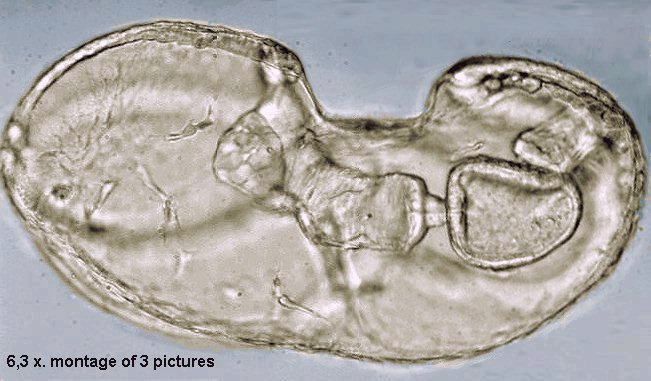
Another
case, a little more complex, shows some other features: How to enlarge
the field and optimize resolution with a moving subject. This method is
NOT usable on distorting organisms like protozoans.
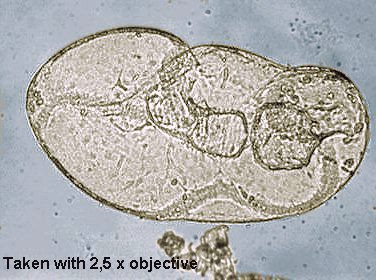
I have made this starfish larva image with a 2,5 x objective and I want to obtain a better image, by a montage of three pictures taken with a 6,3 x objective (pictures sizes are 50% reduced from original dimensions below). Areas selected have a white border. |
||||
 |
|||||
| Note the subject has moved (rotated) between the second and third pictures. It's so simple to correct rotation with the ROTATE tool (30° right in this case), but after pasting the rotated picture, a white background remains on corners. Follow the process described here and you easily obtain a good result: COPY an area of background near a white area, PASTE this copy INTO SELECTION having the same size as the area to fill, then use PUSHBRUSH to mix colors on edges. For perfect results use EYE DROPPER to pick a color near the edge and AIRBRUSH to smooth with this color. | |||||
 |
|||||
| The result below shows resolution gain in the final image when compared with that taken using the 2,5 x objective (shown earlier). Note that the stomach and gut are clearly visible on the right hand side. | |||||
 |
|||||
| It seems like hard work but
with a little practice, you can give a 'personal touch' (and why not an
artistic touch??) to your pictures. At the end you would probably think,
it's pleasant to work on pictures.
I have occasionally asked myself a question: can I improve picture quality with software, without impairing their 'scientific' value? It would be a good subject for the chat page... indeed, edge enhancement, coloration and montage as described above, can add (or remove) some details. But with a little care; avoiding cutting and pasting into the most significant areas..., I think the processed pictures become more attractive and can help people to be interested by them. Many other scientific images are not raw (fortunately!) but are processed by powerful computers: e.g. space research on galaxies, infrared satellite pictures, weather report maps on TV, and closest to our field of interest ... confocal microscope images. Aesthetic considerations can help science and science can enrich aesthetics, why not...! |
| Note: The names and icons of the image processing tools shown above are from Paint Shop Pro® (PSP). |
Comments to the author Jean-Marie Cavanihac are welcomed.
Footnote: In addition to the 'cut and paste' method described above for joining images, some software packages also have a 'stitch' or similar function where points defined in two separate images with overlapping features can be auto-stitched. Picture Publisher v7.0 has this feature.Related Micscape articles:
Martin Mach's article's on radiolaria and diatoms also show stunning examples of microscopic images created by assembling smaller picture elements.
All photographs © Jean-Marie Cavanihac 2000
Published in the October 2000 edition of Micscape Magazine.
Please report any Web problems or offer general comments
to the Micscape
Editor,
via the contact on current Micscape Index.
Micscape is the on-line monthly magazine of the Microscopy
UK web
site at Microscopy-UK
WIDTH=1