 |
 |
 |
|---|---|---|
|
photo paper |
HP 8112c plain paper |
HP 8112c photo paper |
|
Introduction
Several months ago Chitchai Chantangsi wrote an excellent article A Measuring Method for Microscopic Organisms; and a bit later Walter Dioni extended this thinking with About Microscopes, Measurements and Meters. However, Chitchai assumed the availability of a stage micrometer. In most academic settings, or businesses where microscopes are frequently calibrated, one is likely to be available. Unfortunately, for those of us who have only one microscope at home, spending upward of $150 (USD) for something that will only be needed once is a bit beyond most of our means (possibly exceeding the value of our microscopes). The following is a slightly less accurate alternative, but also much more economical.Technique
If you are willing to live with measurements that are not based on something with NIST certified accuracy, you can make your own stage micrometer. I borrowed this idea from the amateur astronomers, who use a light beam passed through a Ronchi grid to test lenses. A suitable Ronchi grid can be generated with graphic software and a good printer. Whether a Ronchi grid, or a micrometer; what is needed is a pattern of lines spaced at a known interval.Using Sun's OpenOffice (available free for the downloading), a grid down to 100 lines per inch can be created in the graphics tool. Simply draw a box, then customize the "Area" setting, specifying a vertical line pattern, with lines spaces at .01" (lowest limit of StarOffice). Since there are 25.4 mm per inch, this produces a scale where each unit equals 254 microns.
To get more precision, I asked Alan Mueller (architect friend, and brother-in-law) what he could do with Adobe Illustrator. Using the same general technique, he was able to generate a pattern down to 50 µm. Attached is the file he created (here). It is in the Adobe Acrobat format (free for download). While Adobe may logically generate that small of a pattern, the limitations of your printer will likely not give a printed grid which is that accurate.
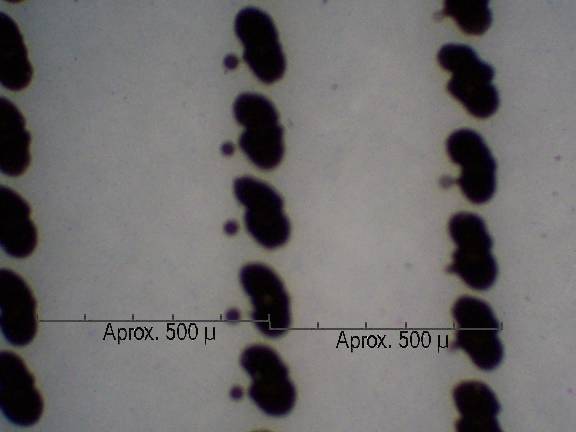
What you print the file on will affect the accuracy. The quality of the printer (dpi - dots per inch) is a limiting factor. The theoretical smallest grid you can print is one with alternating dots (i.e. a 300 dpi printer can only do a 150 lines per inch grid, a 1200 dpi laser printer has one dot about every 21 µm). A high quality paper, or photographic paper, will reduce the ink 'bleed', giving sharper lines. Some inkjet printers are changing their technology, with the ability to vary the amount of ink per dot; effectively making smaller dots. However, most inkjet printers have a standard sized dot. HP printers are typically 40-60 µm (depending on paper bleed). Thus, with my printer, the 500 µm grid is the smallest useable image. However, the printer dots themselves can also be used as a proximate ruler. You may notice that on my printer the lines are not evenly spaced. I suspect this is an interpolation between metric and English units of measure. Because of this I measured across two lines when creating my ruler.
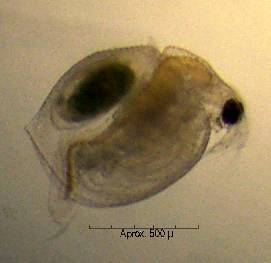
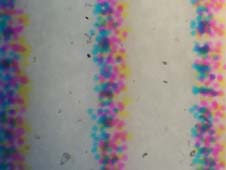
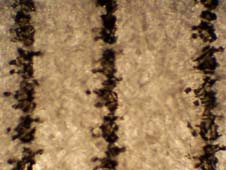
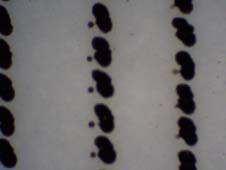
The file was laid out to match the Avery 5890 mailing labels, but plain or photographic paper works well. I found the paper is thin enough that enough light is transmitted through it to get a decent image. Chitchai suggests photographing the micrometer and using it as a ruler for measuring other pictures. You may want to modify this step; as even with the best of printers, with much magnification the grid will be a ragged scattering of ink drops, and not a sharp line (see images below). As an alternative, take several pictures of different portions of the grid, then using your favorite drawing software, create a ruler that has sharp lines based upon average measurements from these pictures. I zoomed in on the images, and counted the pixels between lines, then made my ruler based upon the pixel count. If you make the background transparent, this ruler can simply be overlaid on any other images taken at the same settings.
Images
|
|
|
|
|---|---|---|
|
photo paper |
HP 8112c plain paper |
HP 8112c photo paper |
Ruler drawn from grid images
Ruler in use |
Ruler overlaid on grid image |
Technical Details
Calibration File: this file is in PDF format.Microscope: Bausch & Lomb monocular, 10x ocular, 4x, 10x and 40x objectives.Camera: Kodak 3200 Digital, 'good' mode 576x432 pixels.
Comments to the author Howard Webb are welcomed.
Published in the October 2002 edition of Micscape Magazine.
Please report any Web problems or offer general comments to the Micscape Editor.
Micscape is the on-line monthly magazine of the Microscopy UK web
site at http://www.microscopy-uk.net/