|
Introduction to Hand-sectioning & Wax-embedding Page 3
Plane Irons and cutting edges
The reason why a plane iron is a brilliant tool for cutting thin sections
is because of the fine yet sturdy edge we can hone into it. We are able to produce a solid, sharp, straight, edge
on this massive slab of metal and we are going to be able to hold it really firm and steady when doing our hand
sectioning!
You can use a variety of methods to hone an edge on an iron. You can use expensive stones like Belgium Yellow which
cost about 35.00 pounds a lump and weighs a ton; you can use man-made stones containing those specks of tough abrasives
(can't remember their name, but you know - the same sort of stuff you get in modern sand-papers); or you can use
the best method which we will
be exploiting here!
We are going to be using this:-
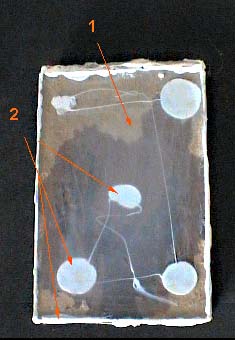 This is a small sheet of
glass glued to a wooden block. Ideally, it should be plate glass... but it doesn't matter if it isn't. I used ordinary
glass (1). This is a small sheet of
glass glued to a wooden block. Ideally, it should be plate glass... but it doesn't matter if it isn't. I used ordinary
glass (1).
I stuck mine down using a hot melt glue gun. (2)
We are going to use this with abrasive powders in our project to get a fine edge on our cutting tool. There are
all sorts of powders we can use - even hardware store stuff like scouring powders, or metal polish, but I'll try
and get my mate Mol to get some abrasive powders into my resources in the Mic-UK online shop in case you have any
problems locating the right stuff later.
The important thing right now is for you to make this 'honing plate'. Make it about 6 inches by 4 inches - the
size of a photograph.

You might be able to find an old photo-frame and use the glass from that for
your honing plate. The glass mustn't be too thin though in case it cracks when you run the plane iron across it!
Why all this fuss to sharpen a plane iron?
A sharp edge may look sharp until you look at it under a microscope:-
 Here are the two plane irons
I showed you on the last page. The top one is the smaller plane iron and the bottom one is the larger. You are
looking at their edges close together and opposite each other under a microscope (low magnification). The top blade
or iron has not
been sharpened nor prepared for sectioning wax blocks... although it is probably already sharp enough if it were
used for its original purpose in a carpenter's plane. Here are the two plane irons
I showed you on the last page. The top one is the smaller plane iron and the bottom one is the larger. You are
looking at their edges close together and opposite each other under a microscope (low magnification). The top blade
or iron has not
been sharpened nor prepared for sectioning wax blocks... although it is probably already sharp enough if it were
used for its original purpose in a carpenter's plane.
I have prepared the bottom blade ready for cutting wax sections.
Take a closer look :-
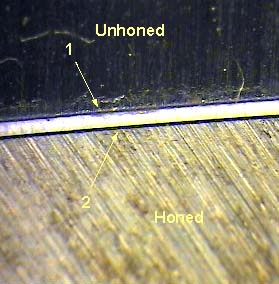 At higher magnification, the
jagged edge of the unhoned blade (1) can be detected. The honed blade not only has a refined and very straight
sharp edge, but something special as well: it has a facet - a narrow face honed at a slightly steeper angle onto
the already-angled side of the iron! You see it here as a thick dark line (2). At higher magnification, the
jagged edge of the unhoned blade (1) can be detected. The honed blade not only has a refined and very straight
sharp edge, but something special as well: it has a facet - a narrow face honed at a slightly steeper angle onto
the already-angled side of the iron! You see it here as a thick dark line (2).
This facet along with a carefully prepared sharp edge are
the critical keys to cutting hand sections perfectly!
You will learn how to prepare your plane iron to look just like this during this project.
What wax is used for wax embedding?
I'll see if I can get some wax put into the Mic-UK's online resources - maybe
they will make up a little kit so you can get the abrasive powders, and wax etc., all together. Ideally, the paraffin
embedding wax should be good quality, 50 degrees Centigrade melting point.
A Quick Recap
This is what you will need for this project:-
- A hand microtome
- A plane iron
- Paraffin wax
- Abrasive and polishing powders
- A home made glass honing / polishing plate
Before we begin our first real physical, hands-on, adventure into this together,
I thought you might like to see hand-sectioning in action. It's likely I will be showing you quite a few video
clips on-line so you are going to need to make sure you have a special plug-in video player (a piece of software)
installed in your browser.
The software is called The Vivo Free Player. You can fetch your player by clicking on here.
When you have it installed, turn the page and see a small clip of perfect hand sectioning on a Brunel Bench Microtome
(modified) using a plane iron as the cutting tool.
(continue...)
|