The Theory
I'd like to show you a better and safer way. First of all, take a look at
We will use PVA glue to create a thin wall that will run just inside the edges of the cover slip.
PVA glue is ideal for this. It can be painted onto glass and dries very quickly. Some specimens, like my
flea - for example, will require a higher wall to ensure the cover glass does NOT sit on the specimen
itself. We can build our well to be as deep as we like simply by adding layers of PVA glue after the previous
one has had time to dry.
Put a glass slide on a sheet of paper and draw a line around it with a pen or pencil.
Place a cover slip centrally in the rectangle drawn and trace around this with your pen.
Now you can use your drawing as a template by laying the glass slide on top of it instead
of the cover slip when painting on the PVA glue.
After you have completed the PVA line, put the slide to one side for the glue to dry. It will
be ready quicker if you put it somewhere warm. I sit mine on top or near a central heating
radiater and they dry in a few minutes. You'll know when the glue is dry because it changes
colour from white to nearly transparent.
You may wish to make several slides in your first batch. If so, preapare a few more and put these
aside to dry.
To make a slide, we need to create an extremely thin well or cavity on a glass
slide in which to place our specimen and our Fructose mounting solution. There are many ways
of doing this. We could, for example, use pieces of a broken cover slip and stick these onto
the glass surface of a slide. Ultimately, the cover slip would sit-down onto these pieces - which
prevent the specimen from being crushed.
 Does this give you an idea of how we will build a well
on the slide?
Does this give you an idea of how we will build a well
on the slide?
![]() Let's do our PVA glue wall now together. Lay your slide on top of a cover slip, ensuring
that the slip itself is centrally placed under the glass slide. By doing this, we can see
see where the edges of the cover slip will be when - in a later stage - we fix the slip on
top of the slide.
Let's do our PVA glue wall now together. Lay your slide on top of a cover slip, ensuring
that the slip itself is centrally placed under the glass slide. By doing this, we can see
see where the edges of the cover slip will be when - in a later stage - we fix the slip on
top of the slide.
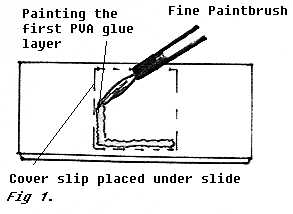 Take a fine paintprush and moisten it. Maybe you should put some water in an eggcup and keep it close
to hand for this purpose. Now open up your PVA glue, or lightly squeeze some out and gently dip the tip of the brush into the milky
white liquid. You only need a tiny amount of glue. Do not overload the brush. With a steady hand,
paint a fine line onto the top of the glass slide just inside where you can see the edges of the cover slip
beneath it.
Take a fine paintprush and moisten it. Maybe you should put some water in an eggcup and keep it close
to hand for this purpose. Now open up your PVA glue, or lightly squeeze some out and gently dip the tip of the brush into the milky
white liquid. You only need a tiny amount of glue. Do not overload the brush. With a steady hand,
paint a fine line onto the top of the glass slide just inside where you can see the edges of the cover slip
beneath it.
![]() It's important to try and maintain a continuous line of equal thickness and depth all the way round.
You can remoisten the brush and reload it with glue as you go, but remember to shake off excess water from the
brush before loading it with glue. If you have problems holding the glass slide still and in position on top
of the slippery surface of the cover slip, try this instead:-
It's important to try and maintain a continuous line of equal thickness and depth all the way round.
You can remoisten the brush and reload it with glue as you go, but remember to shake off excess water from the
brush before loading it with glue. If you have problems holding the glass slide still and in position on top
of the slippery surface of the cover slip, try this instead:-
![]() Take a look at the specimen you are going to use for your slide. Is it as big
as a flea? In my first batch, I made slides of a flea, pollen grains, hairs from a leaf, and
a mould found on bramble leaves. The first two required me to build up
a PVA wall in several layers to ensure the specimen would 'sit' down properly
inside the well. If you fail to put on enough layers, you won't be able to get
the cover slip to settle down on the dried glue properly!
Take a look at the specimen you are going to use for your slide. Is it as big
as a flea? In my first batch, I made slides of a flea, pollen grains, hairs from a leaf, and
a mould found on bramble leaves. The first two required me to build up
a PVA wall in several layers to ensure the specimen would 'sit' down properly
inside the well. If you fail to put on enough layers, you won't be able to get
the cover slip to settle down on the dried glue properly!
Variations
Another method of preparing the specimen for the fructose is to place it into some clean water. For example, I plunged
some leaves from a New Zealand bush into boiling water and left them in there overnight. This helps to force
air out of the plant which, if not done, would prevent fructose mountant from seeping into the leaf's structure.
I scraped a leaf's surface with a razor blade to remove the hairs into a saucer containing a few drops of fructose
solution diluted heavily with water. Lets use this as my example for the best way of proceeding.
There are several ways you can prepare subjects for immersion in the Fructose.
One way is to put a tiny amount of the solution into a clean small dish or egg
cup. Put your specimen into this, being careful not to introduce air bubbles,
and leave it for a few days for some of the water to evaporate - leaving the solution much thicker!
![]() If you wish to try this method, stand the eggcup or small dish between two pencils and rest an up-turned tumbler or
glass over the eggcup but resting on the pencils. This will allow air to flow through but
prevent dust from falling into the solution! It is a good idea to at least soak your specimen in Fructose
for a night so that the solution can seep into its structure.
If you wish to try this method, stand the eggcup or small dish between two pencils and rest an up-turned tumbler or
glass over the eggcup but resting on the pencils. This will allow air to flow through but
prevent dust from falling into the solution! It is a good idea to at least soak your specimen in Fructose
for a night so that the solution can seep into its structure.
![]() When you have been an amateur microscopist for a while, you will learn different ways of using
chemicals to help clean and fix the specimen prior to mounting it in the fructose solution. I am
deliberately skipping this important step here because it involves using chemicals which are normally
highly inflammable or slightly toxic. As this is your first slide-making try, I wanted to keep the
process as simple as possible.
When you have been an amateur microscopist for a while, you will learn different ways of using
chemicals to help clean and fix the specimen prior to mounting it in the fructose solution. I am
deliberately skipping this important step here because it involves using chemicals which are normally
highly inflammable or slightly toxic. As this is your first slide-making try, I wanted to keep the
process as simple as possible.
This is what you do:-
You need to judge how big a droplet to leave on on the slide. You should be aiming to
lay down a drop big enough that when you finally place a cover slip on top, the solution
will spread out and fill up the PVA-glue formed well. In the long run, trial and error
will enable you to judge this. You simply repeat the action to build up a bigger drop
of solution in the well.
Using a smooth implement like a knitting needle (I use a slim glass rod),
insert the tool into your jar of Fructose solution. Remove it and bring its point
down into contact with your glass slide, ensuring the point of contact is centrally
inside the 'well'. Let the Fructose drop slip down onto the slide.
![]() Work carefully and precisely trying to
avoid introducing air bubbles into the droplet. When you think you have enough solution in the 'well', position
your specimen on the slide by pushing it gently into the frustose droplet.
I used my glass rod to pick up a drop of watery solution (containing plant hairs) from the saucer and introduced
this to the Fructose droplet on the slide.
Work carefully and precisely trying to
avoid introducing air bubbles into the droplet. When you think you have enough solution in the 'well', position
your specimen on the slide by pushing it gently into the frustose droplet.
I used my glass rod to pick up a drop of watery solution (containing plant hairs) from the saucer and introduced
this to the Fructose droplet on the slide.
Lowering the lid
Working quickly, lower the cover slip down onto the droplet, keeping the edges aligned with
the PVA-glue on the slide. Just before the Fructose droplet comes into contact with the underside
of the cover slip, release the slip - letting it float down onto the PVA glue walls. The Fructose should
spread out across the underside of the slip and fill the 'well' without leaving any air gaps.
Check! If the slip is not resting squarely on the dried PVA glue walls, gently slide the cover slip sideways
until it properly position. If you find you have used too much Fructose mountant - causing it to leak out
onto the glass slide itself - use moistened cotton buds or tissue paper to gently clean and wipe the spilled
fructose away. Ensure you leave the area around the cover glass as clean as possible.
Right, how did you do?
You may find you have air bubbles trapped under the cover glass. If these are very few and not
all over the specimen itself, leave it be. If you have a lot of them, it might be best to recover
the slide, cover glass, and specimen by placing the whole thing in a saucer of warm water.
You can clean the glue from the slide by peeling it off. Dry and clean the glass slide and slip and reuse it again
for another go.
This is what may be causing air bubbles to form at this stage:-
Before I move on to the next stage, here is a recap of what you need to do to get
to this point:-
(a) Position the cover slip under the slide.
(b) Brush on layer/layers of PVA glue.
(c) Place Fructose Drop and specimen in the well.
(d) Lower the cover slip (after breathing on it).
(e) Ensure slip rests on the 'well' walls squarely.
If you are satisfied with your slide or slides up to this point, put them
somewhere warm for a few hours or better still, leave them somewhere dust-free (remember the pencils
and tumbler tip) for a day or two.
However, if you are in a rush - like me - just make sure the area around the cover slip is dry, free of water and
spilled fructose, and carry on as below.
Take the cover slip and, either using tweezers, or holding it gently between index finger
and thumb, breathe two or three times rapidly onto its surface.![]() This is to moisten it
which will help the Fructose to run without trapping air when we lower the slip onto the slide in a moment!
This is to moisten it
which will help the Fructose to run without trapping air when we lower the slip onto the slide in a moment!
Too small a drop of Fructose used.
Cover slip was not moist enough.
Cover slip was not clean enough.
Fumbling around as you let the cover slip go.

Take care when applying the dabs so as not to move the cover slip or spill varnish onto the central area of the cover slip. Put the slide to one side for 5 minutes to let the varnish dry. Be sure to return the brush to the bottle right away so the varnish doesn't dry on the brush itself.
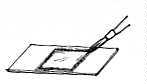 When the 4 spots have dried on the slide, carefully run the nail varnish brush all
around the edge of the cover slip. The edge of the cover slip and the surface of the
glass slide up to about 1/8 inch around the slip should be covered in one continuous
line. The idea here is to completely seal the edge of the cover slip where it meets
the glass slide.
When the 4 spots have dried on the slide, carefully run the nail varnish brush all
around the edge of the cover slip. The edge of the cover slip and the surface of the
glass slide up to about 1/8 inch around the slip should be covered in one continuous
line. The idea here is to completely seal the edge of the cover slip where it meets
the glass slide.
Put the slide to one side and let the varnish dry. It will take about 5 minutes in a warm room, and then you can apply another layer on top of the first one. Work quickly so the solvent doesn't melt the first layer as you sweep the brush over it!
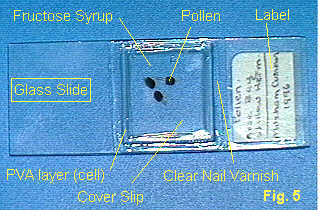 Here's one I made so you can see just how wide a strip of nail varnish
to apply. Look at it carefully. Can you see all the elements we have
spoken about so far? You should be able to see the PVA glue beneath the
cover slip. To do a proper job, write out a tiny label and sellotape it
to the slide as I have done here in Figure 5.
Here's one I made so you can see just how wide a strip of nail varnish
to apply. Look at it carefully. Can you see all the elements we have
spoken about so far? You should be able to see the PVA glue beneath the
cover slip. To do a proper job, write out a tiny label and sellotape it
to the slide as I have done here in Figure 5.
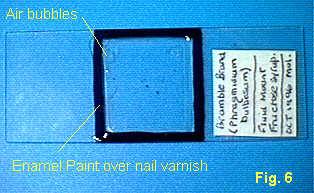
Enamel Paint
Here's one I did! Notice that I didn't apply enough Fructose Mountant in this
one which has left some air bubbles under the cover slip. They are well out
of the way of the specimens in the middle, so I decided not to recover the slide
but keep it instead.
After all that, I guess you want to see what my slides look like under the Microscope.
Okay then... pick from these 3 I made. Alas, I can't show you the flea one cos I broke
this accidently one night while I was looking at it under the scope: my first broken
slide!
That's it for now. Drop in on me again and I'll show you a lot more things
we can do together....
![]()
At this point, your first slide is finished but if you want to do it the right
way, you should apply a layer of enamel paint once the varnish has dried. The paint
must be painted on as you did the varnish.
See my SPORES SLIDE
See my POLLEN SLIDE
See my HAIRS SLIDE