About five years ago I bought my first microscope. Because photography is my main profession I soon tried to make pictures. The microscope did not have a built-in lamp so I used a slide projector and a mirror. By chance I discovered a way to make stereoscopic pictures through the microscope. I was already experimenting with stereo photography and I knew what to do to get a proper stereophoto'. It is relatively easy to make stereo pictures using one camera and making two pictures. You have to take the pictures with a separation of about 6.5 cm (eye distance). When you use slides you can put the two slides in two connected plastic slide viewers and you have a stereo image.
When I was adjusting the lighting with the mirror I saw the foreground shifting from the background. This was exactly the shifting that occurs with our stereoscopic vision. This meant that it should be possible to make stereoscopic pictures. I tried it and it worked. Between taking the two images I slightly rotated the mirror.
At that time I knew almost nothing about microscopy. I joined the Dutch Microscopy Club N.V.V.M. and there I learned the tricks of the trade. The chairman Jan Parmentier provided me with all kinds of material so I could experiment more. I found out that the technique works best when you don't use the correct way of adjusting your lighting. It only works well when I lower the condenser (or swing aside its upper lens). I tried several methods. When you have a condenser with a rotating turret you can use this to alter the direction of the light. You can move the diaphragm from side to side.
I realize this all sounds like severe microscope malpractice. The most important thing in stereo photography is depth. When you use the full aperture you have very shallow depth of field. Not so nice for a stereo photo'. It means when adjusting the light you will always have to find a compromise between resolution and contrast. In my normal micro photography I almost never (except with dark field illumination) use the full aperture of the lens because the photographic material can't cope with the lack of contrast and the fine details.
These 3D techniques have their disadvantages. Objects with a crystalline structure don't work that well. Also moving organisms are a bit difficult (but not impossible). Every animal must take some rest once in a while.
But there is another solution.
 How to
make a stereoscope from a binocular and how to make three
dimensional pictures from live organisms. I experimented with filters to split the light beam
into two halves . I first used two polaroid (linear) filters. I
put them in the filter holder of the condenser. I also put two
polaroid filters on the oculars. To my great surprise I got a
stereoscopic image. Unfortunately the prism of the binocular
depolarized. Then I tried it with red and blue filters used for
anaglyph glasses - (see Fig. 1.) This worked
better and had one major advantage. I could take instant three
dimensional pictures with it. The only thing you have to do is to
put the two filter halves in the condenser filter holder. I use
LEE filters (no. 106 and 118).
How to
make a stereoscope from a binocular and how to make three
dimensional pictures from live organisms. I experimented with filters to split the light beam
into two halves . I first used two polaroid (linear) filters. I
put them in the filter holder of the condenser. I also put two
polaroid filters on the oculars. To my great surprise I got a
stereoscopic image. Unfortunately the prism of the binocular
depolarized. Then I tried it with red and blue filters used for
anaglyph glasses - (see Fig. 1.) This worked
better and had one major advantage. I could take instant three
dimensional pictures with it. The only thing you have to do is to
put the two filter halves in the condenser filter holder. I use
LEE filters (no. 106 and 118).
One filter half can be slightly on top of the other and taped with transparent tape. You have to experiment a bit with the right (lowered) position of the condenser. The field diaphragm should be opened fully. The image will be purple because of the combined red and blue filters. Then put a red and a blue filter on the oculars. When the filters are at the right place you can see the image three dimensional. It may be a bit uneasy for the eyes but you get used to that. And what else would you expect from such an inexpensive solution. I used the technique for my drawings, shown in two earlier articles in Micscape (Carchesium: A study in pen and ink and Stars of the Marshes ). Because I can even use it with a 100x lens, although it is not the most superior image, it gave me useful depth information. When you take the filter from the ocular you can take pictures. You can make slides or normal photos and view them with the red and blue glasses. It is even possible to film through the microscope and capture a 3D video film of moving subjects!
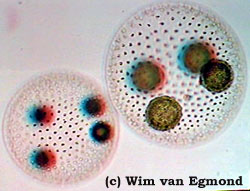 These Volvox are far more defined in the
original than shown here. Some detail and impact has been lost
preparing this image from an original photo ready for use on the
web. Sit further back from the screen and take a look through
your red/blue 3D glasses. While we are on the subject of
Volvox, these spherical colonies spinning and gliding through
pond water produce a stunning sight: a perfect specimen for the
novice to feast his/her eyes upon. Each tiny dot in stuck to the
outer sphere is actually a cell with a fine tail undulating to
produce movement in the water!
These Volvox are far more defined in the
original than shown here. Some detail and impact has been lost
preparing this image from an original photo ready for use on the
web. Sit further back from the screen and take a look through
your red/blue 3D glasses. While we are on the subject of
Volvox, these spherical colonies spinning and gliding through
pond water produce a stunning sight: a perfect specimen for the
novice to feast his/her eyes upon. Each tiny dot in stuck to the
outer sphere is actually a cell with a fine tail undulating to
produce movement in the water!
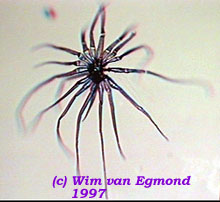 The
scaly hair on the right works well because it has a lot of depth.
Again, it has more 'pronounced' 3D in the original photograph
than is seen here.
The
scaly hair on the right works well because it has a lot of depth.
Again, it has more 'pronounced' 3D in the original photograph
than is seen here.
With this technique not every subject works that well and the specimen must be transparent but not too flat. Printing the pictures can be a bit difficult. But when it works its great fun. I used my micro stereo photographs in several exhibitions, theatre plays and lectures. At the moment I make large photo-montages for an art exhibition and I am going to try to use video with these technique.
The author Wim van Egmond would welcome comments.
Note by Maurice Smith
There are other techniques for producing 3d
microscopy images which do not involve using filters - just a
monocular (single tube) microscope and a camera. The method
involves combining the images together using inexpensive computer
software. Would you like to take a look?
Please report any Web problems
or offer general comments to the Micscape Editor,
via the contact on current Micscape Index.
Micscape is the on-line monthly
magazine of the Microscopy UK web
site at Microscopy-UK