|
Material and methods
ANESTHESIA and EUTHANASIA
The
materials used for this work were 6 specimens of Periplaneta from
Durango and 6 others from
Cancún.
Anesthesia of the just captured animals
(Durango) or those collected from
material immobilized by the insecticide in Cancún was induced
by putting the
specimens in the refrigerator at 4º C, in a closed capsule of
course.
In
general it is best to initiate the work with anesthetized insects,
not dead ones, to avoid any damage to the parasites of our interest.
But see next
paragraphs.
In
spite of the immobility of anesthetized animals, which does not respond
to the external stimuli, the antennas, legs, and buccal palps continue
moving, because
in the long nervous ventral cord there are many independent ganglia
that govern
them. (A similar phenomenon occurs in the batrachians, in which, even
after anesthesia
and decapitation, the heart continues beating for hours, due to the
presence of
intracardiac ganglia, independent of the brain.)
If
this makes you uncomfortable, euthanasia of the animals anesthetized
by cold can be completed by submerging them for a minute in a more or
less
concentrated
solution of domestic detergent (dishwasher). The detergent is
immediately absorbed
by the tracheal system and it kills quickly without affecting the hosts
of the digestive
tract.
DISSECTION
Head
is first severed out, and next are the legs, with
the help of fine pointed forceps and
scissors
(the best
ones, are the professional instruments used for iridectomy, but, see
the Appendix).
Next the body must be pinned to a small dissection tray with thin but
rigid
pins (the best are the kind used by entomologists to pin their
specimens, but
you can use the thinnest and longest steel hand sewing needles. Do not
use
ordinary stitching pins)

|
cockroach prepared for dissection
|
With
the scissors you must cut the ligaments on the righthand side of the
abdominal sternites, beginning at the rear end, and the ventral plate
so released is hinged towards the left side, clearing its adhesions to
the
internal organs with sharp needles or with a microscalpel, and is
discarded or
pinned down. You may want to see the centrally placed ventral nervous
cord with
its many ganglia and nerves.

|

|
Ventral
plate of sternites
|
you
must cut along the yellow line
|
All
this can be done in the air, but the following manipulations give
better results if they are made under water. A physiological saline
solution designed
to work with insects can be used to avoid damages to tissues by osmotic
pressure differentials. (See the APPENDIX.)
Nevertheless due to
the annoying reflections of light
on the surface of the water, even sacrificing some resolution, the
following
photo was made in the air.

|

|
grease
must be worked out
|
labeled
image. click over to see the full size version
|
Isolating the alimentary canal
With
thin and sharp teasing needles and
(or) very fine pointed forceps, the fat that surrounds the abdominal
organs is removed. The alimentary canal is easily isolated and it can
be
set free
from its ties. If you want to separate it more or less completely, the gizzard must be moved with the tweezers
until the esophagus is seen and then it must be cut distally,
the rest of
the digestive tract can now be liberated with the needles, and cut at
the
other end, at the level of the anus (or cloaca). It is then possible to
end
with a preparation like this:

|

|
the
dissected digestive system
|
same
picture labeled
|
But,
given that gizzard and crop normally do not have parasites of interest
to us, you may wish to separate only the intestine and the rectum.
Identify
the intestinal cecae. With the help of the forceps and
the scissors, make two cuts in the intestine: one below the cecae,
and another one at the level of
the cloaca. The separated intestine
is transferred to a capsule with clean physiological solution. With the
two rigid
teasing needles, fine and sharpened,
the
intestine must be open alongside, releasing its content. Do not use a
micro-scalpel;
you risk cutting in pieces the parasites. With due care remove the
intestinal
tissues and discard them.

|

|

|
Adipose tissue, the lobes are served by a
tree of tracheae (in black) that transport the air.
|
Due to its fragility and abundance may find
many pieces of malpighean tubules.
|
The intestine is also served by a dense
tree of tracheae.
|
Collecting the parasites
The
material in the capsule is preferably examined over a matt dark
background
(a black box ( see Appendix), or a matt black velvet) with the help of
an upper
light, this will make it easy to see the nematodes which are wriggling
most of the
time, or the ciliates swimming in the bottom of the capsule.
Separate
the most individuals you can, with a fine pointed pipette or
a fine pointed brush, with the help of a magnifying glass of 6
to 10 powers
(or the low power - 8.5 x on my microscope - see "Köhler
microscope" article). Those who have a stereomicroscope already have
the really
effective tool.
Collect
the nematodes into a small capsule in a few of milliliters
of physiological solution.
An
old, but always useful method to fix nematodes is to warm water or
alcohol 50%, to 50ºC in a small test tube over a low flame. (Take
care and
protect your skin and eyes from the hot liquid projections. The mouth
of the
tube must always be directed away from your body.)
Gathering
the nematodes with a fine brush, submerge them quickly in the fixative.
The organisms are thus fixed in extension.
Now pour off most of the liquid without losing nematodes
and replace it with AGA (alcohol 70% with 10% of glycerin and 1% of
acetic acid). Set
apart the
specimens in a well stopped vial to examine them later.
Return
to the sediment in the capsule and prepare now 3, 4 or more thin wet
mounts. Seal them using molten paraffin wax, from a candle, or better
VALAP
or VAPA
(see the APENDIX). These preparations will allow you to investigate
inmediately the sample with the 40x and even 100x objectives, to
search for
the parasitic protozoa. Make your drawings, take your notes, shoot your
pictures. The individuals will be alive for a while.
If
there were sufficient individuals in your material, and you have left
some live nematodes, the moment to place them under the objective has
now
arrived. Observation of live worms can give interesting data, but in
such
transparent animals that accept a perfect clarification in glycerin, it
is not
essential for arriving even at a specific determination.
To
examine in detail the nematodes, you can pass after an hour the fixed
material to glycerin 20%, and after another hour to 30% glycerin. If
you want
to make permanent slides use the method of Seinhorst for glycerin
mounting that
was detailed in my article on mounting media. It is the professional
method
to mount and preserve nematodes.

|

|

|
content
of the gizzard
|
nematode
over black background
|
Nyctotherus
in the intestine.
|
RESULTS
In
only 12 dissected Periplaneta americana I found two protists
and two species of nematodes that I describe in detail below.
Endamoeba
blattae, Leidy, 1879
The genus is Endamoeba Leidy, 1879,
whose
type species is exactly Endamoeba blattae; and by no means Entamoeba,
Cassagrandi & Barbagallo, 1895, which
is the genus that is normally applied to the
most common parasitic amoebas of man ( E. hystolitica, E. coli, E.
gingivalis) and to
other
several species parasitic on other vertebrates.
Apparently
the International Commission
of Zoological Nomenclature considered as a valid genus for all
those
amoebas, the one founded by Leidy. But the common use in the
bibliography, particularly
in North
America,
favors Entamoeba for the human and
other vertebrate parasites.
In what is inappropriate from every
point of view, many authors extend the use of Entamoeba to
the amoebas of invertebrates. Do not follow this trend.
Endamoeba has two known species, both
parasitic on insects. The
other is E. simulans, parasitic on termites.
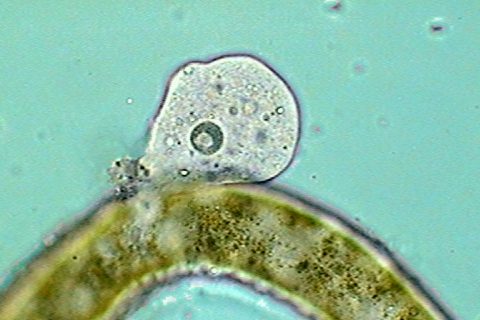
Endamoeba blattae is a big
species, easy to observe, with a clear and homogenous
cytoplasm and a globular nucleus with a wide peripheral clear ring and
a darker
center. It belongs to the kind of amoebas that move like the free
living A. limax.

|
a free living amoeba with a limax
locomotion type
see the adhesive rear uropod and the clear blunt front pseudopod
|
They do create a unique and ample "rolling"
cytoplasmic front. Its cytoplasm, still being amoeboidal, that is to
say, easily
deformable in any sense, does not produce the common pseudopodia
expected for
most of
the free amoebas.
 
Three aspects
of the locomotion of Endamoeba
blattae.
At bottom one individual is crawling over a Malpighian
tubule. In the
center it has freed itself and floats in the liquid. And at
right the amoeba has settled over the slide, developed an uropod
and start gliding to the right.
The similarities with the free living amoeba are clear.
It
is not probable that this amoeba causes serious damage to the
cockroach.
Apparently their food is grains of carbohydrates not digested by its
host, and
probably also bacteria. It seems also not to be very common because I
only
found it in one individual. Any type of oblique illumination allows
satisfactory
images.
Nyctotherus
ovalis
Nyctotherus is a genus of parasitic
ciliates very common in other invertebrates, and also in different
vertebrates
(frogs for example, which hosts another very common species: N. cordiformis).
It
has cytological characteristics that have turned it into the star of
important investigations on the life in anaerobiosis.
The favorite species to conduct those studies is exactly the species
that
inhabits the Periplaneta.
N.
ovalis is
a big species, pear-shaped, but somewhat laterally
compressed. It is enveloped by a thick and stiff cuticle, that bears
the
numerous and long cilia. The thin end is the anterior one. It has a
nucleus, visible
alive, which in lateral view looks fusiform and granular.
The
nucleus is surrounded by a membrane, that some denominate suspensorium,
which adheres to the
“dorsal” cuticle at a higher level than to the “ventral” one.

|
a full picture (two
stitched images) of Nyctotherus ovalis with the x 100 HI objective
|
So,
the nucleus and its suspensorium separate the ciliate in two well
defined zones. An anterior and smaller one filled with darker
particles,
and a bigger posterior one full with lots of clear granules.
In
lateral view one can see along the frontal side a long, deep, and
clear furrow (the peristome) that
lodges an undulating membrane reaching
the suspensorium base. The peristome ends in a funnel open to the
exterior
creating a false cytostome, that gives access to a long cytopharinx
also provided with an undulating membrane, which extends under
the nucleus almost in contact with its inferior wall, and finally
curves
downwards to open in the cytostome in
which the alimentary vacuoles are born. These are practically
never
distinguished, because they are obscured by a countless multitude of
small opaque
grains that fills all the later part of the protozoan.
At
the rear end can always be seen a big and clear excretory vacuole
extended cross-sectionally.
What
makes the Nyctotherus famous
is the fact that the opaque grains that fill their cytoplasm are of a
very
special nature.
Nyctotherus lives inside an
intestine, in the middle of a mass of decomposed food, practically
without
oxygen. How it can even fulfill its vital functions to be even the most
frequent and numerous inhabitant in the intestine of most cockroaches?
It
does because it has been able to obtain energy for its vital
functions from the hydrogen of the methane, produced by bacterial
fermentations
in the intestine of cockroaches (and also in that of human
beings). As
methane fluoresces it can be detected inside the Nyctotherus with UV light. See an example in
this site.
http://user.uni-frankfurt.de/~schauder/termites/termites.html
Nyctotherus
do not have true mitochondriae. (See part 1) Its cytoplasm
is full of prokaryotic derived
symbionts named hydrogenosomes,
which
uses as a source of energy hydrogen, not oxygen.
That
is the secret of its adaptation to the LIFE IN THE INTERIOR. That
secret has been investigated by tens of scientists that have been able
to
determine, from the morphological and chemical structure of the hydrogenosomes, that these are probably
derived from the mitochondria of other ancestral cells, or from a
former prokariote that was at the same time the ancestor of both
mitochondria and hydrogenosomes, as an
adaptation to the
metabolic exigencies of the life in intestinal media. The battle over
the
nature and origins of the hydrogenosomes has not ended and is
investigated
using different fragments of DNA from hydrogenosomes and mitochondria.
Nyctotherus was present in most of the
specimens
dissected in Durango, but it did not
appear in any of the Periplaneta dissected in Cancún.
This is suggestive
and provoking, but of course the small number of specimens dissected in
each locality
does not allow us to do affirmations, or even hypothesis, of any kind.
APPENDIX (technical support)
The dissection tray
Any metallic container
of about 15 to 18 cm. wide by 20 to 22 cm in length and 3 to 4 cm deep
can
become a
useful tray for dissecting adults and larvae of insects, oligocheta,
small
vertebrates, etc.
The
only one essential adaptation is to provide the tray with a floor
that does not float, that receives well the dissection pins, and that
preferably
has a dark color, so that the removed pieces of the dissected subject
stand
out better. In shops that sell products for crafts (artistic candles),
you can
found a good enough paraffin. In Mexico and other religious
countries there are sold big votive paraffin candles (here called
“veladoras”).
Buy the necessary paraffin to produce about 400 milliliter of melted
paraffin.
In order to obtain the black, coffee, or very dark green color you
need, you
can resort to pigments soluble in the paraffin. The best source are the
same shops for handicrafts. But if necessary you can resort
to buying the
"wax pencils”, or “crayons” children used in schools, and to mix the
suitable ones with melted paraffin. Mix well to have a homogeneous
color.
According to the hardness of paraffin, you can add solid petroleum
jelly to it
(does not matter if it is perfumed or not) until you have a paste that
solidifies but admits easily and without cracks the pins necessary to
hold the dissected
bug. After a time of use the adhered impurities and the holes left by
the pins
will ruin the surface. As the tray is metallic it is simple to place it
over
the fire or in the oven to melt the paste. All the impurities will fall
to the bottom
and the surface when cooling will be totally recovered.
Instruments
A
magnifying glass of 6 to 10 powers is a good aid.
With
some skill it is possible to construct or to adapt the few instruments
necessary.
Scissors. The stainless steel
scissors with fine curved points that manicurists use could do a good
job if you
select them with care, and take time to fit screws and to sharpen the
cutting
edges with a small fine grained stone.
Micro-scalpels. Shaving blades of
one or two edges can be cut in fine triangles each with an edge, if you
press
them between the jaws of a bench vice (a jewellery “baby” bench vice is
ideal),
and bend them with the aid of a piece of hard wood. It is of course a
task for
a careful adult. Cut pieces of 12-15 cm from a wooden rod of 3 - 4 mm
in
diameter (here in Cancún they are easily obtained from stores
that sell
articles for schools). If you want, with a cutter or a pencil sharpener
give a
conical shape to one end. Press the blades edges between the jaws of
the bench
vice with their points down. With a hammer, and care, fit the wooden
handle to
the blade. If you can not find shaving blades, pieces of steel springs
from
more or less old clocks provide a steel with magnificent qualities. It
is only necessary
to have a rotatory sharpening stone to give a good shape to it.
Teasing
needles. Hand sewing needles, of steel, long and
slender, can be mounted in wooden handles
with the same procedure used for the scalpels.
Droppers. Recovered from
old medicine bottles or bought in the drugstore.
Micropipettes. You must follow the clear indications of
Jean Marie Cavanihac:
http://www.microscopy-uk.org.uk/mag/artnov01/tools2.html
Transparent
plastic dishes. To substitute the small Petri
dishes of prohibitive
prices now; in the handicraft shops and those selling fantasy articles
for
children's birthdays, small boxes are sold to package candies or small
gifs.
They
serve very well for these aims. Add some plastic plates recovered from
packages
of medicine pills or tablets, with cavities of different form and size.
They
will be most useful to separate specimens or to deal with them.
Of course who can make required
investment will do well
in following the detailed instructions of
R. L. Howey for
the adaptation and improvement of relatively cheap surgical
instruments.
http://www.microscopy-uk.org.uk/mag/artjul00/rhlab1.html
Physiological saline solution for
cockroaches
You
must use preferably a physiological solution for insects. The
professional prescription is the following one:
Dissolve 9g sodium chloride
(NaCl), 0.2g
potassium chloride (KCl), 0.27g calcium chloride (CaCl2•2H2O) and 4g
glucose. Add enough distilled water to bring final
volume
to 1000ml. Adjust
pH to 7.2 with sodium bicarbonate (NaHCO3)
But
this one is an amateur formula which works: in 1000 milliliter of
filtered
rainwater, or bottled plain water (do not use
distilled or demineralized, we need the minerals
normally present in
the water) dissolve 9 grams of a good and fine kitchen salt and 4
milliliters of
syrup for breakfast with fructose or glucose. Caution: do not use the
domestic water
supply; it has much deleterious chlorine and chloramines.
Make
pH slightly alkaline with sodium bicarbonate (7.2-7.4 by ex.) To
measure pH the best thing is to use a kit of those used for
aquariculture,
selecting a pH paper or solution with a rank akin for our necessities.
David Walker
reviewed the subject for the UK in
http://www.microscopy-uk.org.uk/mag/artmar05/dwwater.html
But you can buy similar equipment
in most Aquarium Shops of your country.
Black box.
It
is difficult to obtain a perfectly black background. All the
materials reflect the light in greater or smaller
measure. The
ingenuity of physics, and photographers – mainly the ones specialized
in macrophotographs
– produced the "black box".
A
"black box" is a relatively big box, with the interior walls
covered with matt black velvet, whose upper face has a relatively small
orifice.
The size of the black box depends on the use to which it is destined,
for that
reason the term "relatively" is used here. The most useful shape for
you is a cube, but the former scientific black boxes were spherical,
that shape
optimized the light extinction.
Any
light that goes through the orifice will be absorbed by the internal
walls, so offering a perfect black background useful for numerous
applications.
If the intestinal content is placed in a capsule of glass or plastic
placed
over the orifice of the upper box face, and is illuminated with a hand
torch or
another appropriate light, the content will be seen very clearly
illuminated,
allowing to distinguish by its form and movement ciliates and
nematodes. The amoebas can only be detected observing samples at the
microscope with
the 40
and 100x objectives.
Coverslip sealants.
In
order to seal a number of definitive
preparations VAPA or
VALAP can be used. Both formulae adhere very well to glass even whetted
with
glycerin, and allows a complete an easy recovery of both slide and
coverslip.
VAPA.
- is a mix of equal parts of solid petroleum jelly and paraffin (or
60% petroleum jelly and 40% paraffin) both substances are placed in a
container
and warmed up until melted and well
mixed. Pack it in a wide mouth container, and let it solidify until it
is
needed.
VALAP.
- is a mixture in equal parts of petroleum jelly, lanoline and
paraffin. It is prepared and packed the same way the previous sealant
was. It
is less fragile than pure paraffin and adheres much better to the glass.
A
sealing tool, very efficient, constructed with an office paper clip,
was described by Olivier Messmer in his Message of 08/11/2004 to the Forum
Mikroscopia (the
address is on the front page of Micscape). The illustrations are so
clear that
even not knowing a word of French Language you can make and use it. So
I take
the liberty to reproduce it here. (If the browser resizes image to screen,
use
feature usually on bottom right of image to expand to full size .)
In
the next part I will describe the nematodes.
|

