Notes
on adapting a Nikon Labophot 1 stand for LED use.
by David Walker, UK
I
recently had extended access to a Nikon Labophot 1 stand / optics; this stand with various outfits crops up quite regularly
on eBay and is illustrated and described on Nikon's excellent MicroscopyU Microscopy
Museum website. An
aspect of the stand I found particularly useful was the ease of adapting this model's lamphouse to LEDs, and its design
allowed a rapid interchange during microscopy studies to LEDs of different
visible and near IR wavelengths. Other maker's models with similar lamphouses
may also prove suitable (but note comments on electrical aspects below).
The
ease of adapting the Labophot lamphouse is summarised in the annotated images below.
A spare lamphouse is dedicated to LEDs and the original
quartz halogen lamphouse can be reinstalled whenever needed.
The LED can be changed out to study the effect of varying the wavelength
on imaging a subject, e.g. diatoms for shorter wavelengths or dense insect exoskeletons
for longer wavelengths.
Why
use LEDs? Glass filters are of course quick and easy to place on the field iris
but I find that the near monochromatic LEDs give superior
results to a non specialised glass/acetate filter and the LEDs cost very little.
There's
two diffusers on the Labophot 1, one after the lamp and another after the field condenser
which reduce the available light with the supplied
6V / 20W lamp and even superbright LEDs for techniques like phase at higher mags.
Immersion
oiling a large coverslip to the
accessible rear diffuser made it clear for more light throughput; and it
seemed to have no effect on the evenness of light and is easily reversible if needed. (The
lamphouse was uprated
on the Labophot 2 but the lamphouse is bulkier).
Safety
note: Please see safety footnote below if using high intensity visible
LEDs and particularly if
considering LEDs outside of the visible spectrum.
|
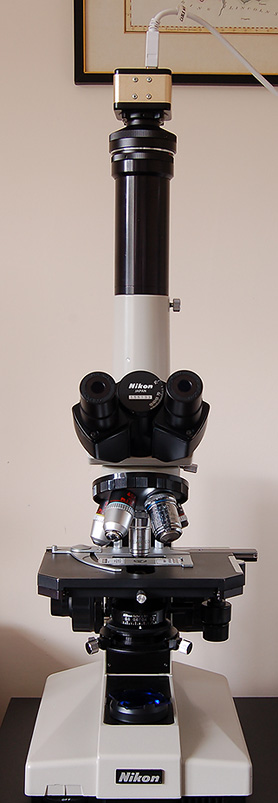
The Nikon Labophot
1 shown with its parfocal 35 mm film port. A Nikon bayonet to 'C' mount adaptor
allows a digital camera to be used, in this case an OpticStar
PL-30M 1.3 Mpixel USB2.0 monochrome camera, 2.1 V Lux / sec
sensitivity. (Sold for astronomy typically as a guide camera
ca. Ł130.) The C-mount camera is convenient but not essential; many
hobbyists have adapted the very affordable webcams for microscopy although
sensitivity may be a problem for 'light hungry' work. A Nikon 2.5x
projection eyepiece was used.
|

The
small lamphouse holding the quartz halogen bulb on the rear of the Labophot
1 stand, just plugs in and out and is small, light and cheap to buy as a spare.
Other stands of course have quick release lamphouses e.g. on a dovetail but
these lamphouses can be bulky and expensive to keep a spare.
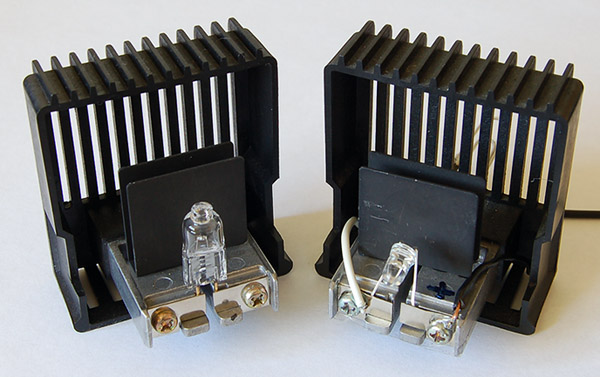
The
quartz halogen lamp is held in with two screws and is a simple matter to shape
a typical 5 mm envelope LED's wires to clamp in these screws and align
so as the emitter is at the same focal point as the bulb filament. I have prepared
LEDs of various wavelengths to fit (coded on the LED envelope so as I know which
is which). By experiment I prefer narrow beam angle LEDs at the high mags,
they give an even light through the Nikon's lamp optics at mags
used.
Important
electrical and safety note: The 0 - 6V output of the Nikon's internal PSU is DC so could
be the basis of an LED supply, but a suitable dropping resistor
is needed as it is 10V open circuit and would immediately blow an
LED typically rated for 4.5V max. If considering
adapting another microscope model which must have a low voltage not a mains
voltage bulb to LEDs please seek professional advice if uncertain
on how to safely adapt/use.
I
prefer to use an external battery operated supply using the flying
leds shown coming out the back (they don't interfere with the plug-in
mount). The power supply was made by my brother Ian and is described
in his article 'LED illumination
for microscopes'. To avoid the battery voltage trickling
into the microscope's PSU (which is off) the lamp conductors below
lamphouse have been insulated with tape.
|
Diatom
Frustulia rhomboides, Klaus Kemp 'Test plate 8 forms'.
Hyrax. Blue 470 nm LED. Nikon oil NA 1.2 -
1.43 darkfield condenser, Zeiss 40x NA1.0 oil objective. Nikon
D50 DSLR, 2 sec exposure. Zeiss 4:1 projection eyepiece.
LED
details: Nichia NSPB500S, 5 mm envelope, 4.4 Candelas, 15 degree
beam, (www.maplin.co.uk
Maplin code NR85, Ł3.34). (LEDs can be up to 10x cheaper
on eBay but the maker and full specifications may not always
be supplied, which
is important to know at short wavelengths to check if UV present.)
Diatom
Pleurosigma angulatum, Klaus Kemp 'Test plate 8 forms'.
Hyrax. Blue 470 nm LED (no UV component). Nikon oil NA 1.2 -
1.43 darkfield condenser, Zeiss 40x NA1.0 oil objective. Nikon
D50 DSLR, 2 sec exposure. Zeiss 4:1 projection eyepiece.
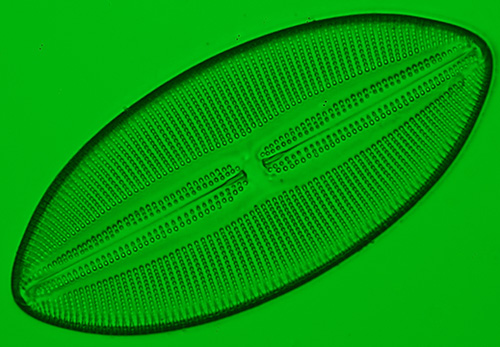
Diatom
Navicula lyroides, Klaus Kemp test plate. Zrax. Two image
stack.
Green LED. Nikon condenser, Zeiss 25x NA0.60 objective. Nikon D50 DSLR, 1/2 sec exposure. Zeiss
4:1 projection eyepiece. (LED 5 mm, 20 degree beam, 525
nm, 15 Candelas, eBay sourced Ł2.99 for 10.)
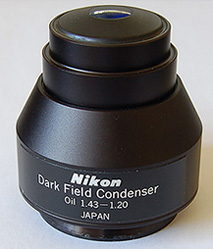 The high NA 1.2
- 1.43 of the Nikon darkfield condenser also allowed a variation of the popular
'COL' technique to be tried, i.e. circular oblique lighting by
using water not oil immersion with the condenser. This gave a narrow ring
of light just inside an NA 1.3 objective's back focal plane, thus
exploiting its near full NA. Coupled with the blue LED 470
nm, the combination suited some test diatom studies.
The high NA 1.2
- 1.43 of the Nikon darkfield condenser also allowed a variation of the popular
'COL' technique to be tried, i.e. circular oblique lighting by
using water not oil immersion with the condenser. This gave a narrow ring
of light just inside an NA 1.3 objective's back focal plane, thus
exploiting its near full NA. Coupled with the blue LED 470
nm, the combination suited some test diatom studies.
This is a technique Ted Clarke (USA) encouraged me to try
with this condenser as he has used it to good effect with a LOMO darkfield oil immersed
NA 1.2
condenser with a LOMO NA 1.3 apo objective. (Water is required for the higher
NA of the Nikon condenser). Paul James has an excellent suite of Micscape articles
on many aspects of COL.
The
technique does have a low tonal range cf. conventional oblique, so tonal balance
would normally be adjusted. See examples below using this technique.
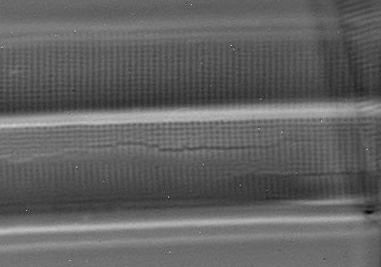
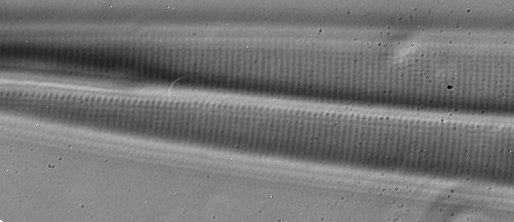
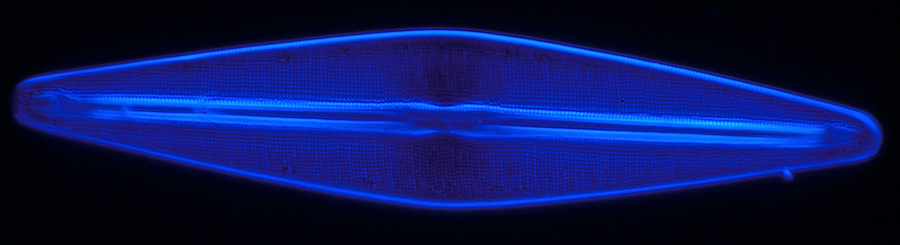
High
NA COL: Above:
Amphipleura pellucida. Resolving the transverse striae
(seen vertically in above images) to punctae is regarded to be near the limit of light
microscope resolution. With high NA COL
a Zeiss 100x NA 1.3 Neofluar objective is close to punctae resolution, LED 470 nm (blue,
no UV). The full annular ring of light doesn't stretch the camera's
sensitivity as much as conventional directional oblique may
do.
Left: Victorian mount strew by 'S S Pilgram
North Wales, Hyrax'. Specimens typically 140 µm long. Out of
camera image crop.
Right:
Klaus Kemp '8 form test plate', Hyrax. Specimen 90 µm long.
Out of camera image crop with slight tonal balance adjust.
Opticstar
PL-130M monochrome camera.
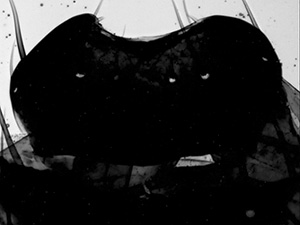
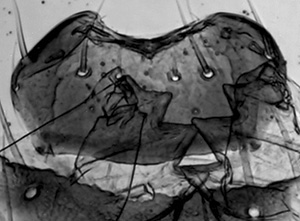
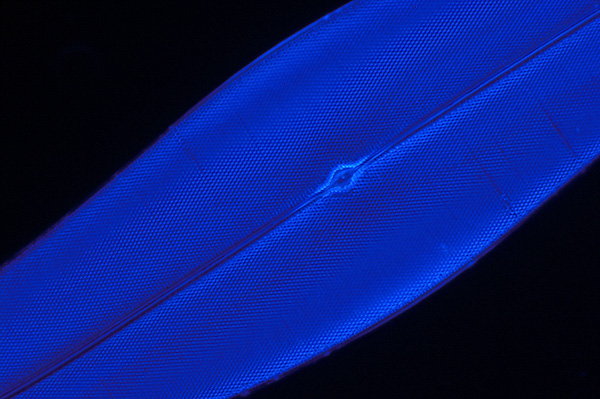
Near
infra red: Cinnabar
moth head, Nikon 4x NA0.1 objective, NBS slide. Left: visible light,
right - near IR LED 880 nm.
(LED details: Siemens SFH487P, 3 mm
envelope, typically Ł0.88, 130 degree beam - for low power work,
I prefer a wide beam).
Near
IR is useful for studying subjects where the loss of resolution
from the longer wavelength isn't important e.g. the gross structure
of the dense exoskeletons of some insects. There's no visible image
of course with near IR (and eyepieces shouldn't be used) but the live
view of the camera allows all microscopy work.
Comments to the
author
David
Walker
are welcomed.
Acknowledgements:
Many thanks to Klaus Kemp for his excellent diatom test plates and type
slides (available from
his website www.diatoms.co.uk),
and for making them so affordable to the hobbyist.
Also
thanks to Ted Clarke for personal emails where he has shared his
skills and for encouraging me to try the high NA COL technique. He has shared
his use of the LOMO stand and its NA1.2 darkfield oil immersion for COL with
a 90x NA1.3 LOMO apo in a recent presentation at Inter
/ Micro 2007 entitled 'Using the E330 DSLR camera with compound and stereo
microscopes'. The use of COL formed part of the presentation where
he showed the ability of the 'live view' mode of the Olympus E330 DSLR
to fine focus difficult subjects, e.g. the striae of Amphipleura pellucida
on the camera's LCD screen. Update Aug. 15th. Ted Clarke has kindly allowed
Micscape to host a copy of his Powerpoint presentation of his Inter / Micro
lecture and can be dowloaded here,
(file 3.6 Mbytes).
Safety
notes: From
the author's hobbyist perspective, trying to establish what is a safe eye exposure
off and on 'scope from both an intensity / wavelength perspective for the many
LEDs on the market can be complex, so it's best to err on the side of extreme
caution with high intensity LEDS and especially any with wavelengths approaching
or exceeding the boundaries of the visible light spectrum (near UV and near
IR); we've only got one pair of eyes!
On
a microscope a live view webcam and computer screen can become your eyes and
with common sense and awareness of an LED maker's guidelines and those from
other authorities, high power LEDs can be and are being used safely by many
hobbyists but not suitable for unsupervised youngsters.
General
guidelines, please see the articles linked to:
Modern visible light LEDS and
those required to give a good camera sensitivity on a microscope at high mags
and using 'light hungry techniques' can be very bright and potentially
dangerous
to view directly both on and off 'scope, but especially off 'scope as they are point sources.
Apparently the eye becomes increasingly insensitive
to shorter or longer wavelength extremes of the visible spectrum so visible light LEDs such
as blue (no UV) need to be used with care. (For eye sensitivity to colour,
see 'The joy of
physical perception' an online book by Peter Kaiser.)
This
article High-Power LEDs Pose Safety Hazards on
the Photonics website by G R Davies is invaluable reading. (With thanks
to the Yahoo Microscope group members for highlighting it.)
My
own view is err on the safe side and do
all LED microscopy studies with potential safety queries with a webcam,
which often have good sensitivity to shorter wavelengths (and
longer wavelengths if no IR blocking filter) and can be used entirely for all studies
after setting up in brightfield.
Check
the maker's spec sheet for short wavelength LEDs e.g. deep blue / violet to
be aware if any near UV component. High power near IR LEDs also need caution
from inadvertent viewing with eyes.
An LED
with any UV component must not be used for visual work
but only with a suitable camera with direct stray light from the microscope blocked. Near
IR should also be used only with a webcam. (A
maker's
spec sheet (ETG-5UV400-30) for a 0.7
Candela 400 nm LED i.e. on the near UV / visible light border, has warnings
of even brief eye exposure.)
Disclaimer:
The author, site contributors, and site owner (of Microscopy-UK / Micscape, OnView.net)
accepts
no responsibility for any eye or other damage by using LEDs. It is up to the
user to adopt appropriate
safety precautions for an LED's intensity and/or wavelength as recommended by
the maker or other suitable authorities.
© Microscopy UK or their contributors.
Published in the June 2007 edition of
Micscape.
Please report any Web problems or offer general comments to
the
Micscape
Editor
.
Micscape is the on-line monthly magazine of the Microscopy
UK web site at
Microscopy-UK
© Onview.net Ltd, Microscopy-UK, and all contributors 1995
onwards. All rights reserved.
Main site is
at www.microscopy-uk.org.uk
with full mirror
at www.microscopy-uk.net
.