Notes
on digitising and rejuvenating
slide film photomicrographs
by David Walker, UK
|
|
Notes
on digitising and rejuvenating by David Walker, UK |
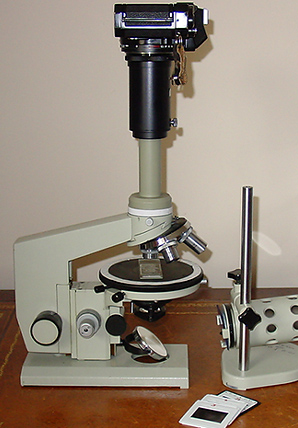
My film photography through the microscope goes back some years and use a Nikkormat FT3 body which has mirror lock but the standard focussing screen is less than ideal. This sits atop a LOMO Biolam using their achros / planachros, external lighting and a visual eyepiece for projection (above). Not the finest photomicro' setup admittedly but it's all the more satisfying when I occasionally get a good image!
For projection or straight printing, a photomicrograph slide has to be close to spot-on i.e. correct focus, colour balance, exposure, so I've got a large collection of slide images that have little direct use. But the advent of increasingly affordable digital imaging offers a potential new lease of life to some of these images, as once digitised all the well known editing techniques can be brought to bear to pull a better image back. This can be worthwhile if a prepared slide is no longer available or the subject was live and can't be rephotographed.
Many prosumer cameras can do a good job of digitising a slide and the camera maker's or third party slide copiers are available for many models or a DIY macro set-up can be devised. Seven to eight megapixel digicams with good macro for less than £300 are readily available. For more professional digitising or where large prints are desired a dedicated film scanner could be sought. The best way to buy a scanner is often secondhand as even the latest model may devalue by half or more, even earlier models sell for a fraction of their new price.
An advantage of digitising film with a scanner rather than a digicam is that the former are capable of providing larger images (e.g. up to 40 Mpixels for a 5400dpi scanner) which can be useful for larger prints or if a publisher takes an interest in an image. Modern scanning software also has features to remove dust, scratches, recover the colours from fading film and grain management (e.g. ASF's (now Kodak) ICE, ROC and GEM suite) so older slides that may look unrecoverable may be able to give an acceptable image. On the odd occasion I do need a large multimegapixel image I can use film in the knowledge that the image no longer needs to be spot on. For users without scanning equipment a PhotoCD ordered at time of developing can also be quite economical.
I've been surprised how a quite reasonable digital image can be pulled back from rather grim slides. Below is a selection of 35mm photomicrographs to demonstrate the improvements that can be made after digitising (in this case from an early PhotoCD I had made of some slides). These images can then be used for prints, web use etc. The details of the image manipulations will be familiar to users of Photoshop or other image editing software. Paul James in a two part Micscape article gave a good description of these features. (See Part 1 and Part 2).
Needless to say the manipulated images are for aesthetic use, imaging for scientific purposes where it is critical that original details aren't altered or artefacts introduced needs to be much more rigorous but outside the scope of this article.
As an aside, printing out the final digital images doesn't necessarily need your own colour printer which with their often expensive consumables can make each print poor value. A cost effective way for occasional prints is to send the images online to one of the printing houses. They are photographic not inkjet prints and can give very crisp results usually by return of post. (e.g. in the UK www.bonusprint.co.uk, a 6x4 inch print costs 12 pence and a 10x8 print £1.20). On the spot printing facilities in high street photo outlets are another option.
Colour balance
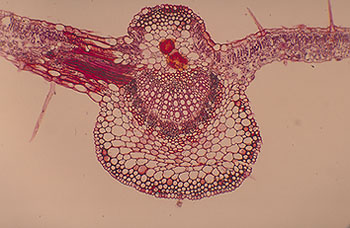
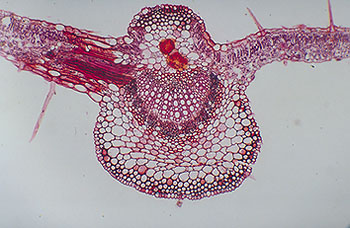
On older slides the brown oxidation of the mount may be quite extensive (below left) and can almost mask the original colours or stains. In Photoshop Elements the feature Enhance / Color / Color Cast is a one mouse click correction of the desired area. The example below has very pronounced oxidation so correction is unlikely to retrieve the accurate colours but it's an improvement to give a feel for the original.

African mahogany, stained, unknown mounter.
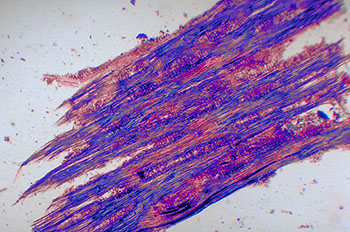
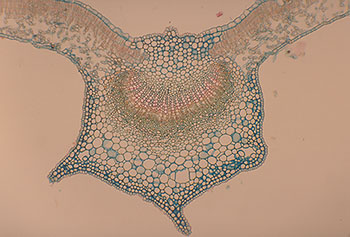
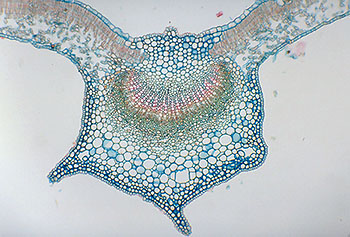
Tungsten balanced slide film tended to be too expensive for my use so I always use daylight balanced film. A disadvantage is that the filtering and lamp temperature only has to be slightly incorrect to give a noticeable colour cast, i.e. reddish or blueish. This is what happened in the example below. This lesser colour cast when corrected is more likely to retrieve an image closer to the correct colours.
Hibiscus,
T/S leaf, stained, Biosil slide.
Convert to grayscale
In the example below, the cast was too close to the colour of the subject for the correction to work. In this case, where there is little colour information converting to greyscale is a better option. There's a variety of ways of converting digital colour images to grayscale in Photoshop and similar software and has been widely written about. See e.g Russell Brown's downloadable pdf article on the Adobe website.
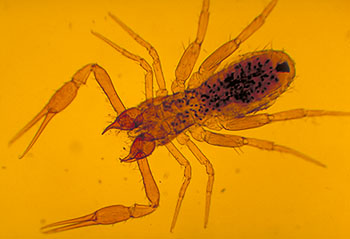
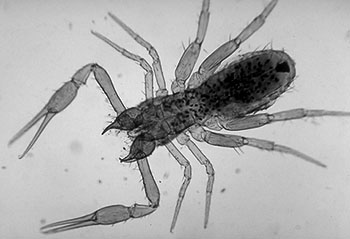
Pseudoscorpion,
labelled 'Chelifer', unknown mounter.
Nov.
6th correction. Thank you to a reader who kindly tells me that the genus is
Chthonius not Chelifer.
Contrast / brightness / tonal levels
With only a few successful images per roll of film I quickly changed to cheap drugstore branded slide film rather than the expensive brands. This kept costs down but did find that even correctly exposed images often didn't have the punch or crispness of higher quality film. The Levels feature in software to adjust highlight, midtone and shadow detail as well as brightness, contrast and saturation can bring some punch back into a thin slide.
Adjusting the tonal balance may emphasise any uneven lighting. Bucket fill can correct this but the parameters have to be chosen with care to ensure that the edges of a subject aren't corrupted. Or uneven areas can be painted or cloned out, which can also be useful to remove unwanted bits in a background
In the example below a colour cast and thinness due to slight overexposure and cheap film was corrected.
Apple,
T/S leaf, stained, Biosil slide.
Grain
Many of the cheaper films I've used weren't the finest grained and some brands were notoriously grainy such as certain Agfachrome stock. Grain can be very noticeable in scans and even the finest grain film can show quite considerable grain when scanned, particularly if using a scanner without a diffuse light source option. On my Minolta 5400 scanner there is a 'grain dissolver' function which diffuses the light but prefer not to use it as it softens the image. Software such as Noise Ninja and in this example Neat Image can do an excellent job of removing grain (and noise in digicam images) from scanned images without unduly affecting the image itself. The software is very affordable and have many parameters to optimise the noise and grain removal.
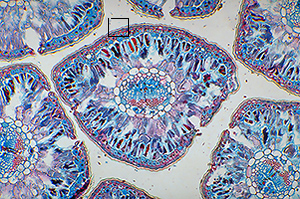
A
resized 3072x2058 scan. The small box middle top shows crops of
masters
below. (Biosil slide, stained blue atlas cedar T/S leaves.)
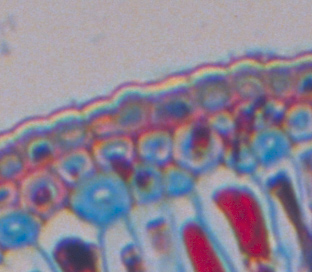
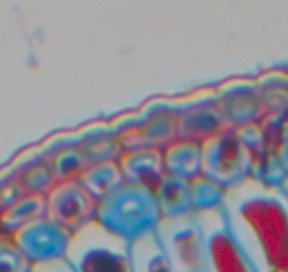
Left:
Crop from master of original scan. Right: Crop of similar area of full scan
processed with default settings in Neat Image software.
Cropping
The subject may not fill the film area or undesired features may be present so cropping can improve this. In the example below after cropping and colour cast correction the true green of the desmid couldn't be guaranteed so a greyscale image was a better option.
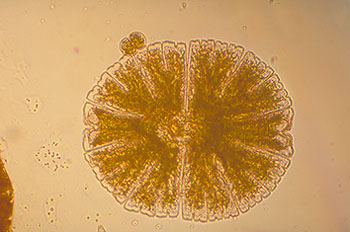
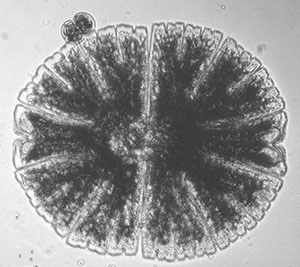
Desmid,
Micrasterias, unknown mounter.
Fun with effects and filters
For aesthetic purposes the corrected image can be a start for further tweaking to obtain interesting images. The original below, after colour cast correction and level adjustment is OK but not particularly striking.
The Emboss filter has been dubbed the 'poor man's DIC' and can be used to good effect with suitable images (see Mike Dingley's Micscape article for excellent examples). It's worth trying with subjects with well defined geometric detail such as plant sections.
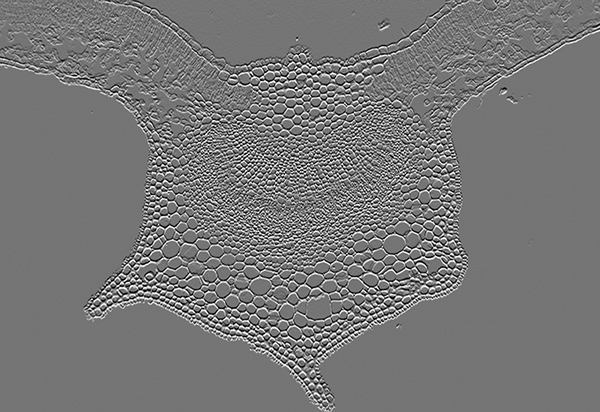
The Invert Color feature can work well with brightfield subjects as a 'digital darkfield' type effect is created.

For further examples of imaging effects see Richard Howey's Digital Photomicrography Micscape article.
Comments to the author David Walker are welcomed.
Published in the July 2005 edition of Micscape.
Please report any Web problems or offer general comments to the Micscape Editor .
Micscape is the on-line monthly magazine of the Microscopy UK web site at Microscopy-UK
© Onview.net Ltd, Microscopy-UK, and all contributors 1995
onwards. All rights reserved.
Main site is
at www.microscopy-uk.org.uk
with full mirror
at www.microscopy-uk.net
.