TOPICAL TIPS
an annotated list of on-line links
and bibliography on...
MINI-AQUARIUMS, MICRO-AQUARIUMS, HANGING
DROPS, WET CHAMBERS, AND
ELEMENTARY COMPRESSORS
First Part
Walter Dioni Cancun,
Mexico
|
Without publication, we are doomed to repeat the same mistakes and make the same discoveries "ad infinitum, with a poor vision of the world, stuck nose to tail in a flock of sheep. G.Couger, 2006 |
INTRODUCTION
There are at least 2 categories of instruments referred to as Micro-aquaria.
Many photographers of small aquatic animals (fish fry, mosquito larvae, larvae of other aquatic insects, and other small animals or plants) use what they call "micro-aquaria. An example is here
http://home.earthlink.net/~photofish/FreeSwimming.html#top
These are generally small containers, which can measure from 7.5 x 7.5 (rarely smaller) to sizes of 10 or 15 cm side.
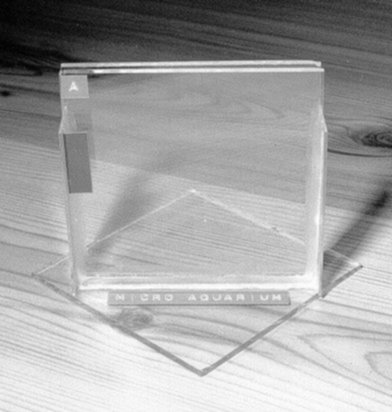
For the macro-photographers, or the amateur microscopists they are relatively easy to build auxiliary equipment, for which there are even commercial versions. They can be seen as micro-aquaria, compared with the true aquariums that amateurs use for breeding and exhibiting their plants, fish and other aquatic animals, whether freshwater or marine. Usually these smaller tanks are of very shallow depth (between 0.5 and 3 cm) to limit the movement of their inhabitants and keep them in the focus of the camera, which is why they are built. A good example is the following due to Jean Legrand (jlegrand@wanadoo.fr)
Another one is suggested by Paul Davidson which was commented on http://media.www.florala.net/media/storage/paper293/news/2003/10/16/FrontPage/Better.Than.A.Chia.Pet-530735.shtml
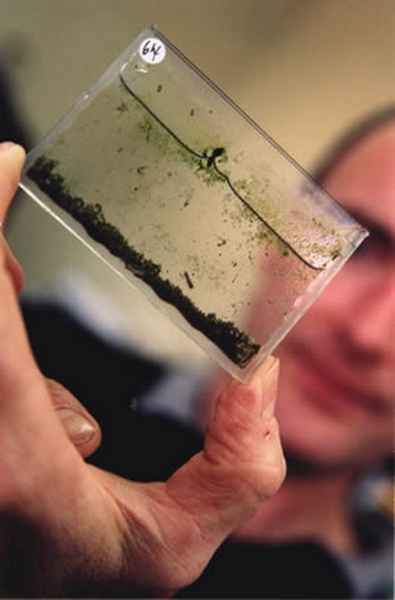
The picture was taken by Emily E. Godwin and was published in the referred site of the University of North Alabama
Of course I think that both, and many similar ones, would deserve another name. Maybe a Mini?
But the name does not interfere with the enormous utility of these small instruments that can be used in the laboratory or in the classroom, on the table, or even in the case of the Davidsons aquarium, lying on the stereoscope stage.
They could even be sources of material to seed the micro-aquariums we review now.
See also:
http://hubcap.clemson.edu/~jwfoltz/Courses/WFB493PH/subjects/macro/aquatic/small/aquatic.htm
NOTE: The pictures with no cited origin, were made for this publications by Axel Quarchioni, using C4D. I am grateful for his generous contribution of personal time stolen from his family.
MICRO-AQUARIA
The MICRO-AQUARIA to which we refer hereafter are much smaller, because they are designed to observe live microorganisms directly on the microscope stage. The primary aim of the various structures is to keep alive the observed organisms for a long time, in order not only to investigate their morphology and behavior, and photograph them, if possible, but to observe and learn in detail their reproduction, development, or some aspects of their physiology. I have gathered materials from many sources. I comment on the proposals, and when possible I add a link. If no link added, the proposal could be mine. I also use micro-aquaria!!
There are a number of tips scattered throughout the Net (and of course, in most books on microscopy, old and new, for both beginners and professionals). I found it interesting to collect in one place the reference to over 22 different basic structures (many with several derivatives) which are, all of them, proposals for a single purpose. I had not made an exhaustive search (micro aquaria has 5,860,000 links in Internet), but almost any one reference, turns out to be a link to what I call a MINI AQUARIUM. Even if you limit the search including microscope in the browser, you are offered more than 400,000 references ... most of them MINI, and thus my list is most probably not complete. I offer here only about 30 links. Any way, I would start with:
WET MOUNTS - Although, as we shall see, they are not micro-aquaria, because they do not comply with the important objective of long-term observation, abusing a little of the term it can be said that the most simple version of a micro-aquarium, is commonly known as a wet-mount. It is really a short-lived micro-aquarium, and is perhaps the technique more described, annotated and discussed, and certainly the first that young microscopists try, and the more used by the experienced ones. If I describe it here is only as a background, and to be able to compare it with their long-lasting alternatives.
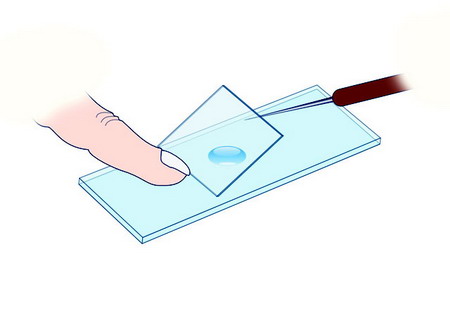
1) A very clean slide is placed on a flat table and a small drop of the medium containing the subjects we want to observe is added at its centre (Calculated according to the thickness we want the preparation to have, and the size of the coverslip which will be used. A matter of experience of course). A coverslip is placed over the drop with the main purpose of turning it into a thin film of equal thickness across its entire surface, and to protect eventually the objectives of the microscope.
 2) For a good
practice it is discouraged to drop vertically the dry coverslip on the mount.
Usually this results in a bad location of the coverslip and in the production
of air bubbles that are trapped beneath it.
Instead it is preferred to support a border of the coverslip on the
slide, generally maintained in position with the index of the left hand, and lay it
down carefully, with the aid of a mounted needle, until it relies entirely
flat. This prevents trapping air. But with some subjects that
may shift toward the edge opposed to the first contact point.
2) For a good
practice it is discouraged to drop vertically the dry coverslip on the mount.
Usually this results in a bad location of the coverslip and in the production
of air bubbles that are trapped beneath it.
Instead it is preferred to support a border of the coverslip on the
slide, generally maintained in position with the index of the left hand, and lay it
down carefully, with the aid of a mounted needle, until it relies entirely
flat. This prevents trapping air. But with some subjects that
may shift toward the edge opposed to the first contact point.
3) A second technique of applying the coverslip is to calculate a smaller drop to be put on the slide, and deposit another drop even smaller on the coverslip. This is reversed, so that the drop is hanging, and approached down horizontally, with care, until the top drop makes contact with the bottom drop, and until it rests fully supported on it.
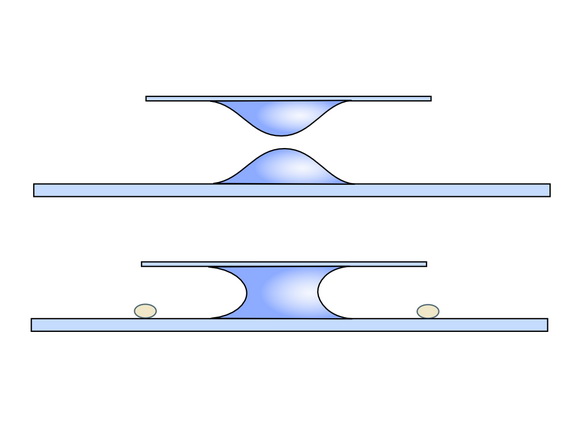
This second technique, usually called of two drops also ensures the absence of bubbles, but has fewer tendencies to move the subjects contained in the bottom drop.
Both features make this technique still more important and appropriate when it is intended to make definitive or semi-definitive preparations, ensuring a better distribution of the mounting media with minimum disorder of the material.
In any of the two cases, if you acted correctly, a preparation is obtained in which the water drop extends to the four edges of the coverslip without flowing outside of this. So, capillarity maintains an environment which could be easily explored with the low and middle power objectives. If the size of the water drops were calculated wrongly, water goes to flow out of the coverslip, the preparation will be very thick and the coverslip would be "swimming" on the surface moving unpredictably. The remedy is to prepare a long triangle of filter paper, or any absorbent paper, and to touch the side of the coverslip with the end corner of the piece. This will facilitate flow control and does not create too fast currents, nor remove fluid in excess.
If you want to use the 100x OI objective, which may be necessary to examine small and intricate details of many subjects, a trick should be used which is to secure firmly to the slide the four corners of the coverslip using some cement. Some time ago small balls (or droplets of molten heat product) of paraffin, wax and mixtures of both, or even cements as VALAP (vaseline, lanolin, paraffin, melted together in equal parts) were used.
Heat the end of a wire in a spirit burner (or a cigarette lighter), submerge it in the paraffin. Leave drain excess for a second and touch the four corners of the coverslip. If the coverslip and slide surface were dry, the waxes make a good seal.
Today it may seem easier to put in every corner of the coverslip, a small drop of nail polish which dries quickly, and ensures to avoid the displacement of the coverslip due to the viscosity of the immersion oil. But, although this is quick and really effective, the product must be tested, because the enamel solvents are generally toxic to the subjects to be observed. If this is the case, the safe alternative is to return to melted paraffin or Valap.
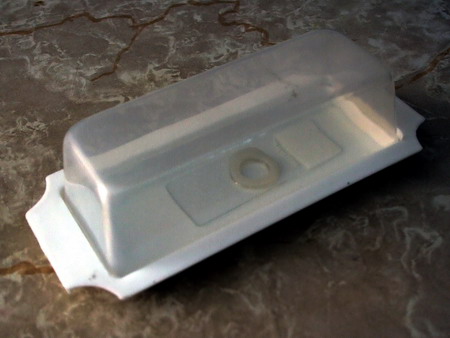
So structured, this fresh preparation, or temporary wet mount, will last a couple of hours. You can add some time putting the wet mount in a humid chamber when you need to leave it unattended. Take some container with a lid, which can receive your slide, put an absorbent paper on the bottom, put over this some water drops and the preparation and cover tightly. For a tight seal put some Vaseline around the rim of the cover before to apply it to the base.
 Often evaporation reduces the volume of the drop,
which, with free unsupported coverslip it is often desirable, because it compresses
the subjects under observation, making them to move slowly, or to increase its
transparency, or you can discover their internal structure more easily.
However, this trend may be exaggerated with time, and the micro-organisms could
be crushed, or could produce the absorption of air by the edges of the
coverslip. The latter can be corrected if, with the fine tip of a micropipette,
or a needle, or even in an emergency, with the tip of a toothpick dipped in the
appropriate liquid, you add periodically a small drop of water, to maintain the
initial volume.
Often evaporation reduces the volume of the drop,
which, with free unsupported coverslip it is often desirable, because it compresses
the subjects under observation, making them to move slowly, or to increase its
transparency, or you can discover their internal structure more easily.
However, this trend may be exaggerated with time, and the micro-organisms could
be crushed, or could produce the absorption of air by the edges of the
coverslip. The latter can be corrected if, with the fine tip of a micropipette,
or a needle, or even in an emergency, with the tip of a toothpick dipped in the
appropriate liquid, you add periodically a small drop of water, to maintain the
initial volume.
This wet mount itself turns with little effort into an interesting experimentation aquarium.
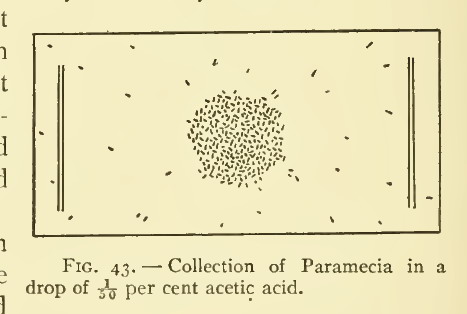
An interesting detail that helped the first microscopists to objectify the need for oxygen of the microorganisms, is that shortly after installation of the wet mounts, the ciliated protozoan, sooner than others, and after them many other organisms begin to agglomerate, forming a moving band around the air bubbles caught in the interior, and also along the open edges of the preparation, looking for oxygen.
This prompted the first researchers on the behavior of protozoa to make interesting experiments on quimiotaxis. Placing a drop of a solution of the chosen substance in contact with an edge of the coverslip, we can observe the effect of attraction, or vice versa, repulsion, and even toxicity, of the product tested.
The taxis are oriented reactions of mobile organisms to different stimuli. A definition of the various taxisms which have been investigated in microscopic protista and invertebrates can be found on Wikipedia (http://en.wikipedia.org/wiki/Taxis). The theme was taken seriously when the study of these phenomena, which are today only treated roughly in the textbooks, began. A book that some readers with inventive enough to adapt their micro-aquaria for these investigations will surely love, is the classic "The behavior of the lower organisms" by HS Jennings (1906). An electronic facsimile can be downloaded for free from http://www.biodiversitylibrary.org/item/22754
|
|
|
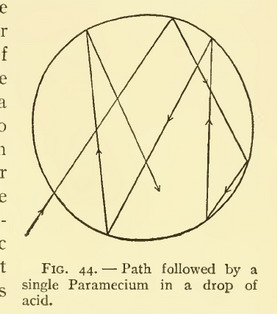
The how and why of the response of Paramecium to diluted acid
If it is not still now in the web, Paramecium taxis deserve some short videos
In some cases it may be useful to change a part or all of the liquid in the preparation. It is relatively easy to do this if the subject is stationary or is stopped by the weight of the coverslip, in which case a drop of medium is added to one side of the coverslip while liquid is absorbed by the opposite edge. If the subject(s) move freely one must be very careful, because diffusion currents can drag materials into the absorbent paper. Use a low power, and watch the behavior of the organisms.
The wet mount easy technique has also its special appeal for the beginner microscopist: allowing them to experiment more or less easily with the studied subjects. For example, if while observing a preparation with abundant paramecia (or many others of the numerous species of ciliates) fine coal dust or finely powdered Carmine is added to it, it will be seen how the ciliates ingest particles through their cytopharynx, accumulate them in the digestive vacuoles, and circulate them through their cytoplasm, to expel them eventually by the cytopige. This a document http://www.photomacrography.net/forum/viewtopic.php?t=7042
If you want to go one step further you can even witness the chemical changes that occur in these digestive vacuoles. Instead of feeding paramecia with carmine, offer them milk or yeast cells stained with neutral red or congo red.
A good image that shows the cycle is on line on page 139 of http://www.sinauer.com/brusca/BruscaCh05.pdf
Both stains are pH indicators and his changing colors allow the observer to know the pH of the vacuole. See
http://www.photomacrography.net/forum/viewtopic.php?t=6668
In a future article I will describe in more detail other techniques, not well documented in the web, to study the well known but still intriguing Paramecia.
Although obviously "wet mounts are environments where our microorganisms are kept, moving and acting in the small medium, allowing us to interact with them, the effort and care required to maintain optimal operating conditions is huge, and there is no possibility of leaving it unattended for some long time, without the danger of it drying out, killing the subjects that interest us.
This is why the micro-aquaria and wet chambers were invented
There is a difference between the two. The micro-aquarium is a space between the slide and the coverslip, filled by water with the subjects that we want to study, and generally closed on their four sides to prevent the drying out of the sample. Sometimes one side is left completely or partially open for the operator to be able to interact with the interior of the aquarium.
Wet chambers are also a closed preparation, but one in which a drop of liquid is supported in a cavity full of air, which ensures a much more prolonged observation allowing a free exchange of gases between the drop and the surrounding air
TRUE MICRO-ACQUARIA
From the simplest to the most complex, all micro-aquaria attempt to provide a closed environment of much greater permanence than the "wet mount", so allowing sufficient opportunity to study in detail the morphology and behavior of organisms with the widest possible range of objective powers.
VASELINE MICRO-AQUARIA - is, by far, the best known, versatile and therefore very used method.
An absolutely logical extension of the temporary preparation technique is the "vaseline microaquarium. The need to avoid evaporation logically leads to close the edges of the coverslips, and the easiest way is to use a common-use product, which does not contaminate with toxins that they can disseminate in the water we are watching, and which can be easy to apply.
Normally they can be prepared directly from solid, soft Vaseline, without scents or added drugs.
Keith Brocklehurst http://myweb.tiscali.co.uk/postalmicsoc/spagnetum.html proposes the use of a hypodermic syringe containing Vaseline to eject droplets of controlled size in the corners, (for temporary preparations and compressors) or lines of Vaseline to fix the sides (3 or 4) of the coverslip (to create micro-aquaria).
Don Williams advocates the use of a simple line of "soft Vaseline" around the coverslip. Argues that the micro-aquarium with its occupants (rotifers, gastrotrichs, etc.), can remain useful over a year. http://tech.groups.yahoo.com/group/Microscope/message/31073
and declares that having used almost any kind of wet-chambers, including some one with inlets and outlets to exchange media, he sticks to the simple Vaseline mount as the fittest for his objectives.
In
the following reference Dan Hollowday
describes the technique he is used to, spreading thinly Vaseline on his
forearm, to withdraw it as a thin border line with the edge of the coverslip.http://tech.groups.yahoo.com/group/Microscope/message/31110
I prefer to extend Vaseline on the palm of my hand, others use a fingertip or a Q-tip. The result is the same.
Of course, it is also possible (albeit somewhat more complicated) to melt the Vaseline over gentle heat. Just have a small jar with Vaseline semi-submerged in a slightly larger container, filled with warm water, and use a toothpick or a fine brush to put it along the edges of the coverslip, or alternatively on the slide.
Be sure that there is no water overflow around the coverslip. Bend a wire as an L. Heat the L tip and sink it into the solid petroleum jelly or paraffin, apply first a drop to every corner to fix it and then apply the tool to one edge of the cover to close it with a line of Vaseline. This is repeated for the opposite side. You can close 2, 3 or 4 sides to form micro-aquaria for different purposes. You can also use the paper clip gadget described when we treat Paraffin.
Vaseline used should be soft. You should leave a small open space on one side, through which water can evaporate slowly and spontaneously. In doing so the coverslip crushed Vaseline by its own weight, or aided by light tapping on its upper face with a thin blunt instrument.
(The Widgets proposed by Drewes can do the job http://www.eeob.iastate.edu/faculty/DrewesC/htdocs/toolbox-VI.htm)
The hole may be sealed with a small drop of Vaseline, when the optimal thickness of the drop, or when the desired compression of the observed organisms is reached.
This simple
technique also allows including small separators under the coverslip (hair,
glass fibers, bits of paper or sheet of plastic, small pieces of adhesive tape,
coverslip pieces, etc) with the aim of limiting the fall of the coverslip,
offering more space for relatively thick organisms such as the entomostraca for
example.
As described, this technique also lends itself to
compress the observed subjects under a fair control.
|
COMPRESSORS - I have recommended this technique, especially as a compressor, http://www.microscopies.com/DOSSIERS/Magazine/Articles/WD-STENTORS/Famille%20Stentoridae.html http://www.microscopy-uk.org.uk/mag/artnov04/wdstentor.html David Walker also mentions its use as a compressor in his article http://www.microscopy-uk.org.uk/mag/artapr08/dw-compress.html Although you do not have the finesse of setting of a mechanical compressor, like the useful mechanical instruments which D. Walker aptly reviewed in his article, these Vaseline or VALAP supported structures have in their favor the ease with which they can be prepared, the simplicity of its use, its relatively good efficiency, its dual use as a compressor and aquaria, ..... and its unbeatable low prices. |
Despite all, this work should be done with care, Vaseline can contaminate the objectives of medium or high powers, and eliminating it is tedious.
Note: if you want to avoid evaporation to obtain a long-term micro-aquarium, it is imperative to close the four edges of the coverslip. The problem is that as I understand it, solid Vaseline is impermeable to air. It is the material of choice to securely seal the connections of respirometers1,2,3 On the contrary Liquid Vaseline, some times called Petrolatum is permeable to oxygen and CO2. See 2
Theoretically, animals locked up in a completely closed solid Vaseline micro-aquarium should die by suffocation, unless you add enough filaments of algae, and preparations are kept in the light, for photosynthesis to occur. With enough organic matter to be processed by the bacteria, an aquarium with mostly bacteriophages and a few chlorophyceae will last longer. See final remarks.
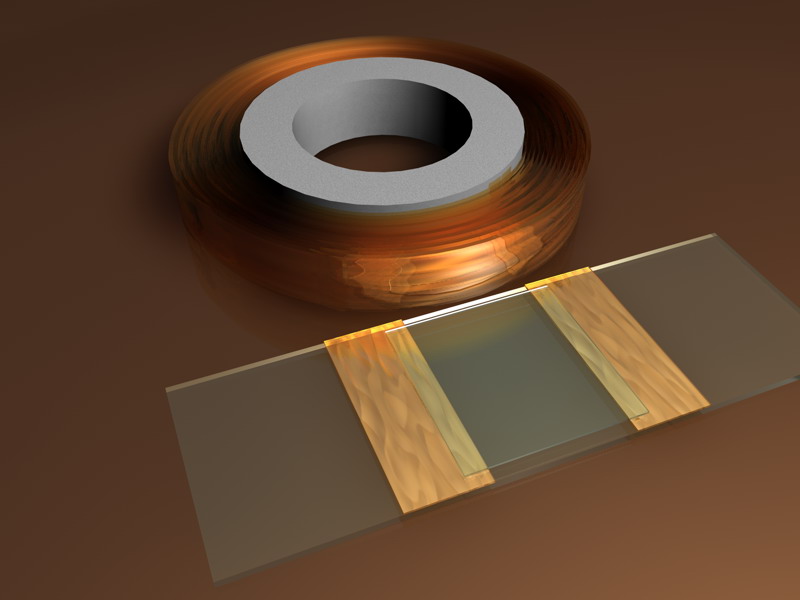
PARAFFIN MICROAQUARIA - A first version is the logical extension of the previous method: Instead of using Vaseline use valap, softer, or paraffin, tougher. This would be similar in outcome to the above technique. But the slides can withstand a more rugged manipulation, stay useful a longer time, and normally (like the anterior technique also) allows to retrieve the slide when it ceases to be useful.
A first technique is similar to that explained for the Vaseline, but it could be useful to have at hand a little gadget (useful also with Vaseline) to apply melted paraffin to the borders of the coverslip.
It is very useful to improvise the simple applicator described by Olivier Messmer in a correspondence of 11/08/04 to the Forum Mikroscopia. (http://forum.mikroscopia.com/index.php?sho...amp;hl=trombone))
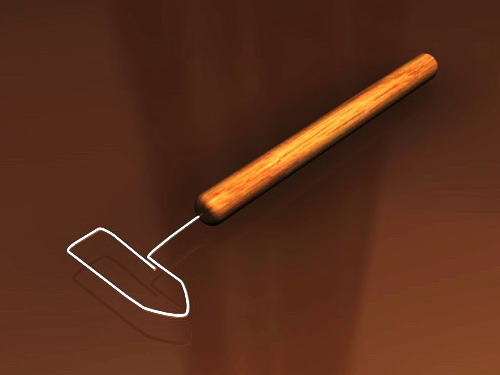
A paper clip of adequate size is formed as seen in the picture. It is heated, applied to a paraffin block to pick some melted wax, and used to distribute it over the coverslip edges. Their point is usefull to apply dots of paraffin to the corners.
The text in the above reference is in French, but the detailed images speak by themselves (and Google has a really useful translator)
A second technique can call more attention from those inclined to handicrafts
An aluminum or copper tube of circular section between 1.5 and 2 cm in diameter, or an equivalent square or rectangular section, always smaller than the coverslip which is intended to use, is cut in a 3.0 or 3.5 cm portion, and equipped with a handle that allows to manipulate it.
The lower end is moderately heated in the flame of an alcohol burner (or a hand cigarette lighter) for example, and then applied over a block of paraffin-wax or paraffin. Any of the products that are sold as votive lamps (very common in Mexico) or small decorative lighting candles, or simply a paraffin candle melted in an ad-hoc container, are useful. The wax melts and adheres to the edge of the tube, which is immediately vertically placed on the selected slide, preferably something cooled previously. It forms a fairly uniform paraffin edge.
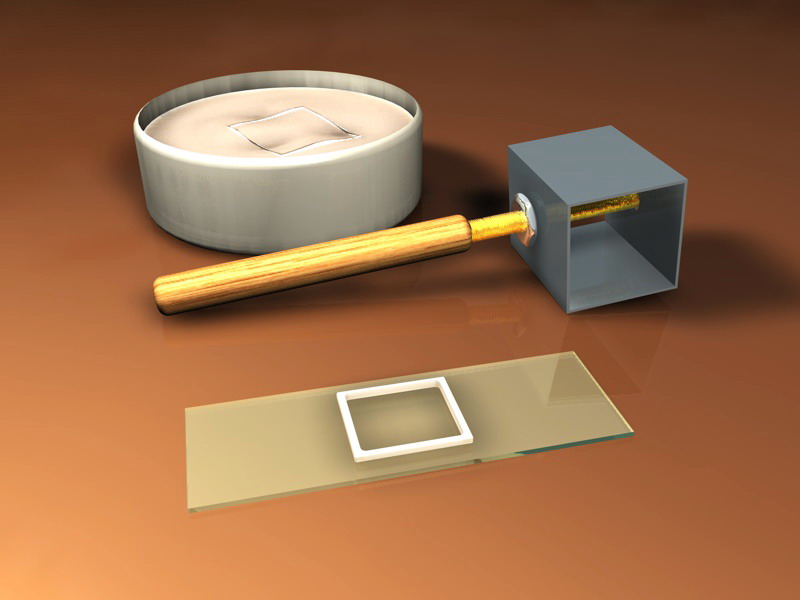
A few attempts will give the necessary practice. When paraffin is cold a very thin coat of Vaseline could be applied with a Q-tip to the rim of the cell and the coverslip could be applied. But if you want to get a more permanent seal you can slide the tip of a mounted needle (or that of the mounted paper clip) conveniently heated following the edge of the coverslip over the paraffin frame (without Vaseline of course).
As with the Vaseline seal, there is declared (Bertrand, 08/04, Mikroskopia, see anterior link), a long term (at least 10 days) permanence, with filamentous algae and protozoa included in the sealed water, even if paraffin is also impermeable to respiratory gases. See final remarks
A MICROAQUARIUM PERMEABLE TO GASES Ward Science, the company providing biological materials, sell a moldable silicon material called Culture Gum. As for the company instruction booklet, rolling a ball of this material between two fingers and placing it on a clean and dry slide allow us to compressed it using another moist and cool slide (to avoid cement adherence) until the desired thickness is reached, producing a film from which one can extract the center with a punch or a scalpel.
The obtained chamber serves as a micro-aquarium and can be closed with a coverslip. Ward instructions indicate that this material is totally permeable to the exchange of gases, allowing for maintaining active for a long time (¿?) the micro-fauna and micro-flora.
Silicon is reputed as fully permeable to gases4. I could not identify any easily obtainable material from other sources, with these characteristics. More approximate seems to be a silicone used mainly to make molds to cast chocolates which seems to have all the features of the Ward silicone molds, and certainly deserve a trial.
A trademark is "Silicone Plastique" produced by Culinart, which I found in the web. Though I only found another brand (AeroMarine), surely there must be more, sold in stores that offer products for pastry. It is a product of two materials that must be mixed. In the above-mentioned trademark, one is blue and the other white, and mix to produce a pasty material which allows to be shaped as you want and that in about two hours forges producing an elastic solid material.
Here are the two American brands I localized
http://www.jgreer.com/silicone%20page.htm?gclid=CLS786WvipwCFclL5QodBD4mXg
http://www.culinart.net/silicone.html
I have not tried any of this materials, I only think that they are most promising and very interesting.
The silicone sealants used on glass windows or aquariums, are soft and sticky, until they are set, and do not allow a manual molding. They are dissolved in substances such as acetic acid, with a very strong smell, and which are highly toxic to micro-organisms.
HOT RESIN MICROAQUARIA - in this line of thought Dan McNeil invented one useful and special chamber,
http://www.microscopy-uk.org.uk/mag/artmay07/dm-cells.html
The now common use of the hot resin guns as used in school or home-crafts and artisans crafts allowed him to build micro-aquaria, semi-permanent, and with easily controlled deep. Although the resins used may correspond to several different chemicals (EVA, polyethylene, polypropylene, polyamide, or polyester) the result is the same. The simple construction and the fact that the resin used is not toxic recommend testing this technique. The micro-aquaria are reusable. ¿are them gas permeable?
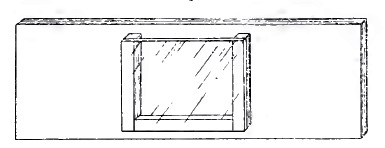
SCHAUDINNS AND LANGERONS ALL GLASS MICRO-AQUARIA
* Friedrich Richard Schaudinn (1871-1906), in the early days of protozoology and parasitology, published a much more difficult technique.** He makes to cut a square of approx. 17 x 17 mm on an edge of the slide (only one professional glazier will do this correctly) and cover both sides of the cavity with coverslips. Langeron, in his Précis de Microscopie recognizes the difficulty of constructing and manipulating such micro-aquaria on the microscope stage, due to the bottom coverslip bulging out of the slide.
* (Schaudinn identified the Treponema cause of syphilis, which was a terrible, frequent, and almost incurable venereal disease until the advent of penicillin)
** F. Schaudinn, Ein Mikroaquarium, welches auch zur Paraffineinbettung kleiner Objeckte benutzt werden kann. Zlschr. /. mas. Mikr., XI, p. 3-2G-0-29, 1891
A micro-aquarium, which also can be used to paraffin embedding of small objects
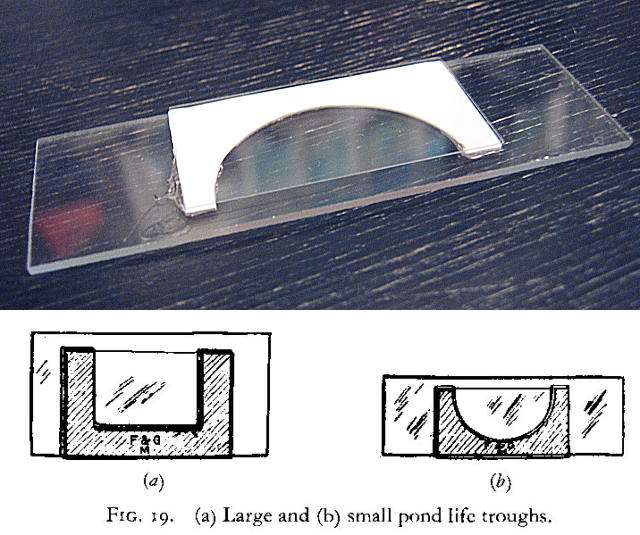
Langeron (1913) use a different approach. He recommends to build the microaquarium sticking to a base slide thin strips of glass, cut from another slide, to form three edges of the aquarium. A coverslip attached to these edges with Canada Balsam completed the instrument.
 For decades the idea was used often by researchers and writers of books on microscopy,
for professionals and beginners.
For decades the idea was used often by researchers and writers of books on microscopy,
for professionals and beginners.
I think that this makes a very deep cell (1000 microns or more) and I use of preference my shallow coveslip chamber.
Similar to this in general concept but very much wider is the Brian Danton stage microaquaria published in
http://www.microscopy-uk.org.uk/mag/artmar99/bdaquar.html
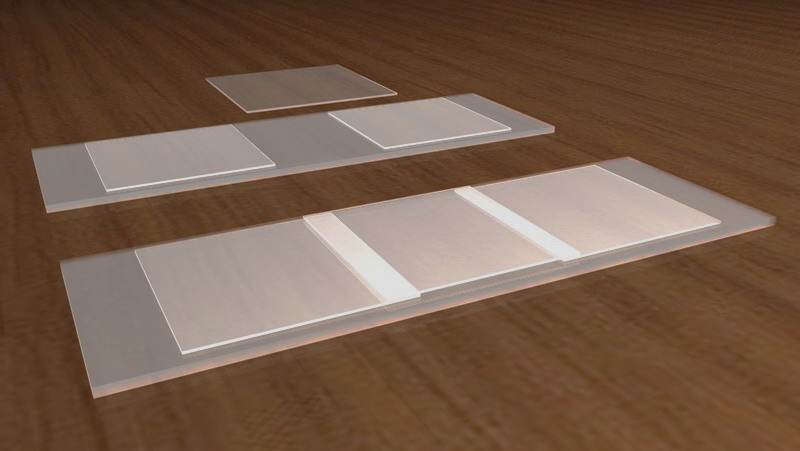
POLYSTYRENE MICROAQUARIA .- G. P. Mathews in his beautiful site
http://www.gpmatthews.nildram.co.uk/index_micro.html
proposes a different way to made thinner chambers, He cuts frames from polystyrene plates for crafts, which he found available in thicknesses of approx. 125, 250, 500 μ and 1.0 mm. He suggests leaving one side open in order to introduce or remove materials. These big micro-aquaria are very useful for example to study the reproduction of micro-crustaceans, micro-oligochaeta or rotifers, or to observe Hydra catching their preys.
The very large coverslip are expensive and difficult to find. Because most of these cameras are usually to be explored at low powers, I think the coverslip can be replaced by transparent plastic cut in various thicknesses from CD's boxes, or toys or electronic components packagings. Of course they do not have the optical qualities of glass, but can be useful for routine work with the 4x or 10x. May be not for photography of course.
Graham Mathews attributes the idea of such large microaquaria to "Garnet, 1953, in his book Freshwater Microscopy". Polystyrene, allows Mathews to design aquaria with much more surface area and a wide range of thicknesses.
FOAMY AQUARIA.- In the same style of thinking (to do simple what could be useful) Charles Drewes has published a set of what he called microtools One of them is a foamy well-slide.
http://www.eeob.iastate.edu/faculty/DrewesC/htdocs/toolbox-IV.htm
The normal thickness of foam (obtainable from home craft supply stores) is 2 mm, giving a very deep cell apt to be used with Cladocera, Copepods, or Ostracods, mostly to be observed with a Stereoscope. I dont know the material but it is made with EVA (ethylene vinyl acetate). The sheets have an adhesive back (paper protected) that allows attaching them easily to a glass or plastic support.
** SHALLOW COVERSLIPS MICRO-AQUARIUM.- Of the described micro-aquaria only the Vaseline and some paraffin ones made very careful can offer the very thin deep which allows the use of medium and high powers (but surely not the Oil Inmersion) to search the trapped organism from the upper to the lower deep of the cell. Thin cells of know and controllable deep can be built cementing two coverslips, (or appropiately broken coverslips) of the desired thickness, with Canada balsam, cyanacrylate or any other similar acceptable cement, at a distance such that another coverslip sitting over them forms a micro-chambers opened by two of its sides.
A very thin layer of soft Vaseline is distributed over the inside edges of the cemented coverslips. A drop, carefully calibrated, containing the organisms were placed in the center of another coverslip that will act as a cover.
The slide and the coverslip, are reversed with a quick movement, to prevent their displacement and gently dropped over the adhesive edges of the supports. With practice this produces a cylindrical drop, centered on the chamber, limited above by the coverslip and by the slide below, with the thickness of the coverslips used as supports (typically 170 μ+) and surrounded by air. One or both of the open edges of the camera can be sealed with Vaseline, Valap or Paraffin to prevent early evaporation of the liquid.
The camera can also be completely filled with fluid, which is easier to install, although you lose the advantage of the air chamber.
It is possible to produce these micro-aquaria in various thicknesses, thus containing different volumes, if you make the supports gluing coverslips one on top of other.
** PLASTIC ADHESIVE TAPE MICRO-AQUARIA - Instead of coverslips (170 microns thick) two bands of office adhesive tape, which usually have a thickness of only 50-60 microns, can be stick to the slide. As with the coverslip cells a very thin layer of Vaseline will help to set the upper coverslip, and fine Vaseline lines will complement the enclosure. The arithmetic is easy. Cells can be 50, 100, 150 microns simply by overlaying layers of tape.
In this same line of thinking Drewes ( http://www.eeob.iastate.edu/faculty/DrewesC/htdocs/toolbox-V.htm) proposes very useful adhesive tape tools to make cells that facilitate the work with micro-invertebrates, or studying or counting plankton, for example. Do not forget these simple and cheap tips, to replace (at amateur level) some expensive tools used by limnologist and planktologists.
** cardboard or paper .- it is not impossible. You can also use bond paper boxes the size of a coverslip, or slightly higher, with a central hole practiced with a very sharp punch, or cutting with an X-acto. The simplest cells are made by painting with scarce Vaseline the lower and upper sides of the paper, and sticking it to the slide and coverslip to produce a disposable chamber. A more definitive montage to help not only in observation but in the permanent mounting of certain invertebrates or other subjects, wet or dry, can be prepared by implementing the cells on the slides and soaking them with a mounting medium (balsam, dammar gum, PVA-G, nail polish), and letting them to dry so they can stay firmly attached, and waterproof. The depth of the cell is easily controlled using papers of different thicknesses, or by adding successive layers of the paper used. You can use these cells, both for temporary or permanent slides, using the same steps as with any of the previous deep chambers.
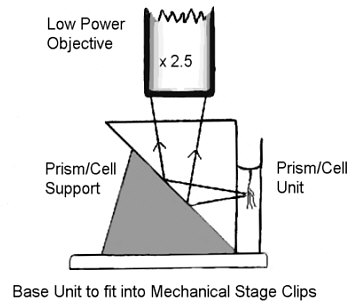
VERTICAL MICROAQUARIUM - One very special mention is deserved for the authentic micro-aquarium, that could be seen vertically on the stage with a low power objective, designed by Paul James.
Even if the article is easily reached I can not refrain to show a schematic of the ingenious gadget
N EXT MONTH THE Second part TAKES A LOOK AT WET CHAMBERS
APPENDIX - QUOTES
1) Broth cultures of Pneumococcus Type II (Strains R and G) were grown anaerobically. 0.5 cc. of sterile ox bile was added to 15 cc. of the anaerobic broth cultures in narrow tubes which were then sealed with Vaseline and incubated at 37ºC. for 12 hours.
http://profiles.nim.nih.gov/CC/G/M/C/B/_/ccgmcb.ocr
2) As a result of our experiments, we have come to the following conclusions: 1. Liquid paraffin oil, used extensively as a seal for anaerobic cultures and in gas analysis, has very little value in inhibiting the access of oxygen. Solid vaseline, on the other hand, forms an effective oxygen-resisting seal. The difference is due to the physical states of the substances at incubator temperature.
For the establishment of strictly anaerobic conditions in the culture tube, we would suggest (1) the substitution of solid vaseline for liquid paraffin oil as an oxygen-resisting seal;......
3) We also can use an anaerobic jar to culture anaerobic bacteria on agar plates. These jars are sealable and utilize a gas pack system to remove atmospheric oxygen in the jar. .......................... A methylene blue strip is included to indicate the presence of oxygen. It turns blue when oxygen is present. Finally, we use Vaseline in the jar lid to augment the seal to keep the oxygen out.
4) Some of the most useful properties of silicone include:
a) Thermal stability (Constancy of properties over a wide operating range of 100 to 250°C)
b) The ability to repel water and form watertight seals
c) Excellent resistance to oxygen, ozone, and sunlight
d) Flexibility
e) Electrically insulating or conductive, depending on structure and composition
f) Anti-adhesive
g) Low chemical reactivity
h) Low toxicity
i) High gas permeability
Text highlights are mine
I must not doubt about the statements in the above quotes. They are made by qualified scientists.
But, also, I can not doubt the published experiences of colleagues microscopists. Their statements are not theoretical, they were their personal experiences.
So I think this is a beautiful theme to be addressed by several skilled microscopists, checking the survival time of samples in microaquaria (not wet chambers), with or without chlorophyceae, adding only protozoa, or adding rotifers and gastrotrichs, or tardigrada, sealed with a variety of substances. Unfortunately it is out of my reach for the moment. Published results (Gordon Couger states a big truism, read it again) must to be of high interest not only for amateurs, but as a seed of ideas for the scientific minded. MICSCAPE is waiting...
Comments to the author,Walter
Dioni
, are welcomed.
MicscapeMagazine
Article
Library
Microscopy UK
Front Page
Published in the September 2009 edition of Micscape.
Please report any Web problems or offer general comments to the Micscape Editor.
Micscape is the on-line monthly magazine of
the Microscopy UK web
site at
Microscopy-UK
© Onview.net Ltd, Microscopy-UK, and all contributors 1995 onwards. All rights reserved.