|
Improving your Bench Microtome Page 2
Fix 1 - Chuck Play
Our first improvement will be to take out the sideways play in the chuck. This is the small shiny thing in the
very center of the microtome. It has a cross-hatched top face.
Slide this out.
Our objective is to be able to reinsert the chuck back into the tube so that it requires medium pressure to pure
it back in. Take note - we dont want to jam it in so hard that we're going to need a hammer and screwdriver to
knock it out again. The aim is be able to fit the chuch into the microtome so that when it is half-inserted, if
you hold and try to wiggle it from side to side - no perceptable movement can be felt.
Now how do we take up the slack? Simple... we have to make the chuck very slightly larger across its diameter!
If a picture truly does say a thousand words, then this one should say it all:-
Yes... we are going to use good old sellotape! Nice and cheap and ideal for our
purpose. The sellotape
needs to be wrapped arond the chuck approx. 1 to 2 times - depending on the thickness of your tape.
You will need a couple of goes to get this just right. Too much tape and you
will find the chuck is too tight in the microtome... too little and the chuck will still have sideways play. It
took me about 4 goes of putting the tape on, offering the chuck up to the microtome to test its snugness, cutting
the tape off and starting again and so on until I got a real neat fit.

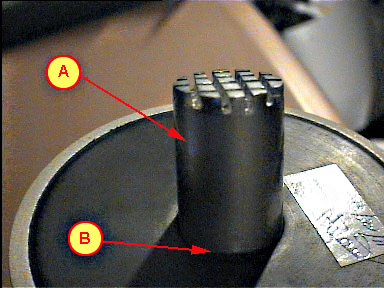
Watch out that the tape goes on very smooth and avoid crinkels and ripples
such as the one about to form here at (A)
if I'm not careful. Watch out that the tape does not overlap the toothed area (B). The edge of the tape needs be to clear from the bottom of the cuts in the cross-hatch
face.
If there is still play in the chuck when you try and insert
it into the microtome, don't just simply add more tape on: take the strip off and start again!
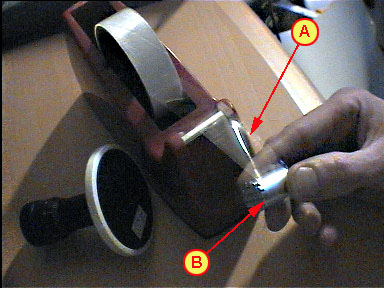
You can see my finished one below as I start to insert it back into the microtome.
See how smooth the surface of the tape is (A)
: no ripples or crinkles! And the tape is firmly pressed around the circumference of the chuck. Make sure there
are no over-hanging bits of tape down here (B)
that could fold over and jam the chuck as you put it back into the tube.
When you are comfortable you have carried out this improvement - we will move
on to improvement number 2!
(continue...)
|