Filter Holders, Filters,
and More Filter Holders

by Rosemarie Arbur, Oregon, US
  
One reason I corrected my built-in illuminator's yellowish tinge with a blue filter installed beneath its collecting lens was that I had already developed a mild filter-mania. The tell-tale symptom: worrying about using "just one more" filter. A blue one to counteract incandescent light, a green one to let my achromats perform optimally, a dark-field stop to see transparent protists better: where would I put them all? The filter holder below my Abbe condenser holds only one filter. What if I want to use my green filter and a dark-field stop? What if I want to use polarized lighting? Or "optical staining"? I was opposed to balancing filters precariously on top of the collecting lens (on aesthetic grounds and to prevent scratching). On moral grounds and to prevent poverty, I had kept myself from seeking any commercially available solutions. 

microscope substage
This article presents some low-cost answers to my questions so you can fabricate your own. The many illustrations and explanations serve clarity, but especially where they seem a bit redundant I hope they serve to inspire you with your own discoveries of "Here's a better [or simpler or quicker or safer] way to get the same result."

First, a backward glance: if your built-in illuminator has the problem that mine did but you don't want to mess around inside its lens housing to correct it, there are other options. One is to mount your blue filter above the lamp lens with a special holder that I'll describe shortly. This option has the advantage of not affecting the microscope's physical integrity— that is, you can use it on someone else's scope (or one in a school lab) and remove it when you're done. The second option is to put your blue filter between the iris diaphragm and the condenser. This option will keep your filter clean and relatively cool, and it won't require that you make a thing— you need only remove the iris diaphragm, put your blue filter in position, and return the iris diaphragm to where it was. But this option does limit your filter's subsequent accessibility. 


micro icon
The space between the iris diaphragm and the lower lens of the condenser is best suited for a filter you use all the time, like a blue "daylight" filter that corrects the too-warm color of tungsten and halogen light. If you don't use a 100× oil-immersion objective (which requires virtually all the light your illuminator can put out), it's also a good place for a polarizer (which functions as a neutral-density filter when you aren't using the second polarizer). Putting a filter above the iris diaphragm is neat, secure, and really easy to accomplish. 

Here's what to do:  (1) Remove the condenser unit from beneath the stage.  (2) Carefully unscrew the iris diaphragm from the condenser.  (3) If you find little set screws on the iris-diaphragm housing, leave them absolutely alone. They are for taking the iris diaphragm itself apart, and, however intriguing its construction is, putting it back together again is no fun.  (4) Gently place your clean blue filter on top of the iris-diaphragm unit, position the condenser over both, screw the condenser onto the iris diaphragm, and then replace the condenser beneath the microscope stage. Simple! 

Since I like to see what "real" color micro-critters are, I want my green filter to be quickly removable. And since I use my oil-immersion objective regularly, I don't want to leave a polarizer above the iris diaphragm, either. Then there are dark-field stops, and colored filters for optical staining of the transparent protists I like to observe.  In other words, I need at least one extra, substage filter holder that's immediately accessible. (Click here for footnote

filter into condenser


substage with filter holder

 
microscope icon A quite elegant yet simple extra-filter holder can be made out of the bottom of a bottle that over-the-counter drugs come in. Determine the outside diameter of your illuminator's lens housing, then search out a plastic bottle that will fit over it. By wonderful coincidence, there is a standard bottle size that's a good, snug fit! —and you may have one in your kitchen or bath.   (Click here for details about materials.)

Get out your tools. Trustworthy glue and (a) If you have access to a workshop: miter box and thin-bladed saw, drill press or electric drill with a sturdy vise to hold it, drill bit to make a ¾" hole, cylindrical rasp or fine grinding stone. (b) If you have to do the job by hand: thin-bladed scalpel, razor blade in safety holder, newspaper to roll tightly to fit inside the bottom of the bottle, masking tape. (Click here for suggestions about tools and safety.) 

Cut the bottle so that the bottom piece is ¾" high. If you're using a miter saw (to keep the cut even at ¾"), don't press hard; let the teeth do the cutting. If you're using a razor blade, mark the bottle at 1" with masking tape, cut it, then mark again at ¾", and make your final cut with the rolled newspaper inside the bottom you just cut off.  bottom of bottle
bottom of bottle Mark the center of the bottom of the bottle. Measure your filter (shown in green) and then mark circles (shown in yellow) 6 mm and 4 mm smaller than the filter. If you're using workshop tools, drill a ¾" hole in the bottom of the bottle, rasp that hole to enlarge it to be 4 mm smaller in diameter than your filter, then carefully trim off the fuzzy plastic edges with a scalpel. If you're doing this by hand, cut out the smaller circle (to get a surface to trim) and then trim it to be 4 mm smaller in diameter than your filter.  bottom of bottle
filter holder Finally, mark the bottom side of the bottle bottom as I show in red, 1 or 2 mm from the edge of your filter. Then devise 4 round or rectangular things (5-mm-thick slices of a pencil eraser work well) to keep your filter centered, and glue them in place. 
When the glue is dry, your filter holder is ready to use. The bumps you just added will not only keep your filter in place but the spaces between them give you just enough room to be able to lift your filter out of this holder by its edges.  filter holder


Once you've made that filter holder, you're almost set, "almost" because now you know how to make more and can indulge your curiosity about lighting techniques beyond standard bright field at very little expense. Remember the little "bumps" that hold a filter in place? Suppose you made them of a size that would put their outside edges 1½ or 2 plastic-thicknesses in from the circumference of the filter holder....  You'd have substage filter holders that can be stacked and rotated! stacked filter holders
cutting plastic bottle These little drawings show where to cut in order to make a second filter holder out of the top part of the same bottle. The first shows an opening larger than a standard filter, similar to the preceding drawing in which the gray disk is a polarizer glued to the inside of the holder; because the opening is large, the piece of bottle in the first small drawing will require the same treatment. The second small drawing shows a cut that may support a standard filter, if the upper part of the bottle's neck is narrow enough. The only way to know is to make the cut and see. If it doesn't hold a standard filter, you can trim it and use it for a custom one. These three drawings also show how the height of stacked filter holders can differ. I leave the holder I use for my green filter attached to my illuminator's lens housing whether there's a filter in it or not. This holder is ¾" tall, the bottom half of it functioning to attach it to the lens housing. With the bottom holder in place and stable, any upper filter holder can be much shorter. See what works. 


polarizer


An extra filter holder enables you to try "bargain" polarization by using a scrap of polarizing material or by cannibalizing Polaroid sunglasses or clip-ons. (Click here for a fine introduction to using polarization, and click here for a brief explanation of polarized light.) Whatever you use, you'll need a second polarizing filter (called an analyzer) that goes inside or, more easily, on top of your eyepiece. A holder for your analyzer will protect it from scratches on or off your eyepiece and lessen the amount of oil (from your eyelashes!) that it picks up. Here's how to make a holder: 

polarizer for eyepiece

Start by determining the diameter of your eyepiece(s), and then find a little plastic bottle that will fit over it (or them). My analyzer holder started out as the cap for a little container of prescription tablets; if you search your kitchen and medicine cabinet, you'll likely find what you need. And don't worry if what you find is a tight or loose fit, as long as the closed end can be brought into contact with the top of your ocular. A tight fit means only that you'll be turning your eyepiece as you adjust the analyzer, and a loose fit means you'll be turning only the analyzer and its holder. Either way works.


Cut the little container to a depth of no more than half an inch. (Mine is only ¼" deep, and it works fine.) Then put a hole in the end or bottom of the cut-down bottle (the same way as applied to the bottle bottom at right). It should be larger than the diameter of your ocular's top opening, and small enough to leave a surface against which the polarizing material will be placed. holes in bottom


Cut a circle out of your polarizing material that will just fit inside the holder. Before you glue it in place, be sure that the polarizing material here and in your substage polarizer are oriented similarly (e.g., both facing your eye). Check the curve of the material, and/or its shine, and/or even its apparent color to determine which way it's facing. Check twice.

Then glue it to the inside of the holder, using something cylindrical and solid (a smaller bottle? rolled-up paper or cardboard?) to hold the polarizing disk flat against the inside of the holder while the glue dries. When the glue is thoroughly dry, slip the new analyzer-holder over your microscope eyepiece, and you're ready to experiment with polarized lighting. 


one filter holder A second substage filter holder permits more experimentation, including another use of polarization. The normal way is to put your specimen "between crossed polars"— the light gets polarized by the substage polarizer, goes through your specimen, and then is acted upon again before reaching your eye. 
two filter holders A different effect occurs when light is polarized before it goes through a specimen. As with crossed polars you rotate the polarizers with respect to one another to control the degree of polarization. The effect is subtle; when applied to dark field, the two substage polarizers soften highlights without affecting perceived contrast.


micro icon


A somewhat less elegant substage filter holder can be made with material from the middle of the plastic bottle, some glue, and thread or (fishing) monofilament. Its advantages include
     · making it requires no workshop tools;
     · it will accept filters of almost any size;
     · filters stay cooler because it's ventilated.
Here, look:
 
 
monofilament- or thread-supported making spacer glue spacer underneath stacked filter holders


Cut a cylinder ¾" tall. Make smooth holes no farther than ¼" down from the top edge. The drawing shows only one set of holes (so you can see them), but you could have more, especially if you're going to use filters smaller than 30 mm. Make a drawing of the lines of thread you want to include and fuss with it; you may be able to use the same holes for more than one line of thread. For each line, use clear (2-lb-test) monofilament, two strands of "invisible" thread (fabric stores have it) or of normal white or green sewing thread (light will bend around it, and the very slight green effect can only help). Put some clear nail polish or glue on your knots, push the cylinder onto the illuminator lens housing till the thread is just above the top of the lens, and you're done. (I show a green filter in the holder.) 
The next three drawings show how to make an additional, stacking filter holder. Cut a ¼" cylinder, slice it vertically, slip it into the holder you've already made and mark the little piece you need to cut off so that this piece of plastic will fit snugly inside the holder. Then make another holder like your first, only shorter, perhaps ½" tall, and fit the ¼" band into its bottom, far enough so that it does not rest on the threads of the first holder, and glue it. Now you have a second filter holder that fits snugly into the first but rests on the outside of the first holder; you can rotate the second holder smoothly, without abrading the threads of the first holder. 
Using these, put smaller filters on the lower holder; so close to the light source, they'll make conic sections of their color that will be large enough to fill the field you view through your microscope, especially if your condenser's diaphragm is not wide open. Look again at these holders: they permit you to use a filter on the threads and also to rest a large one on top —one filter holder can accommodate two filters. 


micro icon


The icon above highlights the real filter holder, which I usually reserve for dark-field and oblique-lighting stops. Dark-field stops have black centers surrounded by transparency, and those for oblique lighting allow light to reach the specimen only from the side. With both, the opaque area causes darkness in the field of view. If you want something different from black, experiment. for dark field
These drawings should give you a visual starting point for making your own stops. (Click here for a helpful Micscape article on dark field, click here for one about diffused illumination, and click here for another about oblique lighting.) An excellent material from which to make oblique-lighting cutouts is the black plastic dish used for frozen, microwavable entrees: it's thick enough, and heat-resistant enough, to remain flat in your filter holder, yet scissors can cut it readily.  for dark field
cutting a disk You can make transparent 30-mm disks for these from the lenses of reading glasses, or plastic petri dishes, or CD "jewel cases." To get the right size, score the material deeply with a hobby knife (the black lines), break off the excess, then file the disk till it's round. If you lack a metal file, use emery boards (for fingernails). Here's more information about home-made filter-sized disks


micro icon

This last icon suggests my last variation on extra-filter placement; the illustration below shows what to make to put the filter in.  Eric Gravé explains that the "optical staining" technique introduced by Julius Rheinberg in 1896 

... is essentially a modification of darkfield illumination. Instead of making the central stop dark and leaving the peripheral ring bright, Rheinberg replaced these with stops and rings of different colors. The effect is a color contrast between the specimen and its background.... The central stop can be left black, but the outer ring can be half blue, half yellow. If preferred, the stop can be blue and the ring half green, half red  (Using the Microscope, NY: Dover, 1991, p. 42). 

My little contribution to "optical staining" or "Rheinberg- Differential-Color-Illumination" is physically to separate the stops from the peripheral rings, replacing the latter with "filters" made from any of a wide variety of materials sandwiched between the two parts of the filter holder shown below. Then, one's painstaking, delicate efforts are limited to making "[color]-field stops" for the normal filter holder, which can be used with any of the optical-staining filters that you have on hand or that you make up on the spot with some colored material and the two halves of this filter holder. So, here's how to make the holder:


for sheets (1) Start with one of those horrible "Press Down and Twist" caps from a jar of vitamins or somesuch. 

(2) Cut a hole through both layers of the cap at once. There are drill-accessories for cutting holes for doorknobs, etc. that work almost satisfactorily. They put a ¼" hole in the center, so you can work from the other side once the inner cap begins spinning. You have to finish this step by hand, with a scalpel, but the scoring done by the drill makes it easy.

(3) Using fine-grit sandpaper, remove most of the bottom border from the outside of the cap. The goal is to be able to remove the inner cap easily (keep sanding till you can) but to keep a little bit of the outside cap to function later as a lock to hold the inner cap flush against the outer one.

(4) The result: a holder that will keep thin plastic or film filter-material (that you put between the inside and outside layers of the cap) nicely flat and easy to maneuver under your microscope stage. 


The cap I used for my holder is from a 500-cc vitamin bottle, but the size is arbitrary. Gravé suggests photographic gelatin filters and, elsewhere in his book, pieces of colored cellophane. To these I'd add the translucent colored covers sold as binders for term papers, pieces of colored plastic grocery- or department-store bags, even bits of cloth. (I'd also add a word of caution about leaving any of these non-glass materials close to your illuminator for extended intervals.)

Rheinberg illumination or optical staining is particularly suited to transparent or nearly transparent life forms, since it increases their visibility and is safer for them, even, than "vital staining." (Click here for an introduction to Rheinberg illumination, and here for an article on vital staining.) The cheap filter holders and materials I suggest here are particularly well suited to low-cost effects that you'd like to try before purchasing standard items (will a "daylight blue" filter solve your problem? try one made of a Walmart bag before you buy). Click here for more cheapskate ideas. If, on the other hand, you like saving money, you may find that your home-made optical staining filters work well enough. I love my dark, dark red (bread wrapper) background stop for what it does to the world of green protists. If I end up using it so often that the color comes off, I'm pretty sure I'll just make another one. 


WORKING WITH TOOLS SAFELY

requires that you know how to use them, that you use them carefully, that you wear eye and/or face protection, that you do not rush, and that you've had a recent tetanus immunization. (Are you feeling a little cautious yet?)

Drilling holes in plastic containers and then enlarging them with a rotary rasp are best done with a drill press. If you must use an electric hand drill, put the rolled-up newspaper with the bottle bottom stuck onto it in a vise, and drill through the plastic into the newspaper. To enlarge the hole, put the electric drill into the vise, lock it at a slow speed, and carefully, being able to see both the rasp and the hole you're enlarging, touch the edge of the hole to the side of the rasp gently. Both the newspaper and the electric drill need to be rock-solid in the vise, and the vise needs to be absolutely and firmly stationary. If you can't meet all these conditions, don't choose the workshop-tools option.

If this advice weren't aimed at keeping you out of a hospital emergency room, it would be downright funny to dissuade you from using workshop tools only to tell you to work instead with terrifically sharp scalpels and razor blades. Know how to use them. Make sure they're sharp. Discard them (safely) as soon as they begin to dull.  And be careful. 


THE RIGHT STUFF

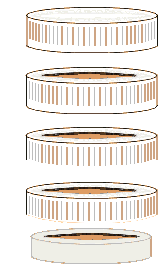
The bottles that I've found are white plastic, 75 cc, containing acetaminophen, aspirin, vitamins, or various herbal supplements. Look for "75 cc" in small raised letters on the bottom of the bottle. 

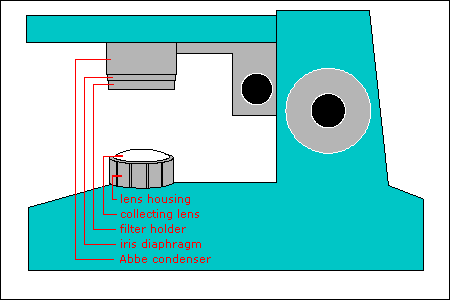
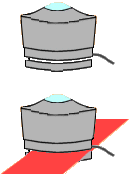
Check the fit of the piece of bottle and your illuminator lens housing as soon as you've cut it. You may have to shave the cut edge of the bottle to make it fit the lens housing perfectly. If your bottle needs more work than that, heat it in a container of water in a microwave oven and, with your winter gloves on, stretch it while it's still hot. Do not despair— you're dealing with microns of thickness here.

To find the odds and ends I mention, just keep your eyes and mind open at home and in stores. Try yard sales, "dollar stores," surplus hardware stores, etc.  Richard Howey told me about American Science & Surplus, a wonderful source of much that others would call junk; this link will take you to the optics section of their on-line catalog. You may find some items too costly (e.g., 75¢ more than the local "dollar store"), but you may not find inexpensive polarizing scraps or "redundant reticles" elsewhere. 

Low-Cost/No-Cost Stops and Filters can be made from unlikely stuff. It's very nice to have darkfield- and Rheinberg-background stops made of 2-mm (or even 1-mm) thick glass, but thinner transparent (even translucent) plastic will work.
     For the 30-mm transparent disk that fits a standard filter holder, look at the stiff, transparent packaging that came with your recent purchase of anything retailers want to keep out of shoplifters' pockets: an ink cartridge for your printer, a dimmer-switch for your ceiling light, electronic components, etc. Find some that's at least .25 mm thick; cut out the flat parts with a safety knife, and then cut out flat 30-mm circles with a scissors.
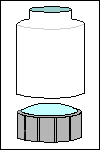
     Find a plastic bag that a loaf of bread came in, or some other soft plastic with areas of color that are not truly opaque (true opacity produces a black background). Cut out a 12-mm circle of each color you want to try as the background. Center this circle on a 30-mm disk, cover that with another transparent 
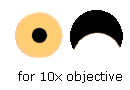
disk, put it in your filter holder, and look at something with your 10× objective. Repeat for as many colors as you want.
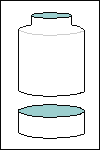
     (If you tend toward perfectionism, you really should see how small you can make the colored circle and still get a dark-field effect; this is particularly relevant to stops for higher-power objectives.)
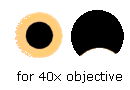
     Having decided which colors you want as background, make a 24-mm circle to try with your higher-power objective(s). Reduce its size to what's still workable, and make your other larger circles of colored material.
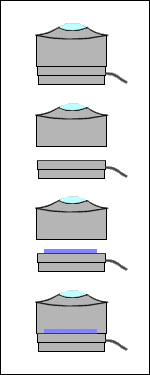
     Time to decide: do you want to have a finished Rheinberg-illumination stop for each color you like? if yes, do you want the colored stop glued to a disk and let be? or do you want to sandwich the colored piece between two transparent disks? or do you want to leave your colored stops loose and place them between transparent disks each time you want a specific effect?
     Don't try to make a whole set of these all at once. Make one and enjoy using it before spending more observation-time on filter fabrication. 


condenser Admonitory note:  There's another place into which you can jam something like a filter, shown at left. My drawing greatly exaggerates thickness of that little space between the top of filter holder and the bottom of the iris diaphragm so that you can see it. I strongly recommend that you don't use this space because use will eventually enlarge it by knocking the filter holder out of line and/or by bending the pin that attaches and supports the filter holder or by enlarging the hole into which the pin is screwed. Consequently, sticking even thin things into this space (red = "danger!") will deprive your microscope of a filter holder and, probably, a means for attaching a new one (if you can find a new one). Just as my drawings show a scope likely owned by persons of modest means (hence 30-mm filters), this article is intended to increase your options re: accessories while saving you money, not the opposite. 
Comments to the author Rosemarie Arbur are welcomed.

Microscopy UK Front Page
Micscape Magazine
Article Library


© Microscopy UK or their contributors.

Published in the February 2001 edition of Micscape Magazine.

Please report any Web problems or offer general comments to the Micscape Editor,
via the contact on current Micscape Index.

Micscape is the on-line monthly magazine of the Microscopy UK web
site at Microscopy-UK

WIDTH=1


© Onview.net Ltd, Microscopy-UK, and all contributors 1995 onwards. All rights reserved. Main site is at www.microscopy-uk.org.uk with full mirror at www.microscopy-uk.net.