Notes on adapting a LOMO Biolam to
be a competent polarising microscope.
by David Walker, UK
|
'Polar
exploration' on a budget: Notes on adapting a LOMO Biolam to be a competent polarising microscope. by David Walker, UK |
|
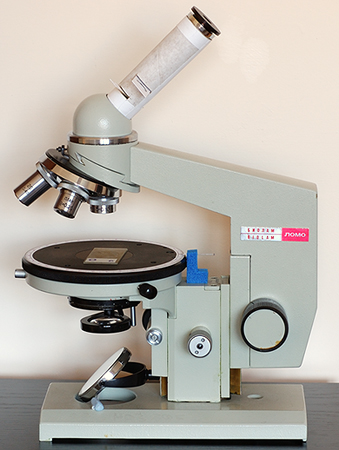
For the enthusiast on a budget there are various ways reported of adapting a typical biological microscope stand to be more suited for polarisation studies. Ian Walker has described some neat homemade adaptations for the Zeiss Standard and Axiostar, including a rotating stage based on a CD-ROM. A particularly suitable stand for adaptation is the rotating/centering stage variant of the LOMO Biolam, as to my knowledge, LOMO were one of the few makers that offered such a stage for their cheapest student models. When I bought mine 25 years ago it was only a little more expensive than the fixed stage variant and less than Ł100.
They are still excellent value on eBay secondhand, and can sell for as little as Ł50 with mono head and good sets of objectives and condenser. As well as forming the basis for one of the most cost effective biological stands to build up into a good microscope, without any special skills they can also be adapted to be quite a competent polarising microscope for little extra cost.
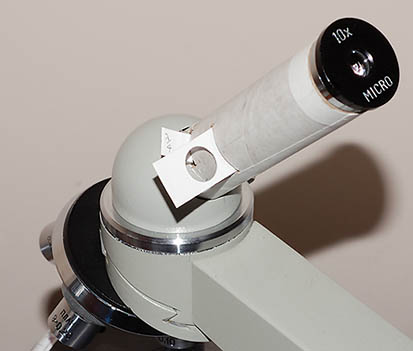
Shown below is the author's converted Biolam for this purpose and maybe of use to others with this stand. I should stress than I'm not a polarising microscopy expert, in fact I built the conversion below to learn more about studying thin rock sections and mineral slides within a limited budget. The LOMO adaptations are based on hands-on familiarity with dedicated polarising microscopes such as the older classic Swift model P and the Chinese maker JNOEC's model XPT-7 (links are to Ian Walker's reviews). The latter is a typical current model sold by dealers under various brand names and costs over Ł500 in the UK.
The mods below are intentionally in the 'beta' stage to demonstrate that simple designs can work. More robust and professional items can be made if desired e.g from plastic tube and sheets, or metal if the user has the skills and tools (the author doesn't).
Stage:
Flat stage a big plus point. Calibrated border readily added.
Add-on rotating
plates can be bought for fixed stage microscopes and although an improvement, cheaper
designs often have a thick base which from experience can be unsuited for higher power
work as the base holds the slide too high above the condenser e.g. for conoscopy
studies.
The LOMO stage is centering and offers a big bonus over some student polarising microscopes in that it is flat and allows quite delicate movements of the slide on an uncluttered stage, or a standard mechanical stage can be used. On angled stages there is always a danger of slide slippage if clips are used and unless a well balanced dedicated polarising mechanical stage is used, the uneven weighted rotation isn't a very good 'feel'.
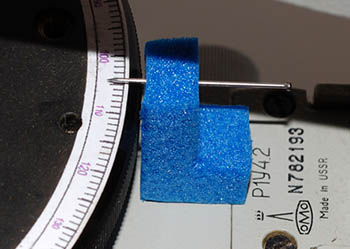
CAD
software printed border and pin in coverslip
box foam lightly glued to scope.
A calibrated 360ş border with 1ş increments can be readily added to the LOMO stage using a modern software CAD package. Thanks to my brother for making the neat one shown above in TurboCAD. Tip: put the glue on the stage and add the dry paper border rather than the reverse, as the paper may stretch if damp with glue.
A simple fixed pointer can be devised to read off angles and should be fine for less critical studies e.g. in basic petrology studies. (Dedicated polar scopes usually have a vernier.)
Polariser:
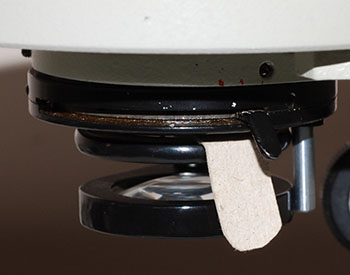
The Abbe condenser filter tray allows a swing-in polariser to be readily
added. A simple card mount can be devised e.g. as shown below, with tab for alignment.
|
The tab is folded downwards so as to minimise it being jogged when the condenser diaphragm is adjusted. For users with a base lamp, a more sophisticated polariser for the lamp field lens could be devised, perhaps even with a calibrated fitting as found in most dedicated polar scopes. For many studies the polariser is left in East-West alignment. This can be set using a slide of Muscovite mica as described in most petrology textbooks. |
|
Monocular tube: card replacement for analyser and retardation plate use.
It's the inconvenience of a normal bio' stand for inserting analyser and retardation plates that first prompted me to adapt the Biolam. Few stands have a slot for inserting these fitted as standard. To date I've been sticking an analyser on the underside of the bino' head but it's impractical for extended studies. It can be put on eyepiece but inserting retardation plates is tricky.
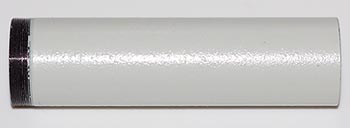
Monocular
tube unscrewed
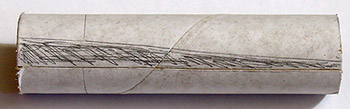
The monocular tube unscrews fom the prism head, and its internal diameter is close to that of the stiff card tubes typically found as the core of aluminium cooking foil (for UK readers - Sainsbury's brand is closer than Tesco's!). By slicing a thin wedge from the split tube a very stiff and workmanlike new tube can be devised as shown below.
|
Slit tube lengthwise, lightly roll up and insert to bottom of monocular tube prism box (not the step further up). Roll will adopt a stable cone shape. Mark in pencil area to be removed. Longer length to pencil line should match LOMO metal tube above prism holder. |
|
|
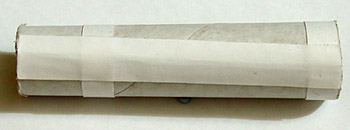
Tube with wedge removed and strengthened with strips of glued paper. |
|
|
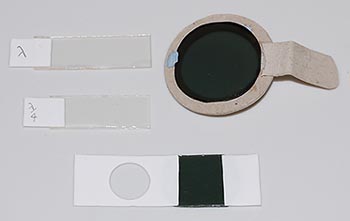
Polariser for filter tray, analyser 'plate' and quarter and full wavelength retardation plates. Sizes can be adjusted to suit. Good quality material can be sourced e.g. from www.knightoptical.co.uk for less than Ł10 for a 10x10cm sheet of each. The white paper is stiff paper adhesive labels. The author used plastic laminate high extinction polar and plastic laminated tint plates so easy to work with a craft knife or single edge razor blade. If desired the tint plates could also made into a design shown for the analyser so they can be removed out of light path without removing plate.
|
|
|
Monocular tube with analyser and tint plate present with eyepiece. The monocular tube can be quickly put in place for dedicated polar work, and replaced with the binocular head for normal microscopy. The card tube is a tight friction fit so quite robust. Ideally, the retardation plates and analyser should be below the prism as seen on modern polarising microscopes, so there's some depolarisation, mainly noticeable with a low power eyepiece with the 3.5x objective, but a 10x eyepiece is OK. The analyser slot is traditionally in the East-West position, (with orientation of the polarizing material North-South to give crossed-polars).The retardation plate slot at 45 degrees to this. By experiment there's some leeway in this angle and to still retain the tint colour, a slightly oversized slot can allow some adjustment as well. On this homebrew design it's unlikely that exact extinction will be achieved 'as is' but a slight twist of polariser or card tube can correct this. Short length eyepieces fit in the tube fine, longer designs won't fully due to tapered tube, but change in top of tube design can be devised if needed. |
|
In
use
Despite its crude looks, the modified scope can accomplish much that
a dedicated student polarising microscope can do. Admittedly with a lot less
finesse, some loss of accuracy and other limitations; in particular the deep black extinction that a dedicated scope can achieve with strain free
optics. But heh, both scope and extras cost less than Ł80; in contrast just a
new polariser filter for a 'big name' scope is invariably over Ł200, tint plates
often more. Olympus' latest student polarising microscope, the CX-31P,
will cost over Ł3400 at time of writing.
The card tube doesn't of course support attached photography except perhaps a lightweight digital eyepiece design, but a typical point and shoot consumer camera can work well on a mini tripod supported over the eyepiece, in this case my brother's Sony P200. The images below were taken with the P200 and the modified Biolam.
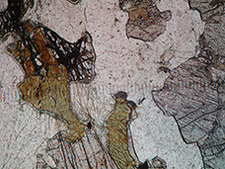
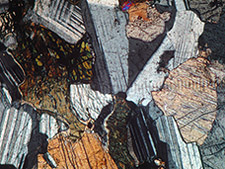
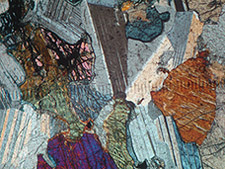
As remarked above, I modified the Biolam to provide a gentle introduction at minimal cost to some thin section studies of rocks and minerals. The image below is gabbro (Open University slide from their S260 box). This is one of a set of 24 slides and is a good starting point as the Open University's course books and virtual microscope software discuss these slides, which can be bought without joining the course. (LOMO 3.5x planachro' objective used and 10x eyepiece).
|
|
|
|
|
|
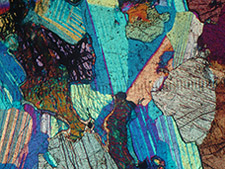
Simple qualitative conoscopy studies can be carried out by studying the back focal plane either visually or with a phase telescope eyepiece if available. A suitable telescope can be made from two conventional eyepieces as shown by Paul James. Dedicated polarising microscopes usually have a built in Bertrand lens to focus on back focal plane to allow a conventional eyepiece to be used.
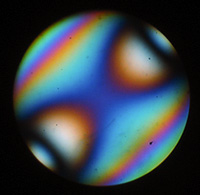
Thick
homemade cleavage of muscovite mica between crossed polars, objective
back focal plane showing a typical interference figure for this biaxial mineral.
Using a 40x NA0.75 unbranded objective and phase telescope. See this
article for further simple studies with micas.
The set-up also allows aesthetic studies and photography with polar active subjects using the quarter and full wave tint plates with any combination of partial or fully crossed polars plus the help of the rotating stage; hours of fun for little cost!
Comments to the
author
David
Walker
are welcomed.
All images
by the author.
Other links: Ian Walker in the April 2006 issue shows how a variable compensator with a mica plate can be made very cheaply for a biological microscope upgraded to polarising studies.
Published in the April 2006 edition of Micscape.
Please report any Web problems or offer general comments to the Micscape Editor .
Micscape is the on-line monthly magazine of the Microscopy UK web site at Microscopy-UK
© Onview.net Ltd, Microscopy-UK, and all contributors 1995
onwards. All rights reserved.
Main site is
at www.microscopy-uk.org.uk
with full mirror
at www.microscopy-uk.net
.