image-001
SAFE MICROSCOPIC TECHNIQUES FOR AMATEURS

I - MOUNTING MICROSCOPIC SUBJECTS.

Part 4 - The Glycerin Jellies

WALTER  DIONI                       Durango (Dgo) México
All the pictures were taken with a National Optical microscope, equipped with an integrated digital camera and software, to control the picture taking parameters, from slides mounted in Kaiser Glycerin Jelly. The pollen pictures were assembled with Combine Z. Illumination was provided through a modified COL filter  that  will be soon described in a Topical Tip (see the original articles by Paul James).

The title picture is the tip of the tarsus of a leg from the cockroach Periplaneta americana. It has two claws. The second claw is beneath the visible one. The yellow feature between both claws is an adhesive organ that allows the roach to climb vertical surfaces easily.


Gelatin is an industrial product derived from collagen that is present in most animal organs. It is most abundant in bone and skin, which use to be discarded when animal bodies are processed for food. A treatment with hot water recovers the soluble portion in the form of gelatin that is dried and sold as thin plates, or powder.

Gelatin has the useful property of forming a jelly when it is treated with hot water. And as reagents are readily mixed with glycerin, it provides the perfect solution to the problem of solidifying glycerol (see the 'glycerin' section in the first part of this series).

Please! Do not try to use gelatin jellies without an antiseptic. If you do, in one or two weeks you can be the proud owners of an assorted collection of fungi and bacteria. (See the article on
Gum Arabic media for a discussion of some antiseptics and a justification for my selection of Listerine.)


GJ.- Kaiser’s Glycerin jelly.-


The classical formulation is that of Kaiser (1880) which is also the best to be used in my latitudes. Many authors assign to it a RI of 1.47.

To make Kaiser’s Glycerin Jelly we (and most of the professionals also) can use unflavored Knox powdered gelatin, from the supermarket, that comes in a box with four envelopes of 7g each. So I adapted the formulas to allow preparations with an envelope of powdered gelatin which provides 7g.


Sprinkle the gelatin over the water which has been already well mixed with the glycerin, and leave it to soak for at least five minutes. Melt it over a low heat, or better in a 'double boiler'. Gelatin melts around 40ºC. Add the antiseptic away from the heat and stir very slowly to avoid air bubbles. But don’t be alarmed if thousands of the tiniest bubbles develop in the liquid, it is normal. Leave the flask in warm water for a while and in a few minutes the bubbles disappear. Pour the medium into a wide mouthed bottle. This media keeps very well. To mount your subjects follow the instructions below.
image 002

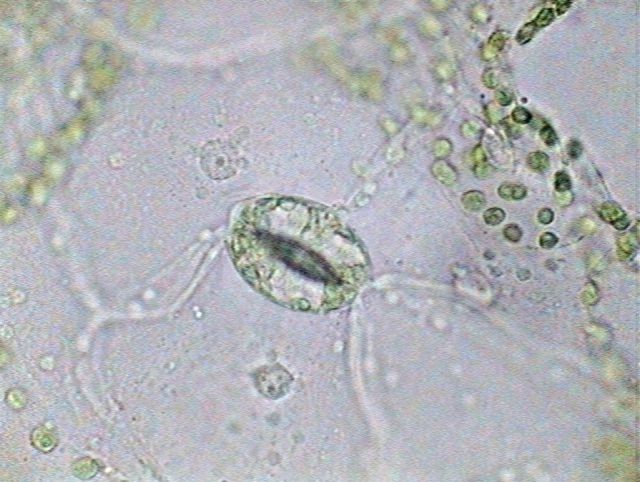
A "hair" from the epidermis of Pelargonium


FJ.- Fructo-jelly.-

Mix Karo and water with the glycerin. Dissolve in the table salt. Sprinkle with the gelatin and leave it for 5 minutes for it to swell completely. Melt over a low fire or in a double boiler.
The RI must be around 1.45, with a pH of 6.6. This is the other formula that gives me more stability in the high summer temperatures. It is less solid than the Kaiser formula.

image 004
image 004b
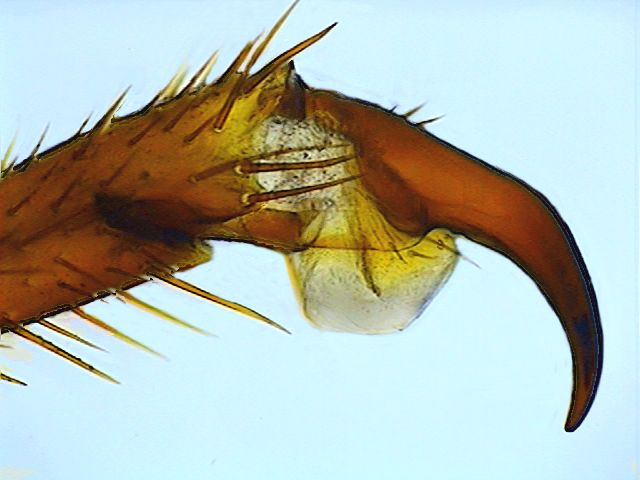
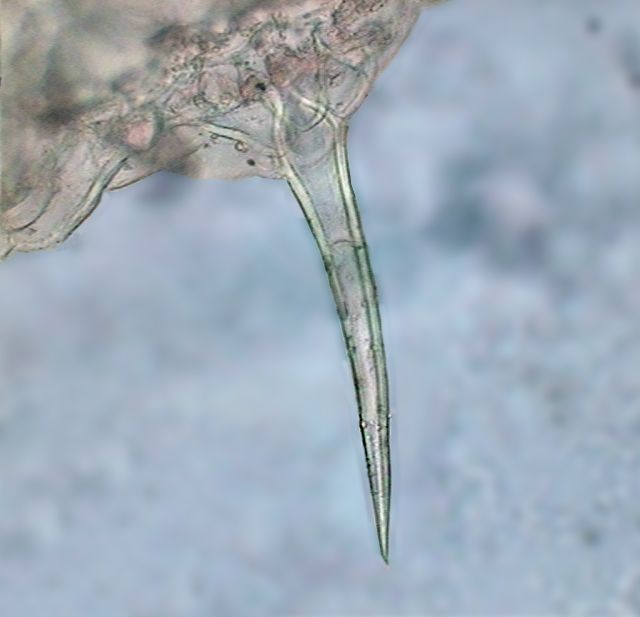
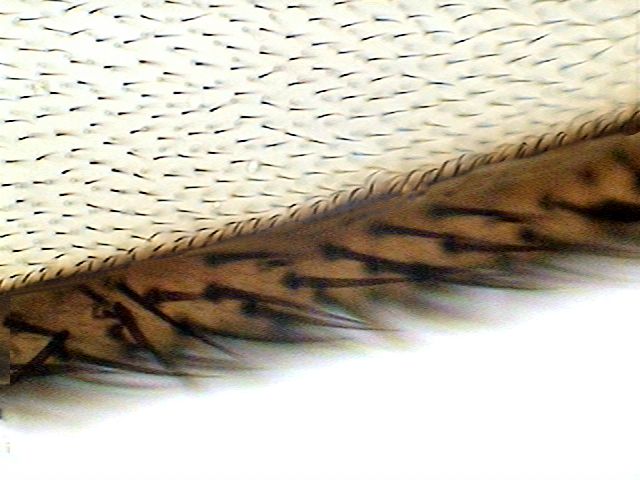
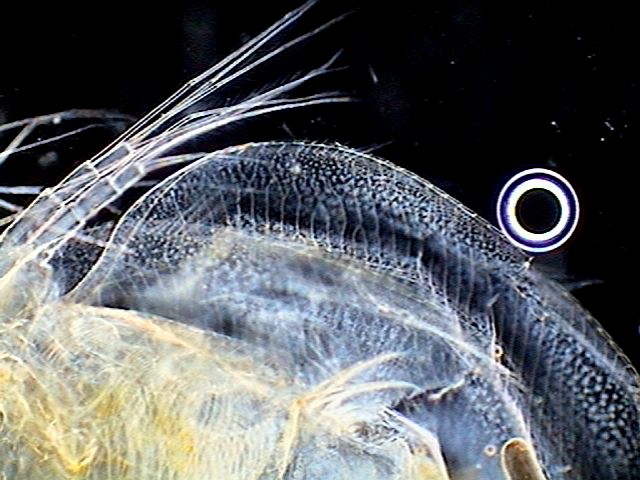
wing border from a diptere of the family Tipulidae. Objective x40.
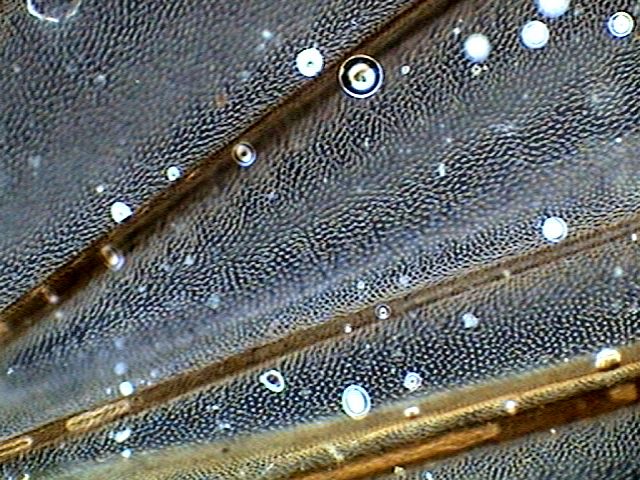
Air bubbles. This is the more common and very frequent problem with Glycerin jellies

CGJ.- Chromed glycerin jelly

Regarding the RI of this formula, see my comments in the introduction to part two. Reportedly it is a jelly formula that is still solid above 60°C, which could make it very useful in tropical climates. I give here the original formula adapted to one gelatin powder envelope.

                                                                        Water - 120 ml           
                                                                        Glycerin - 25 ml 
                                                                        Gelatin - 7 g
                                                                        Chrome alum - 0.5 g
                                                                        Listerine - 10  ml

Soak and dissolve the gelatin in half the water. Add glycerin. Warm the remaining water and use it to dissolve the alum. Mix and add Listerine.

For those that have some interest in the chemistry of this formula, chrome alum  is a double sulphate of potassium and chromium. The common alum is aluminum alum, a double sulphate of potassium and aluminum sold as a translucent 'stone' that in times of razors, men used to stop bleeding of little cuts on their face. The alum of chrome is most used in tanneries for leather-dressing, but has multiple industrial uses, and is said to be easily obtained, which is not my experience.

To date I've been unable to prepare this formula, my supplier sent me the wrong alum, and I couldn’t obtain the small quantities of reagents I need to prepare my own chrome alum. I publish the formula expecting that someone could be more fortunate than I've been.

image 005
image 006
image 006b
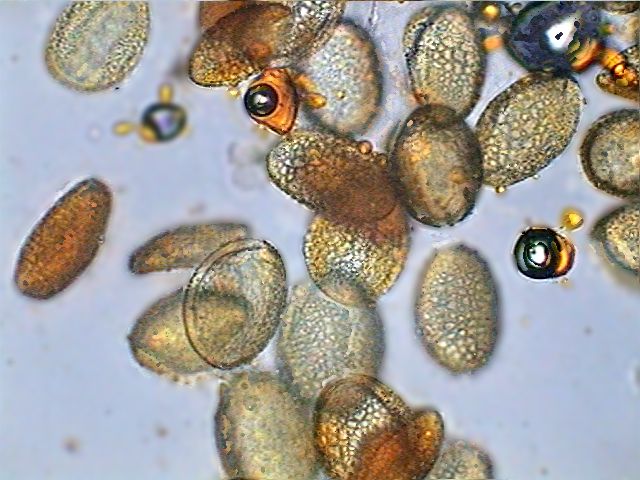
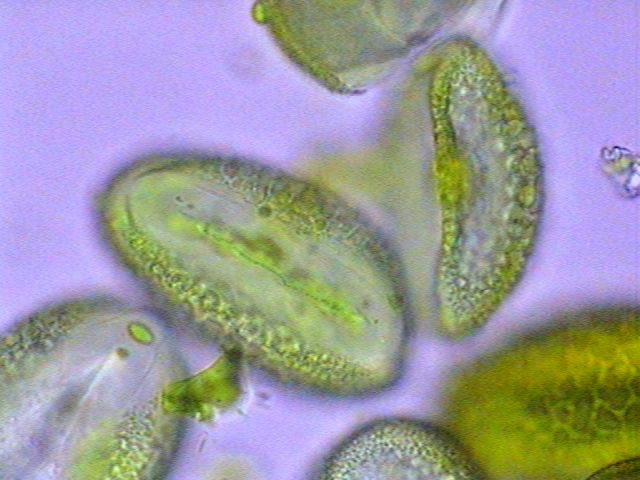
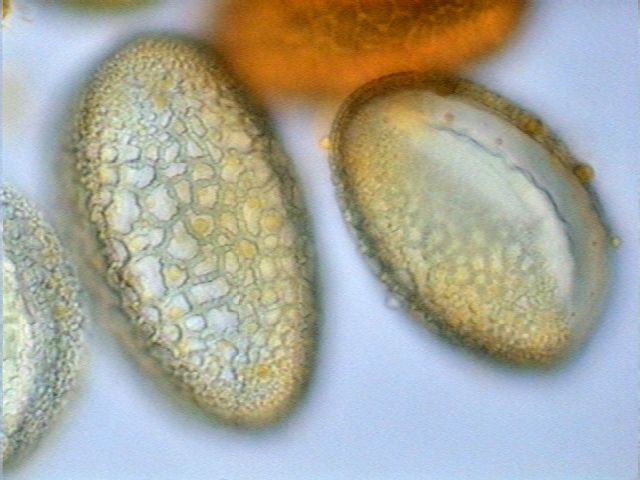
Pollen from a  flower of the family Liliacea. First image taken with objective x40, the other two with the x100 OI.


BJ.- Borax Glycerin Jelly

This is a formula proposed by Fisher in 1912. Borax is sodium borate. My sodium borate is a chalk white granulated powder. Completely dissolve the borax in warm water. Add glycerin. Soak the gelatin and melt.

It is said to be liquid at room temperature, but my preparation turned solid even with a double quantity of water and borax (sodium borate). At first I think the borax made the difference. But borax is only a mild antiseptic and an alkali, both very useful properties for a mounting medium.

I think that I can solve the 'mystery of the solid borax jelly'. When I was a boy, my mother dressed (sized) the embroidered works she was so proud of with a gelatin bath. The dressed embroidery was pinned on a flat surface and left to dry. It remains well extended and flexible. But in those times gelatin was not Knox, and the animal gelatins were not well purified, they were mostly used in carpenter’s works (and smelt very badly). My mother (in the 40’s) sent me to the pharmacy to buy 'fish gelatin'.

Fisher published his formula in 1912. It is most probable that he has used fish gelatin. Fish gelatin solutions are liquid still to 10 or 12ºC, when they gel.
So you can use Fisher’s formula in the modern solid way as I did, or try to find 'fish gelatin' as a thin solid plate or a powder. Tell me how it performs.

Anyway to date Fisher’s Borax jelly is unusable here, because it doesn’t solidify at the summer temperatures of Durango, and even with Listerine it developed a heavy cover of moulds.

Note for all jellies, and other water based media.

Being a water dispersed colloid, the jellies have a remarkable characteristic that they share with Fructose and PVA based media. Water soluble dyes can be added to these media to impart to them a medium heavy tint. When applied to the slides and thinned enough under the coverslip the tint is barely appreciated. But the dye migrates slowly to the mounted subjects, imparting them some color. This is especially useful in the mounting of pollen for which the gelatins are the preferred mountants. Several dyes are recommended: Basic or Acid Fuchsine, Malachite Green, Cotton Blue (Aniline Blue), Safranin, etc. Applying dyes to the mountant media has another use. Some stained materials fade with time, bleeding dye from the subject to the media. The use of colored media counteracts this tendency.

image 003

Epithelium from the underside of an Aptenia leaf. Fixed  in GALA, x100 OI


Mounting in the Jellies

J. Kiernan in his page on water based mountants says that anyone who could mount something in glycerin jelly, can easily use any other mountant.

Here are some of the tricks people use to do the job.

1) Howard Webb mounts his 'daphnia' alive in a drop of Glycerin Jelly he melts with a cigarette lighter. So simple could be the technique. And a very similar method is recommended, by Jean Marie Cavanihac but using a more friendly heat source: an incandescent lamp of 25W.

But you need to develop a lot of experience to melt the gelatin exactly at its melting point avoiding overheating, which boils the mountant, develops big air bubbles, 'cooks' and dries your subjects, and even can break the slide. It is not so easy, but you can learn of course. If others can do it, why don't you try?
 
2) In the February 1999 issue of Micscape Magazine you can find an article by Brian Adams describing a small heating plate to help in the mounting. It is ingenious but is only a step ahead of those methods discussed in 1).

3) And a little 'stove' to maintain the jelly melted is proposed by H. Zander, (March 4, 2002).
     “I have a dropper bottle of molten glycerin jelly sitting on a small hot plate near my microscope. The hot plate is one of those coffee warmers you can pick up in a flea market for a buck or two. It was too hot, so I bought a light bulb dimmer at a hardware store, and used the rheostat to cut down the temperature to "merely warm", which was good enough.” It must be complemented by a small warmed table that helps in the further mounting steps.

4) In the old times the task was accomplished by a Malassez table. This was a metal strip (generally copper) of more or less 6 or 7 cm wide, twisted as an 'S' with right angles, and mounted on thin legs. One end of the strip was heated with a little Bunsen torch or an alcohol lamp.  A temperature gradient developed through the metal ribbon, its intensity depending on the applied heat, and the room temperature that governs the heat loss. The gradient is stable enough to permit the selection of the temperature required to work with. The 'modern solution' is to use a heat source that is safer, but the Malassez table is easy to make and to use.

platina Malassez

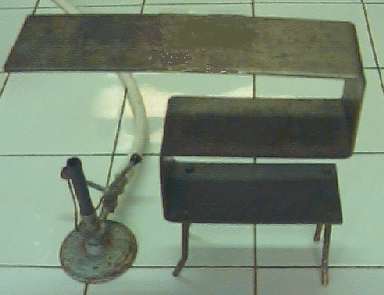
A  heating  table, Malassez style.


5) I solved the problem from my own tests with a stainless steel plate 50 cm x 6 cm mounted at each end over two wooden supports high enough to allow a small alcohol lamp to be used to heat one end. The flame must be small, and you must watch carefully not to heat the metal too much.

I put my subjects on the slides, side by side with a little portion of jelly (more or less equivalent to a 3 or 4 mm cube) and I start my burner. After a very few seconds of heating I displaced slowly my slides from the cold end towards the hot one, until I saw that the gelatin started to melt, and prudently I go back again to prevent boiling. When all the jelly is evenly melted, I displace the slide to the colder end and apply the coverslip. With appropriate forceps I remove the slide from the heating table, put it on a horizontal surface and apply a weight. If you have to mount many slides in a row you need to stop heating the metal table from time to time to maintain an appropriate temperature.

6) And, what I think is the better solution is the home made oven presented by Jean Legrand in the MICROSCOPIES M@GAZIN. It is simple to build and operate. Works in the range of temperatures most microscopists need for their tasks, and has enough space to have at a uniform temperature the melted glycerin, the slides and coverslips, and the instruments needed for the manipulations.

My suggestion is that you don’t try to use jelly formulas if you are not prepared to have the slides, coverslips and gelatin hot enough (> 40ºC) all the time from start to finish of the preparation. The method to do that depends on the subject you want to mount.

Even if the gelatin media doesn’t need a previous dehydration, and all them received the materials directly from water, for best results it is better to pass previously the subjects through some dilutions of, or, in some cases, even to pure glycerin.

The materials that are stored in alcohol must be previously passed to water or to glycerin, because gelatin doesn’t mix with alcohol. Revise the methods for inclusion in glycerin given in the first part, especially the Seinhorst technique.

The mounted subjects clear in minutes to several hours. Cut the excess jelly from around the coverslip, clean with tepid water, cold water, and alcohol, and seal with nail polish; finish with a layer of automotive paint (or glyptal if you can get it). In the high summer, in many countries, the jelly can become somewhat soft. Be sure you file the slides horizontally.

While the jelly is molten on the heating plate you can use the usual weights, if you wish.

 Or you can use an old useful tool.


Take a cylinder of aluminum 18 mm in diameter with a length of 30 mm. Make a hole in its side and screw in a large and thin cylindrical screw. Cut the head of the screw and fit to it a wooden handle. It now resembles a hammer. Make your slide (slides) and leave it (them) to cool, even if the jelly sets before it reaches the border of the coverslip. With a suitable source of heat carefully warm your 'flattener' and apply the flat face of it to the coverslip. The gelatin melts and you can exert the pressure you need. Put the slide on a level surface, apply the usual weight if you want and leave it to cool.

Of course you can make some pretty slides if you have a hot plate (even so small as the Adam's proposal or as good as J. Legrand’s oven) to heat your slide while you are working, if you have a very clean jelly and take the precautions and the time to exclude all the bubbles. When you take the slide out of the heat, the medium jellies in a hurry and your preparation is almost finished. It took probably less than half an hour from start to finish.

Other Commentaries : About the permanence of the jelly preparations I see one testimony of some slides in the British Museum of Natural History which are over 100 years old.

image 007
image 008
image 009
Sometimes air bubbles can be useful!! This one is showing the good centering of the darkfield stop under the condenser.

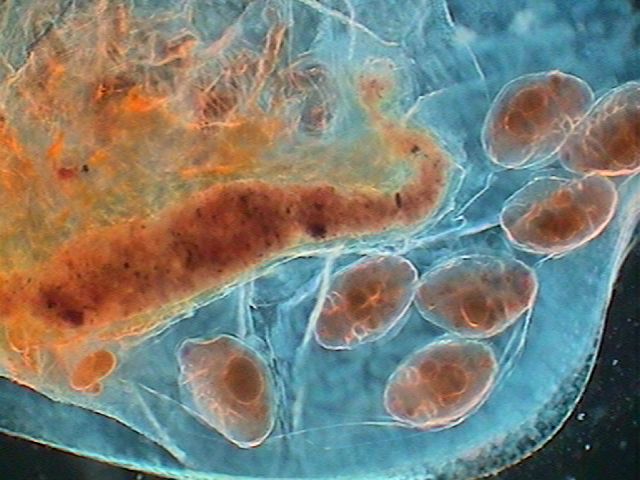
The brood pouch of a daphnia.


An advanced embryo in the brood pouch.


Yes!, Yes! We have arrived at the end of the series on SAFE MOUNTANTS FOR AMATEUR MICROSCOPISTS. If you want to read a summary, with my selection of which I consider to be the best, you must click here to read the great FINALE.

REFERENCES

Howard Webb - MICSCAPE MAGAZINE, November 2001
J.M. Cavanihac - Montage des lames, MicrOscOpieS M@gazine
Brian Adams - MICSCAPE MAGAZINE, February 1999
Jean Legrand - Construction d'une hotte de sechage, MicrOscOpieS M@gazine
Walter Dioni:
Micscape Magazine. SAFE MICROSCOPIC TECHNIQUES FOR AMATEURS. I - MOUNTING MICROSCOPIC SUBJECTS:
 
Part 1: Introduction - liquid media. December 2002
Part 2: Soldifying media. January 2003
Part 3 - Mixed mounting media - Part A; fructoglycerol and modified Brun's medium as mountants March 2003
Part 3b. PVA-lactic acid and PVA-glycerol March 2003
Part 3c - Gum arabic media March 2003


Comments to the author, Walter Dioni, are welcomed.


Microscopy UK Front Page
Micscape Magazine
Article Library


© Microscopy UK or their contributors.

Published in the August 2003 edition of Micscape.

Please report any Web problems or offer general comments to the Micscape Editor.

Micscape is the on-line monthly magazine of the Microscopy UK web
site at Microscopy-UK

CODE="email.class" CODEBASE="../art97/" WIDTH=1

© Onview.net Ltd, Microscopy-UK, and all contributors 1995 onwards. All rights reserved. Main site is at www.microscopy-uk.org.uk with full mirror at www.microscopy-uk.net.