 |
SAFE
MOUNTING TEN
YEARS AFTER 2nd
Part Walter Dioni Cancún, QR, Mexico |
The following are the observations and comments on the mounting media based on gum arabic and resin products. They contain a couple of facts that were surprising to me. Read especially the reviews and documents on GLG and NPM.
GAF-with gum arabic and fructose
www.microscopy-uk.org.uk/mag/artmar03/wdpart3a.html
As it was known that von Apáthy medium sucrose
crystallizes, Lillie based his 1943 mounting medium on fructose and gum Arabic,
hoping that fructose does not crystallize. GAF is based on Lillies medium.
The preparations made by me have had different behaviors. Some, (which are not sealed with Nail Polish) have taken a strong honey tone, very dense in one case. Others (well sealed) are completely transparent, and some (which I suspect have some breaks in the sealant) are beginning to yellow from an edge or an angle.
I think we must find out what causes the coloration, as the conservation qualities of the medium are very good. The only problem it has is that it takes a few days to dry to allow it to be archived with confidence. A good sealing of the borders should prevent this discoloration. (See the final comments on von Apáthy médium)

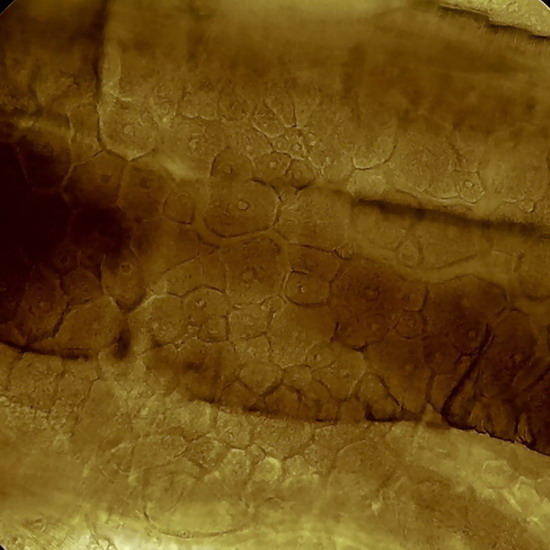
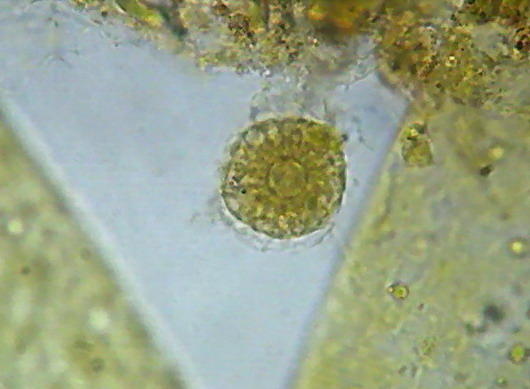
Epithelium around the intestine of a mosquito larva, mounted in GAF. Fig. 1 - taken with the DC-3 and Rheinberg illumination, 10 years ago. Fig 2 - At right, a similar field, taken now with the Logitech. Even nuclei are distinguished, because transparency is good, but the color of the media is a deep coffee.
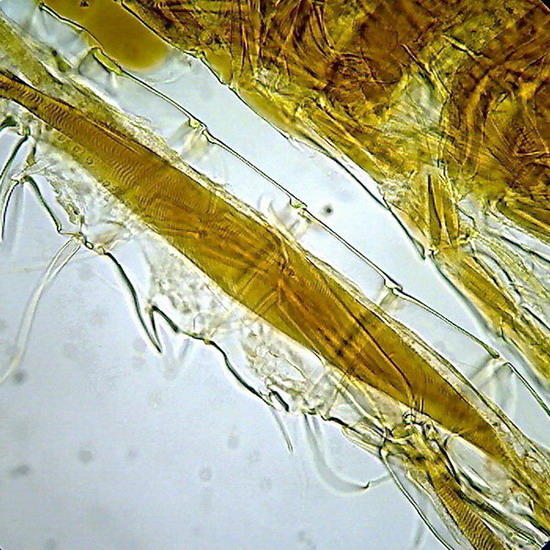
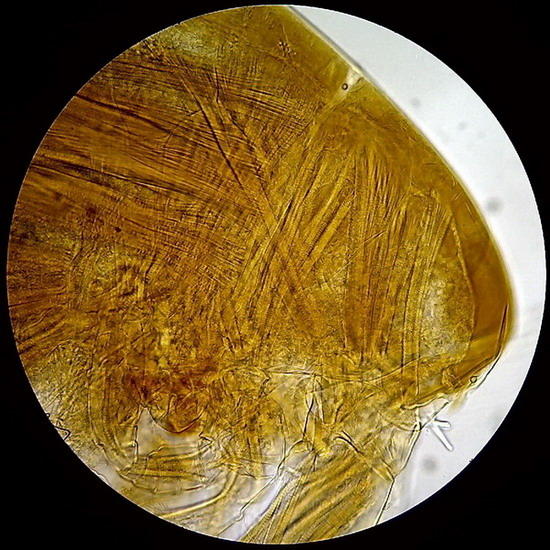
Fig - 3 and 4 Diaptomid copepods, exoskeleton and muscles preserved (fixed in Lactocupric) Preparation sealed. Clear mounting medium.

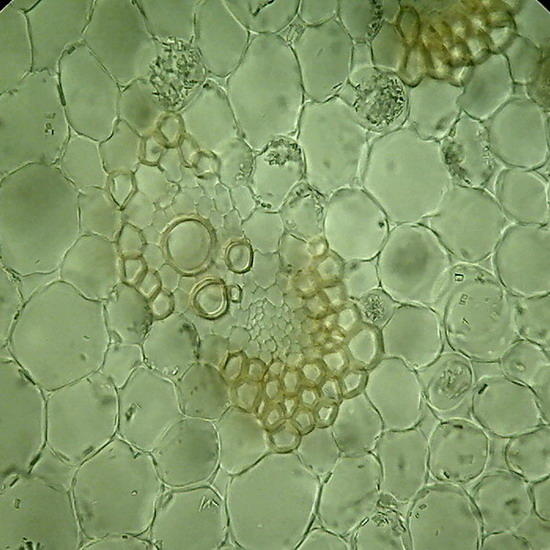
Fig 5 and 6 Botanic sections (Epipremnum aureum, stem) perfectly preserved. Fixed in AFA, cut with a mesotome, no staining. Preparation sealed. Some cells in Figure 6show acicular crystals of calcium oxalate, common in this species.
THE BIG SURPRISE
GLG - Gum with fructose,
lactic acid and glycerin.
www.microscopy-uk.org.uk/mag/artmay03/wdpart3c.html
The original formula was:
GLG
- LACTIC GLYCERINATED GUM
lactic acid 25 ml
gum arabic 40 ml (Commercial solution)
glycerin 20 ml
Karo 10
ml
There was no antiseptic added, because two of the ingredients (the gum arabic solution and Karo) have them included. See the original article.
This is a "Dionis". I found no similar formula published. At the time (2003 - 4th Part) I dismissed it, because it seemed the results were no better than those of PVA-G, which of course remains true.
But its conservation has been excellent, and the mounted material has now nearly the same appearance as when it was just prepared. And the fact that many amateurs have trouble finding PVA, gives it a special interest. It has many advantages, and one disadvantage: in the climate of Cancun, and with Cancun air moisture at certain times of the year; these preparations must rest at least a week before sealing. In drier and less warm locations, it probably will perform better. Surely the use of an oven at no more than 40º C could solve this problem.
This is, with a small but important correction, the solution I proposed in 2003:
Forty degrees (and
more) can be easily obtained, in an amateur's style, by putting the slides UNDER a desk lamp with a
40 or 60W bulb. Turn it on, put a thermometer between the
preparations, and adjust the height of the bulb to obtain a reading of 40 ºC. The
process is more efficient and economic
if you surround this setup with a wall of cardboard or other insulator.
The inspiration for this advanced and ultra modern set up comes from a recommendation by GRAY, 1958, in his book "Basic Microtechniques", which suggests and illustrates an also sophisticated equipment, based on electric lamps, even for inclusion in paraffin!.
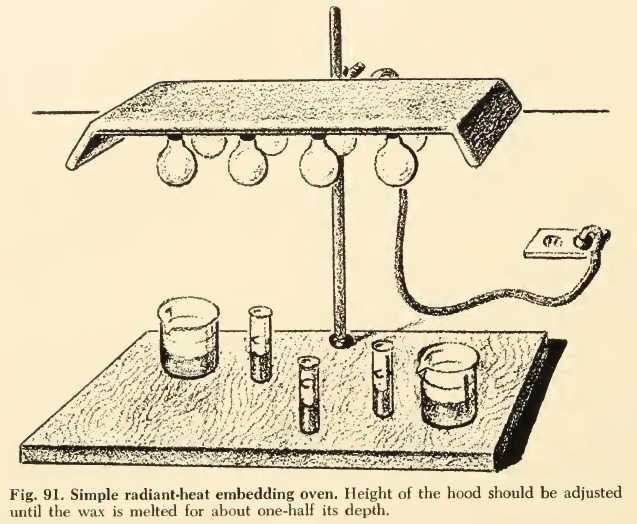
Fig 7
A similar setup can a fortiori be used to help to dry the edges of the preparations, or to concentrate solutions of gelatin, gum arabic or damar, etc.

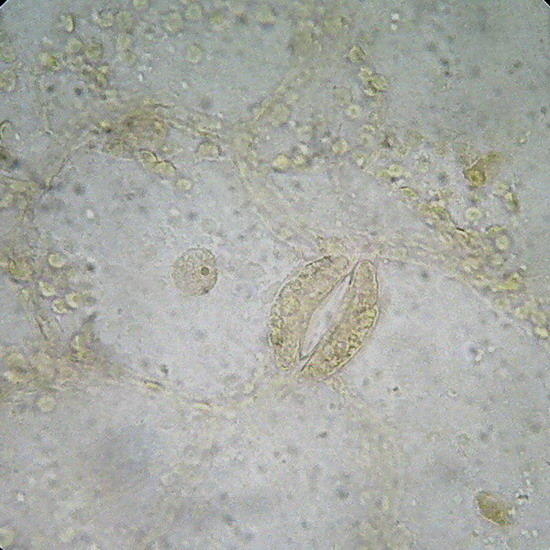
GLG An Aptenia cordifolia epidermis slide, not stained. Fixed with lactocupric, and well washed in distilled water before mounting. Fig. 8 (x40) - - Structure of the epidermis, and color of the chloroplasts of Aptenia, perfectly preserved. The chloroplasts visible outside the stomata must belong in reality to the mesophylle, and adhered at the uplift epithelium. Epithelium cells had not chloroplasts. Fig 9 (100x) See the cell nucleus with its nucleolus, in a companion cell of the stomata.
Its formula includes gum arabic, lactic acid and fructose. Its refractive index is very good as can be judged by the copepod pictures (fig 10 and 11). Some batches of gum arabic may have suspensions of small flocs that litter the background of the preparations. The only solution is to let it decant slowly a very dilute solution for several days, then filter through a coffee filter, or a couple of layers of flannel, and reconcentrate it by heating (using the ultra-modern stove) before adding the fructose.
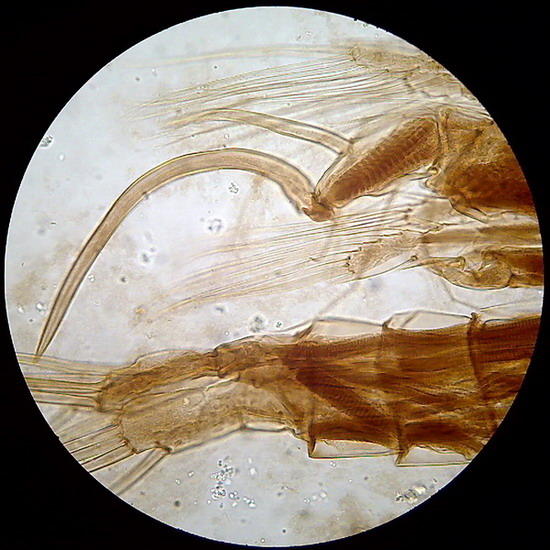
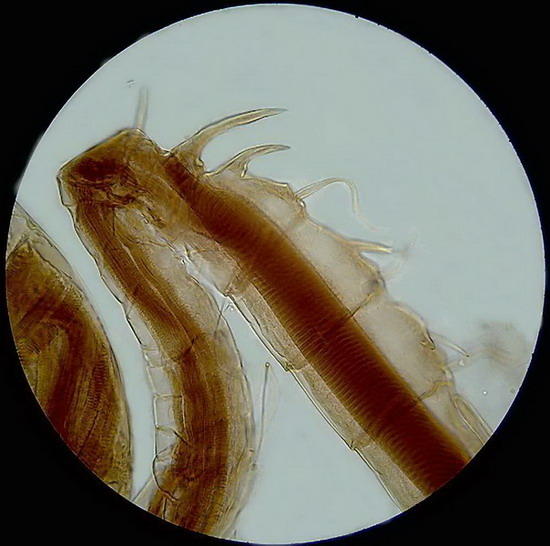
Fig 10 - The fifth leg of the male of a diaptomid copepod, dirty background with flocs and colloidal particles of gum arabic. Fig 11 - Articulation of the antenna of another copepod. In both cases the chitin is well delineated, and the striation of the retractor muscles is perfectly seen (better in the preparation than in pictures).
GLG's original formula was prepared from a commercial solution of gum arabic, sold in stores for artists as a water color fixative and varnish. I am well aware, from my 10 years of age, of the difficulty to dissolve the gum arabic in water, although many sellers ads say it is "easy and freely soluble." A good example is this excerpt from a note whose author in his thesis work strived to prepare HOYERs medium.
Anyway, I've decided that the (Arabic gum) powder from Sigma (which we
have
virtually a lifetime supply of) is not so
bad. We use it to make Hoyer's
solution, which has the following recipe:
50 ml H20
200g chloral hydrate (a controlled substance, requires lots of
fun
paperwork to obtain)
30g gum arabic
25 ml glycerine
The final volume is 200-250 ml. The problem with powdered gum arabic is
that it is really fine, wets quickly, and
makes really slowly dissolving
clumps. The way to
get it in is to add it slowly by sifting through a fine
strainer while the solution is stirring on a
fast magnetic stirrer. Add it
a sift at a time (it took me about 4 days to
add the full amount) and vary
the speed ocasionally so that the powder
doesn't pile up in the middle on
the stir bar.
As soon as you get a few grams in, it will start to form a
thick foam (like meringue) if you stir
fast. This is OK. A couple of
times during the 4 days I stopped stirring
and let it settle overnight.
After a few hours most of the bubbles (which
rise to the top) went away.
At the end, the rest were decanted. This procedure takes a long time but
eventually you will get it all in. Much of the particulate matter in the
gum arabic powder (impurities) settles out
and the remainder is not a
problem for us. I now have enough Hoyer's to finish my thesis
work.
http://www.bio.net/bionet/mm/dros/1994-December/000705.html
Hoyer's medium was discussed in the article on gum Arabic based media,
it is really out of reach of most amateurs because of the difficulty of getting
the phenol and chloral hydrate
So, in the formula of von Apáthy (see article) I used the trick of sucrose being mixed with the gum before dissolving. It works fine. But in the original GLG medium there was no crystals of sugar, to serve as a vehicle for water to invade. This creates almost the same problem we have with PVA. To be able to prepare the formula the amateur microscopist must find by themselves a suitable product commercially available to them, and it is not possible to recommend a particular brand, or closely specify their properties.
But there is a fun thing. The gum is insoluble in alcohol, but is wettable by it. This is the basis of another method for preparing GLG without
problems.
Put the gum in a beaker or similar container. Add just the alcohol needed to moisten it evenly, without
excess. Now add as much hot water as needed, while stirring. The alcohol evaporates. Keep the heat applied until the gum is dissolved. Complete the formula. New
formula:
GLG (Dioni, 2010)
Alcohol c.s.
Gum arabic 20 g
Water 25 ml
Listerine 5 ml
Glicerine 20 ml
KARO* 10 ml
Lactic acid 25 ml
* If not available, fructose syrup prepared as directed by Larry Legg may be used instead.
GUM DAMAR
www.microscopy-uk.org.uk/mag/artjan03/wdmount3.htm
Is a resinous medium recommended to be dissolved in xylol (very difficult for amateurs to buy, and potentially dangerous). But it can be used with turpentine instead, as I did, which is available in stores for artists. Turpentine, which is much less toxic than xylol or toluol, is not prohibited or restricted.
Gum Damar is relatively difficult to prepare (should be prepared hot, it takes time to dissolve, requires a long settling time to become clear). The solvent evaporates very easily and therefore requires the availability of small bottles with very tight closure.
But the damar is as good as balsam (even more so because it turns yellow more slowly), easily available, relatively inexpensive and easy to use.
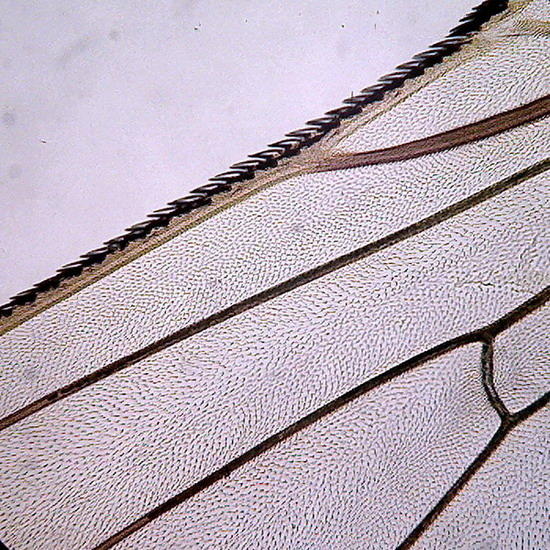
Ten years ago I only prepared one flys wing. It kept neat and clean, without stains of any kind. Pictures of the wing in the 1st, 2nd and 3rd parts of the articles on the Logitech, are of this preparation. It responds fully to expectations.
I didnt consider necessary more experiments with this classical mounting medium, which is also supported, in a more complex formulation, by Clompton, who uses xylol as a solvent (http://www.peru.edu/gregarina/index.html). In papers that indicate in detail how to work with this replacement of Canada Balsam, it's economic and within reach of any amateur. (If there is a good nearby supplier of materials for artists) and thus jumping the barrier imposed by the restrictions on the sale of xylol, if you use turpentine, or the almost always available thinners for wood paints. I also say in the original article that this is a medium to be handled only by adult amateurs, and with proper precautions.
Of course to mount in damar requires a good
prior dehydration of materials, through the use of a series of rising
concentrations of alcohol.

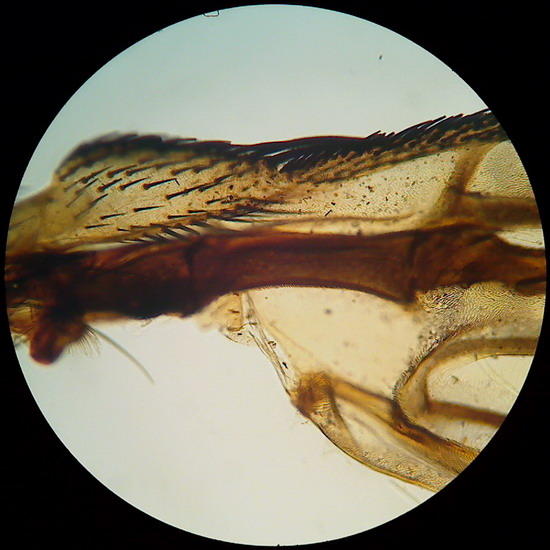
Fig 12 & 13 Surprise!! Two more pictures of the wing (4x and 10x objectives) for those that
perhaps are not bored to see it.
I
promise with all solemnity no to use it again!
NAIL POLISH Mountant (NPM)
www.microscopy-uk.org.uk/mag/artjan03/wdmount3.html
Generally used as a sealer, good quality nail polish is also a very
accessible mounting medium (but not too cheap, given the small bottles in which it
is sold).
Unlike aqueous media, this is a resinous medium like damar, which requires dehydration of the material to be mounted. I have mounted algae and periphyton, leaf epidermis and insect parts. Its outstanding quality is its fast drying, good transparency, and good refractive index. If the subject can become dehydrated or thoroughly dipped in a solvent compatible with the enamel, it can be mounted in NP. To dehydrate with alcohol use it in successive baths, stepped in 20% steps from 30 to 96%. Many subjects can be mounted directly from this alcohol. Others will need an additional bath in a solvent that acts as an intermediary with the enamel. Appropriate solvents (acetone, polish remover, butyl acetate) are sold without problems in the same boutiques, pharmacies or drugstores where you can get the enamel. There are no restrictions on sales. And they are miscible with both alcohol, and NPM.
For me, the most surprising finding was the fact that the first preparations I made still retain the dye (Fast-green) that was used. A fact that (at least for the amateurs, and if this is repeated with other dyes) puts it at the height of Canada balsam or Damar resin, with the advantage that the NPM has not shown the least yellowing, as always happens with the balsam.
Of course the problem is that there is not one, but a lot of nail polishes (the proceeds of the beauty industry rely on the continued production of new developments). However, I believe that sticking to the transparent enamel of a good known and stable brand, one can find a great amateur mounting medium. I have no business relationship with manufacturers of REVLON enamels, but those are the ones I used from the start, and gave me good results.
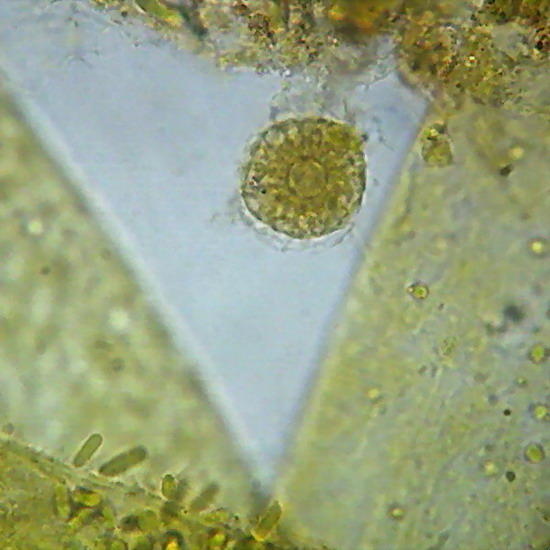
Two extreme subjects: Fig 14 - An heliozoa, staining with Fast Green, showing the typical central nucleus and vacuolated cytoplasm, with retracted axopods of course, within branches of the alga Cladophora. Down the center on the alga are epiphytic cyanobacteria. They have lost the natural phycocyanin (Phycocyanine)color. (Obj. 100x) Fig 15 - To the right, a section of a fly's wing. (Obj 40x)
Norland 61,
I have never used this mounting medium. It is a polymer that is cured with UV light (indirect
sunlight or a tanning lamp) to reach a proper hardening. Although its primary use was, and is, to correct cracks in
automotive windshields, since the 1990s many amateurs reported they find it
useful for diatoms, radiolarians and silicoflagellates mounting, due to its
high RI, and because, apparently, is an alternative (economic and easy to find)
to the mounting media currently used. But so far I had not seen amateurs images published on the
net, which claimed to have been taken from preparations mounted in Norland.
It must be effective, because there are published
works of professional scientists, which specify it in describing its
methodology. These are four examples:
http://www-odp.tamu.edu/publications/183_SR/009/009_3.htm (without images)
http://pangea.stanford.edu/research/Oceans/GES206/readings/Taylor%20and%20Leventer%202003.pdf
http://publications.iodp.org/proceedings/302/103/103_3.htm (used for radiolarians)
http://www-odp.tamu.edu/publications/191_SR/VOLUME/CHAPTERS/009.PDF
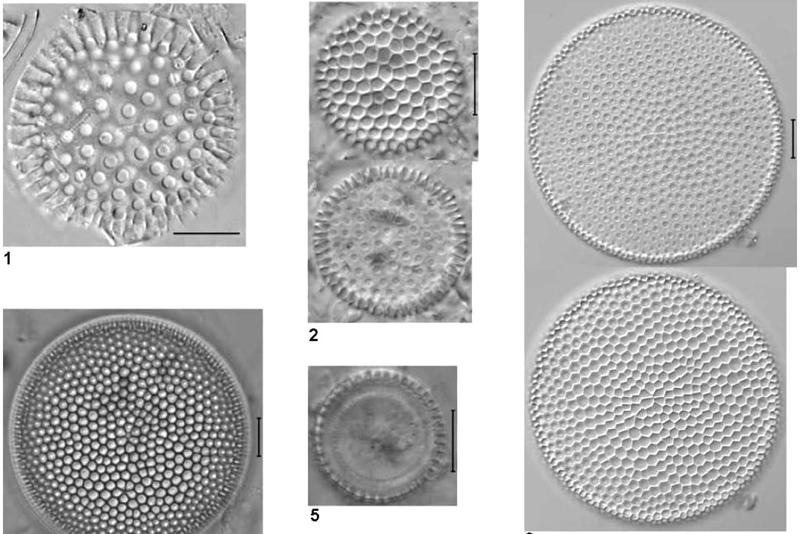
Fig 16 - Images of fossil
diatoms mounted in Norland 61 taken from the last work cited
I keep expecting to see
pictures by some amateur diatomists which may have used the Norland.
A NEGLECTED MOUNTING MEDIUM
Historically many microscopists use a special observation
medium that they identify as such referring to their slides as air mounted, or dry mounted." Those microscopists who try to work
with foraminifera, or with the tiny shells of ostracods, and sometimes
microfossils, they know that it is useful. It is perhaps the most economical medium to display microscopic materials.
You do not need more than a few clean and dry slides and, maybe, for some subjects, a very small drop of PVA Glue (Polyvinyl Acetate, not Polyvinyl Alcohol) Of course the preparations can be made more permanent. It just takes making a cell in the appropriate depth (see the corresponding article. If you have at your disposal plastic double-sided adhesive tape, that would be ideal), a transparent adhesive (previously microscopists used tragacanth gum, today proposedadhesives based on polyvinyl acetate (white school glue, I think that adhesives based on polyvinyl alcohol will work even better, like the one which I use to prepare the PVA and PVA-G/L) and adequate coverslips the size and shape of the built cell. Italso needs a sealant of course, to complete the slides.
The lucky ones who can get round
coverslips of a couple of sizes, can test them, with great advantage in the
visual impact of their preparations, according to the recommendations of the
following article:
http://www.microscopy-uk.org.uk/mag/artoct01/bdmount.html
A Simple Cell
for Dry Mounting by Brian Darnton, UK
Cells much cheaper, if you get the proper punch, or cut self-adhesive labels using a scalpel or an X-acto, are those proposed by Jim Benko .
http://beyond.prodelos.com/2001/jun/benko/drymounts.html
Possibly you also need to build some simple tools to manipulate the
materials to be glued to the bottom of the cell. Select one from this "toolbox"
(http://www.eeob.iastate.edu/faculty/DrewesC/htdocs/toolbox-sections.htm)
And take the decision to
experiment.
Using a stereo-zoom is an invaluable, and almost
indispensable aid for this work, but if not available, you can use the comic
"Köhler Microscope"
http://www.microscopy-uk.org.uk/mag/artdec04/wdkohler.html
I described this some time
ago. It is really useful, beyond doubt, for
anyone without a stereoscopic microscope but having a binocular that has a
condenser. It works.
Beautiful images of
foramininifera (dry mounted of course) at:
http://www.microscopy-uk.org.uk/mag/artaug98/rwforam.html
http://www.microscopy-uk.org.uk/mag/artfeb10/bd-needle.html
So, if you do not like to
prepare mounting media, do not miss the opportunity to enjoy hours of
stimulating and instructive work, using the healthiest and more economic medium.
An impressive display of different
subjects, and of the various techniques used to mount things in the "old
days" can be enjoyed at
http://www.victorianmicroscopeslides.com/slide1840.htm
If you do not want to spend your precious time to prepare mounting chambers (and definitively are not interested in lasting slide mounting), take a small vacation from your wet mounts. Close, in spite of everything, for a few days, the hunting season for protozoa and rotifers, and try to observe the epitheliums covering the leafs of dozens of different plants that can be found in your garden (or in yours acquaintances gardens) or in public squares and parks.
Yes, I know it is very very difficult to make an efficient stereoscopic high magnification observation (to see cells and stomata properly requires to work at least at 100x and preferably at 400 powers) but you can try the method recommended by Anne Bruce in the following article of MICSCAPE MAGAZINE, where she summarizes this technique to get transparent replicas of epitheliums
http://www.microscopy-uk.org.uk/mag/art97b/epider.html
Here are a very few examples of what
I could see in my garden.
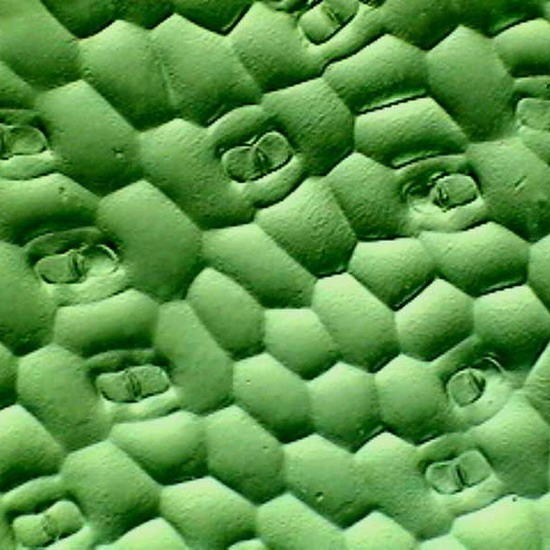
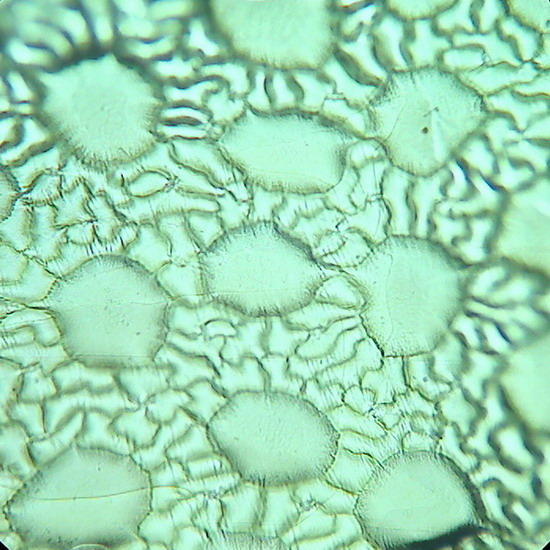
Fig 17. A replica of the epithelium of Tradescantia sp. Prepared with polyvinyl acetate.
Fig 18. Lower face epithelium of Aptenia cordifolia. See one curious detail: in this view there is no a single stoma. This is atypical. The "domes" are the "bladder cells " (water reservoirs) typical of this species. (See my articles on Aptenia cordifolia)
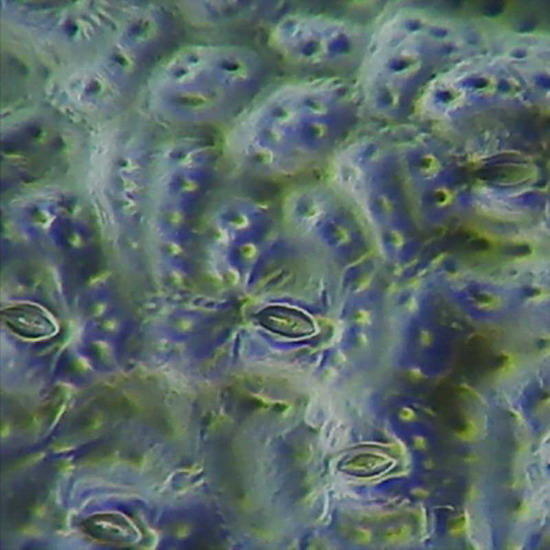
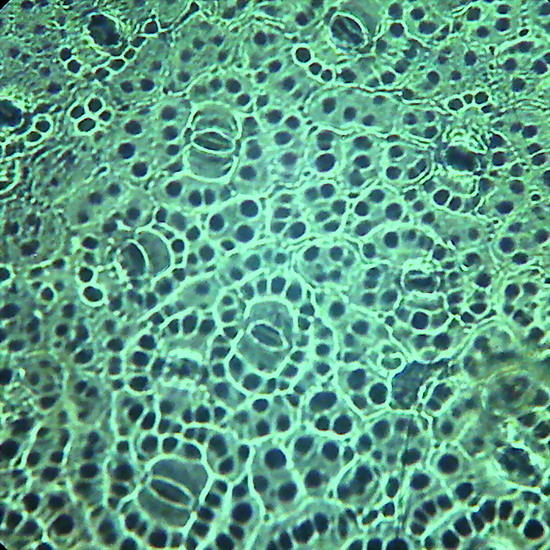
Fig. 19 - Epithelium of the underside of Xanthosoma sp. (Elephant Ear). 40x objective,the focus is on the surface, showing the cell contours and the surface papillae which are typical of these plants. Picture was taken at 14:00 hrs. Leaf was "in situ" in full sun. Stomata closed. -
Fig 20 - The same epithelium, Focus at half height of the relief, obj. 10x
The replicas illustrated in fig. 18, 19 and 20 were made using nail polish. All replicas were mounted dry on the slide, no deep chamber, no coverslip, and observed with oblique lighting. They were ACDSee color amended, except for fig. 20 that shows the colors of capture. Oh!Oh! it is much work? Well you have surely some lamp in the ceiling with a glass sphere around it. Within it you can find a whole population of death moths, flies, hemiptera, spring-tails and the like, waiting to be transferred to a slide. Is it not these a world full of opportunities for amateur microscopists?
Working with
long-term, medium term or temporary mountings, be they either dry or in any
mounting medium, do not miss the opportunity to examine with your microscope the
diverse world around you.
THE SEALING OF THE PREPARATIONS
This overview of ten years old slides makes clear a first conclusion: virtually all preparations which were unsealed show some degree of retraction on the edge, or some internal damage from oxidation. Of course this can be corrected by reviewing the collection periodically (initially every six months for example, and then every year) and filling the retraction if it appears.
But PVA-L results, especially, indicate that, apart from the retraction there is another phenomenon that must be prevented. Relatively thick subjects (even minimally, as a microscopic Thrip, or an aphid) can be crushed, and even deform the thin coverslip!!, by reduction of the mounting medium thickness due to solvent evaporation. This is true even for the elastic glycerin jelly. It does not matter for histological preparations, flat and with thicknesses between 5 and 10 microns, but is noticeable for any other subject reaching 100 or 200 microns in thickness.
Two corollaries
appear to emerge from these observations:
1) do not forget to
lay under the covers some support according to the thickness of the subject
being mounted; or mount in a cell of suitable thickness. These can be built from 50 microns thick and up.
2) do not to forget to
seal preparations made with ANY MOUNTING MEDIUM, if you are interested in the
longest possible duration time. If they do not retract, they can be compressed.
The sealer can be nail polish. But you should give at least two careful layers,
having cleaned and dried very well the edges of the covers and the slide around
it. Seals can be completed, to avoid cracking of the enamel in the medium
term, and because they could help to beautify the preparation, with a coat of
marine enamel or an enamel for automobiles, the desired color.
APPENDIX
An interesting problem
As warned (from a long time ago) in the literature, the von Apáthy (1892) medium, based on sucrose (table sugar) has a danger of crystallizing. That happened with one of my preparations, and I reported and showed it photographically.
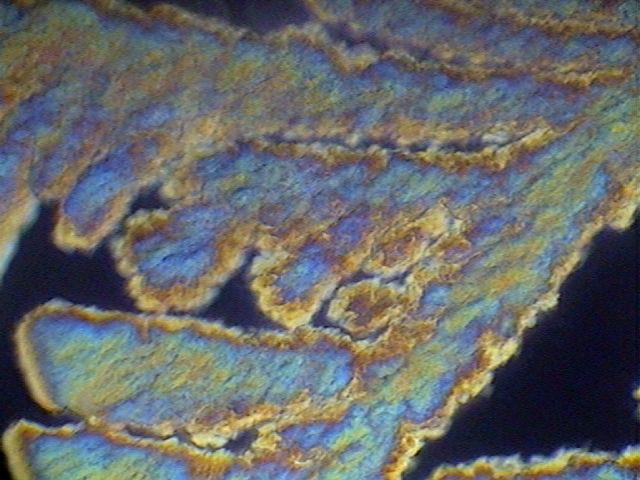
Fig. 21 - The image, showing the growth of sucrose crystals from the edge of the coverslip, taken with the Motic DC-3,with polarized light.
I also assumed at that time that the sealing of the preparations could prevent the event. I was right, because two preparations, which have lasted still today, and were sealed with NP, show no trace of crystallization. However, I applied one coat of the sealer. The same is cracked, and from cuts that match the edge of the coverslip, extends into a brown fuzzy whose origin, by the blurring of color toward the center of the coverslip, appear to be linked to the oxidation of a substance. This is a severe case:
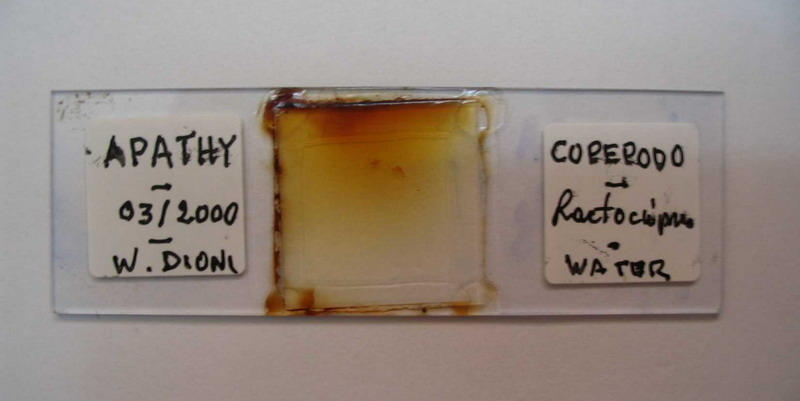
Fig.22
As the same phenomenon is observed in GAF preparations that were not sealed, I think (without any experimental chemical basis, rather than very old memories) that may be the gum arabic. When used as an adhesive in my childhood school days, the old solutions, in addition to be contaminated with fungi and bacteria, darkened strongly in a few days.
The sugars are not responsible, for GAF preparations
were also this color, Apáthy has Sucrose, but GAF has Fructose (in my case
provided by KARO, and the preparations made with Karo himself also remain clear
and homogeneous). The common factor in both mounting media
(v.Apáthy and GAF) is gum arabic, even from two different sources.
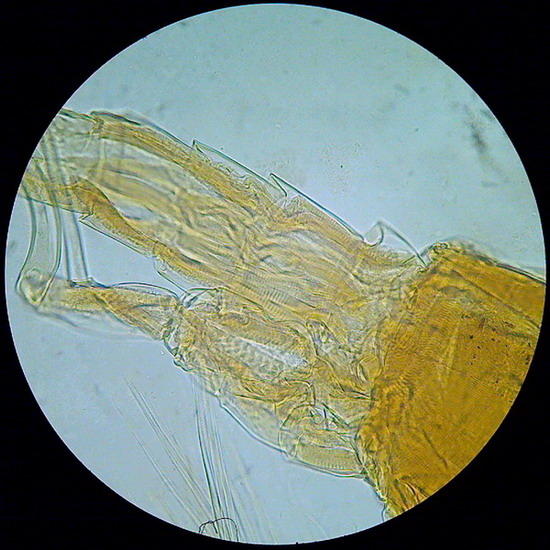
Fig.23 - von Apathy the tail end of a copepod - x 40 - color corrected (AutoExposure - ACDSee) to remove the dark honey color of the mounting medium.
Conclusion
After ten years after preparation, ALL the media
recommended in 2003 as good prospects, for amateur use at least, demonstrate
good medium term stability. The elapsed time allows us to now make some recommendations to enhance ever more the chances of good conservation of
these mountings. And I'm pleasantly surprised by the behavior of two of them.
Nail polish has proven to maintain at least one histological
stain for 10 years, prompting more studies. A problem however is the verification of their quality and availability, due to the multiplicity
of brands on the market.
And GLG, even if it raised some doubts ten years ago
because it was a slow drying medium (in Durango atmosphere at least) has shown
an outstanding behavior, with very good conservation of chlorophyll colour and faithful
conservation of structures in plant and animal materials. It deserves a full
trial, with diverse materials, including histological sections and stains. Its
new formulation allows an easier gathering of adequate ingredients, and a more
standard preparation technique.
THE ELEVEN TESTED MEDIA OPEN AN AMPLE SPECTRUM OF SUBJECTS THAT COULD BE MOUNTED TO PRESERVE IT AS WITNESSES, OR AS CONSULTING MATERIAL, OR AS A SIMPLE DISPLAY OF THE DIVERSE WORLD AT OUR REACH.