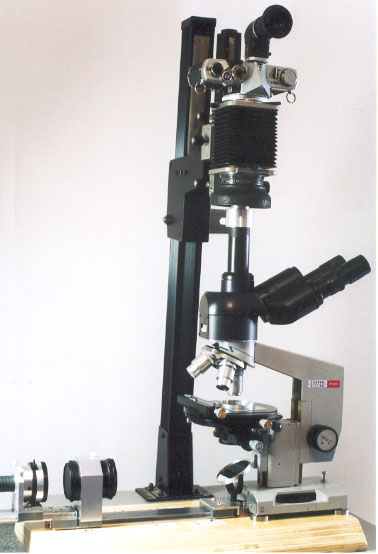
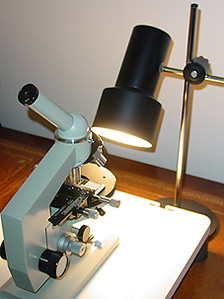
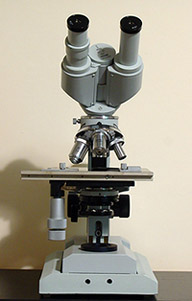
A
typical LOMO Biolam stand, shown here with the HLS-1 quartz
halogen base.
|
Notes on some lighting options
for secondhand
LOMO Biolam microscopes
(Most
options are also applicable to any microscope with a mirror requiring external
lighting.)
compiled by David Walker, UK
with thanks to other Micscape
contributor's articles to
which this page links.
|
LOMO Biolam* microscopes are frequently auctioned on
eBay (UK) and can be excellent value. The commonest stands sold
have a mirror so the buyer will require a light source. This article summarises
a selection of lighting options hopefully of use to the Biolam purchaser who
is unclear of what is
available. Both homemade lamps and most in the LOMO range are covered with comments on their relative merits
and tips on using them. (*The variants of the Biolam stand inscribed 'P1Y4.2'
shown above is being referred to here.)
The comments are based on the author's lamp examples
dated ca. 1970-80s and are those likely to be sold used in the UK.
I'm not certain if the Biolam microscopes and lamps in countries where offered new are of the same design or what
bulbs are currently supplied. Some modern Biolam type stands do now come with
built in lighting.
If unfamiliar with
the types of microscope lighting e.g. 'Kohler' and 'critical', Frithjof Sterrenburg's Microscopy
Primer gives an overview.
Comments to the
compiler
David
Walker
are welcomed.
This
page isn't intended to be read linearly; lamps are admittedly unexciting but vital,
so just dip in to any option of interest!
All images by the
compiler unless otherwise indicated.
All the external lamps discussed are best used with
the flat side of the mirror.
Tip: If a lamp is poor at the lowest mag, take
out the condenser and try using just with the mirror and the lamp.
A wide variety of other lamps have been shared by Micscape
contributors. See the Micscape Library
- Techniques - Lighting section.
Getting started lighting.
Slide
box for viewing 35mm photo slides.
(The microscope is on a variable
height computer monitor stand; a good way of raising its height to a comfortable
viewing height and creates dust free storage space underneath. See
this topical tip.)
Daylight: This is such
an unreliable light source (especially in the UK!) and rules out any after dark
microscopy that it's not really a viable option for regular use. Also need to
be careful, especially with kids, that the mirror doesn't pick up a direct image
of the sun. Directing the mirror at a north facing window indoors is OK or
if in the field where light source options may be limited.
Light box for 35mm photo slides:
I recently bought a small fluorescent light box (5x4 inch lit area) for
ten pounds or so for it's real use but it's also an excellent glare free, white
light source. It's the only light source I know of that can evenly fill the
field of view with a 3.5x objective with no bulls eye or diffuser. It's best
to buy with the maker's recommended power supply (a small plug-in wall adaptor)
as the batteries don't last long.
It's not an intense light source but fine for
low to mid power brightfield visual observations and a useful readily available stepping stone for better lighting.
This is a good lamp for the kids to use because
it's cold running with external low voltage* supply,
so if pond water is being splashed about,
it's safe.
* Higher voltages are generated
inside the unit to drive the fluorescent tube so must not be dismantled to change
bulb when live.
Return to Lamp Menu
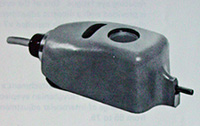
Desk lamp fitted
with photoenlarger bulb.
 A well ventilated and earthed ca. 60W desk lamp such as the
design shown can make the basis of a good microscope lamp to start out with
at little cost. Domestic light bulbs aren't very evenly frosted but can be changed
out for an equivalent wattage photoenlarger bulb available for a few pounds
from camera shops. These give a much whiter light and very even frosting without
much glare. Although a very simple modification and lamp design, this in the
author's opinion is capable of giving excellent illumination and superior in
some respects to the less than perfect LOMO Kohler lamps. It's particularly
useful at the lowest mags because of its large illuminated area as no extra
diffusers are needed in the light path and where even lighting with Kohler can
be tricky.
A well ventilated and earthed ca. 60W desk lamp such as the
design shown can make the basis of a good microscope lamp to start out with
at little cost. Domestic light bulbs aren't very evenly frosted but can be changed
out for an equivalent wattage photoenlarger bulb available for a few pounds
from camera shops. These give a much whiter light and very even frosting without
much glare. Although a very simple modification and lamp design, this in the
author's opinion is capable of giving excellent illumination and superior in
some respects to the less than perfect LOMO Kohler lamps. It's particularly
useful at the lowest mags because of its large illuminated area as no extra
diffusers are needed in the light path and where even lighting with Kohler can
be tricky.
I've used one successfully
for many years for quite a lot of visual work and photography at low to mid microscope
powers but does start to be underpowered for techniques such as darkfield and
polar filter uses. It's quite bright as diffusers aren't needed and works well
with the Abbe condenser bulls-eye for the lowest 3.5x objective.
The lamp is used in a variant of the so-called critical
illumination mode, which sounds techie but simply means that with subject focussed
on slide the condenser is focussed on the lamp frosting, although it's a benefit
to slightly defocus to remove any hint of frosting structure. It doesn't have
a field iris but the bulb is relatively glare free, (point lamp down as shown so
as the bulb is not seen at eye level to minimise glare).
Safety notes: Don't
be tempted to change out the maker's recommended wattage bulb in the desk lamp
for a higher wattage photoenlarger bulb as this is unsafe, potentially causing
overheating and even fire. Desk lamps like these do get hot in normal use so
best not to use unattended or where kids can touch them. Also if studying aquatic
samples, handling water around the microscope and near a mains operated lamp
isn't ideal even if correctly earthed, so low voltage lamps are a safer long
term solution.
Return to Lamp Menu
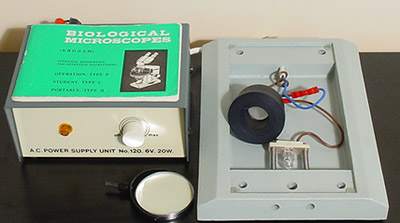
High intensity OI-19 lamp
OI-19
lamp; also shown with a simple but effective set-up for quickly
switching
to flash for photomicrography.
Details:
Uses a 8V/20W tungsten bulb with Ba 15d base
powered by a variable low voltage power supply.
Focussing by the friction
fit lamp base, with two element field lens and field diaphragm. No lamp centering but the
bulbs are usually reasonably centred.
Pros:
Has the important features required for Kohler.
Versatile.
It rapidly doubles up as a lamp for top lighting simply by raising the lamp
holder on the stand.
The design allows simple electronic flash to be available
quickly, see this article for an example.
Mechanically sturdy and hard wearing
paint finish.
Limitations: Uneven lighting if used without diffusers. Poor
light coverage at lowest mags. 20W isn't sufficient for some microscopy techniques
with photography especially if diffusers used, e.g. darkfield and phase at higher powers.
(Note that some 'limitations' aren't unique to this lamp but a limitation of 'Kohler'
type lamp designs with small bulb filaments; see comments in Tips
to improve.)
Return to Lamp Menu
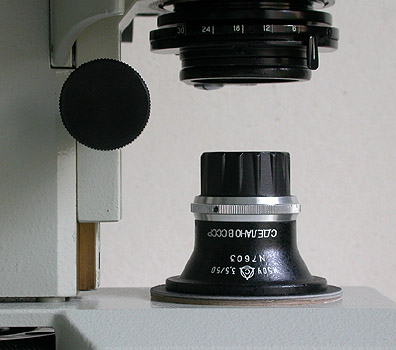
Kohler OI-35 lamp (these notes apply to the older
lamp likely to be sourced secondhand).
Iris
and condenser focus on tube. Internal mirror adjustable by silver
screws for filament alignment. Bulb centrable at back of bulb housing.
Details:
Shares the same features as OI-19 with addition
of centering lamp housing.
Lamp fits in the hole in the Biolam stand
base with the mirror removed.
Pros:
All the features required for Kohler.
The
design avoids alignment errors with external lighting.
Limitations:
Offers no significantly better quality lighting than OI-19
and similar disadvantages in light unevenness without a diffuser and intensity loss with diffusers.
The
unit is deep and gives a congested understage preventing dual tungsten / flash
set up possible for the OI-19. Also less convenient for quick condenser changes.
(Note
that some 'limitations' aren't unique to this lamp but a limitation of 'Kohler' type lamp
designs with small bulb filaments; see comments in Tips
to improve.)
After stripping down the OI-35 lamp and comparing with
the OI-19, the former seems to use the same field lens. So if used with the Russian bulbs supplied
in the 1970's/80's and which may come with a secondhand sourced lamp, the Kohler is not
even enough for photomicroscopy unless a diffuser used.
I bought my OI-35 for Ł39 at a club meet and can be good value secondhand. The new
OI-35 variant at typically $590 seems to be externally similar but note it is advertised
with a 6V/15W halogen bulb so the bulb may be an improvement on the tungsten. The high
price new of this lamp isn't unique to LOMO, although
Kohler lamps are optically and mechanically much simpler than a microscope, they are
often sold for much more than the cost of the microscope. Update Nov. 16th:
Just found a US dealer selling an OI-35 variant for $125 with an 8V/50W bulb
so the price and spec seems to vary quite widely.
Return to Lamp Menu
Tips to improve the OI-19 and
OI-35 lamps.
1) Change the bulb for a better one if needed.
A fellow LOMO enthusiast suggested to
me some years ago to change the Russian supplied (8V / 20W)
bulb in the
LOMO for a Philips 13347W (6V / 15W), so pass this tip on. To ensure
the bulb isn't overrun, a marker can be put on the intensity
knob dial at 6V. It's worth checking with a voltmeter when the bulb
is under load what the exact setting for 6V is, as the graduations
on the power supply aren't always accurate.
|
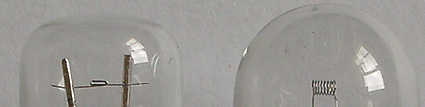
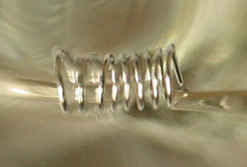
Side
view of left, Philips
13347W bulb and right, the typically supplied Russian
bulb showing the Philip's flat filament and flatter glass envelope.
|
|

Philips
13347W - view of filament from front. The bulb
gives an excellent filament
image, which is evident in the projected image below.
|
Russian
bulb - view of filament from front. The
unflattened coil and distortions introduced by the glass envelope gives
a poor projected image as shown below.
|
|

Philips
13347W - focussed filament image projected onto paper, field iris partly stopped down
to typical user setting.
(In Kohler the filament would be focussed on the iris diaphragm
of the correctly focussed condenser).
|
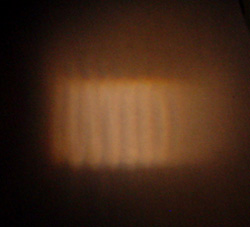
Russian
bulb supplied with LOMO lamp, focussed filament image at same lamp distance . The filament is uneven when focussed and gives
glare for the same field
iris
setting as Philips.
|
2) Use of diffusers supplied
The limitations of achieving even Kohler lighting with a small
filament bulb, field lens and no diffuser especially at lower powers isn't unique to the
LOMO lamps. The big name microscope makers' built-in lighting often has a permanent or removable
diffuser in the light train, with or without an option on the
condenser for low power objectives. The microscopy text
books often note that the only place a diffuser can be inserted to retain
Kohler is in front of bulb but before the condenser and many makers adopt
this.
LOMO do supply a
range of diffusing plates for the LOMO lamps but not practical to adopt the
recommended diffuser positioning. For practicality and for non-critical work, putting
the diffuser in the condenser filter tray with or without the swing in bulls-eye on
Russian Abbe condenser is fine. I've read that some hobbyists sand the
front of the bulb to give a diffuser but my attempts were disappointing and
lose the option to use a clear bulb at higher powers when desired.
The problem with diffusers either permanently built-in or optionally
added is that they cause a large drop in light intensity and the 15-20W lamps typically
used in many microscopes can run out of steam at higher powers or for techniques
like darkfield, phase or polar filter use. It's best to experiment with or without
diffusers with a given objective and subject to see if the image quality is being
deteriorated; some loss of perfectly even field for visual or photo work may
be preferable to loss of quality. Paul James gives a good overview of the pros
and cons of diffuser use in this article, Illumination variants,
diffuse lighting.
Return to Lamp Menu
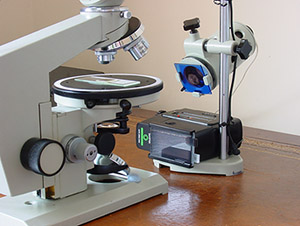
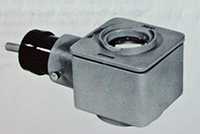
HLS-1 quartz halogen lamp base
Left:
HLS-1 on LOMO. The two screws on base centre the bulb.
Right: lamp base
detail and typical power supply. The bulb is centred using spring tensioned
screws acting on the ceramic bulb base.
The removed field lens in sturdy
metal mount is also shown.
Details:
A sturdy cast metal base for the Biolam stand
with centrable 6V/20W (G4 fitting) quartz halogen lamp and variable intensity power supply.
A single element field lens sits in the hole on LOMO base with mirror removed.
Pros:
This is probably the most professional and neatest
looking lighting option for the LOMO, effectively converting it to an internal
lighting stand with the benefit that has on alignment and space saving.
Also
quartz halogen gives a whiter light.
The bottom face of the field lens is
ground glass so it's a permanent diffuser to give good even lighting. The lamp
base screws to the underside of the Biolam and gives a noticeably more rigid
unit and also provides a useful height increase as the LOMO stand sits
rather low on a typical desk. Some LOMO's come up on eBay with this lamp fitted
and sometimes with the larger fitted wooden box to accomodate it.
Limitations:
The diffuser does significantly drop the potential
light output from the lamp, nullifying to some extent the benefit of quartz
halogen cf tungsten. From the author's tests, it's not significantly brighter
than the OI-19 and OI-35 where there's the option to use without a diffuser.
Tip:
As an experiment the author painted the ground
glass surface with clear nail varnish which almost makes it a clear element
so then offers the option of using the Abbe condenser bulls-eye and/or diffuser
depending on light intensity required. This is reversible by cleaning element
with acetone. The author preferred ground glass on element overall.
Return to Lamp Menu
LOMO 'substage lamps' and
thirty party models
Left:
LOMO OI-32E. Right: LOMO SL-4.
The author has no experience of these lamps, but from TOE's (a former
UK distributor) 1970's spec. sheets (from which images right are
sourced) they use mains voltage 15W bulbs. A used microscope
may come with one of these.
The SL-4 replaces the mirror with prong shown and is a simple
design with frosted glass. Third party designs for microscopes with
a mirror are also available from dealers but one of the other designs
is better for regular use.
The OI-32E sits in the hole in the stand base after removing
the mirror and a more stable design than the SL-4. It is described as having a condenser and has a filter
tray so should be more competent than the above. Homemade field
stops can be made for this if desired. See
this Micscape Topical Tip by Ian Walker.
The intensity of such lamps are fixed and lack a field stop so
can suffer from too much or too little light intensity depending
on mag used. Neutral density filters or polaroid filter can reduce
intensity if there's glare at lower mags.
Return to Lamp Menu
© Microscopy UK or their contributors.
Published in the October 2005 edition of
Micscape.
Please report any Web problems or offer general comments to
the
Micscape
Editor
.
Micscape is the on-line monthly magazine of the Microscopy
UK web site at
Microscopy-UK
© Onview.net Ltd, Microscopy-UK, and all contributors 1995
onwards. All rights reserved.
Main site is
at www.microscopy-uk.org.uk
with full mirror
at www.microscopy-uk.net
.