First, it's necessary to define some fundamental concepts necessary
for a further discussion of the microscope. Secondly, here are some golden
rules on what to do and what not to do, to avoid the most serious errors.
It is assumed that the reader does have a microscope, but is not yet an
expert user. Any slide with reasonably finely structured diatoms will do
for the experiments described.
Contrast and resolution
The main task in microscopy of objects that do not show colour - which
is why diatoms are an excellent example - is to find a good balance between
contrast and resolution.
Unfortunately, one cannot always have both, in ordinary microscopy (called
"brightfield"
because the objects are seen against a bright background) the one is at
the expense of the other. This is why phase-contrast and interference-contrast
have come in. Contrast and resolution have often been confused, but since
computer images have become familiar to all, an explanation has become
easier.
Contrast is the difference between the brightness of various details in the object, and the difference as compared with the background. A typical black and white computer image will consist of pixels in 256 shades of gray, ranging from intense white to intense black. The "gray-value" of the pixels will thus lie between 0 and 255. If the values in the image range from 30 to 50 only, contrast will be very low (soft image), if the values range from 30 to 200, the image will be very contrasty. If the background has a uniform pixel value of 50 and the image pixel values range from 70 to 120, contrast between object and background will be poor; if the background pixels have a value of 50 and the image pixel values range from 120 to 180, the object stands out clearly from the background. The figures given are arbitrary, it's the principle that counts and for colour the situation is similar..
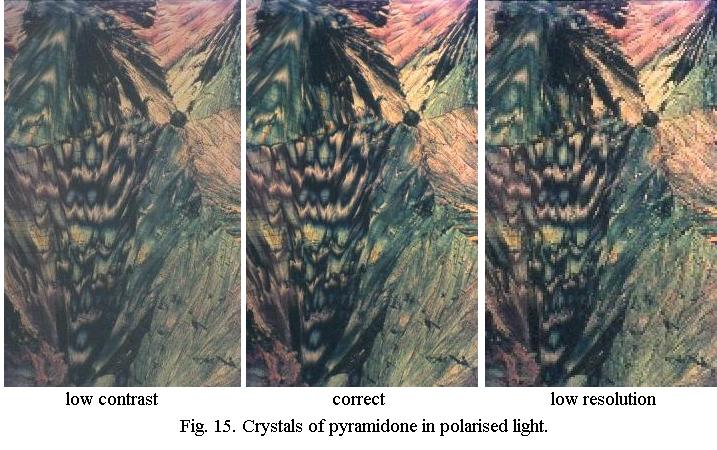
Resolution is the finest detail actually visible in the image (the resolving power is the highest resolution possible with the lenses in question). This is roughly comparable to pixel size: the smaller the pixels, the finer the detail visible in a computer image. The maximum resolving power (think of it as "optical pixel size") for a 40x/NA 0.65 objective is about 0.5 µm, for a 100x/NA 1.25 objective it is about 0.25µ. Whether that value is really attained depends on the expertise of the microscopist. It's just like when you scan a picture for the computer: if you do this at 100 dpi (dots per inch) quality will be much poorer than at 600 dpi, for instance.
Fig. 15 shows low and high contrast, at the same resolution and low and high resolution at the same contrast. High resolution does not help much if visibility is very poor and good contrast is not helpful if you don't see fine detail! Both contrast and resolution are determined by the "illuminating train", particularly the focusing of the condenser and setting of the condenser iris diaphragm.
Hints:
Here are five typical beginners' problems:
1) do not examine objects - in particular, a drop of liquid material - without using a cover-glass. The objectives may become wet and the image will be extremely poor anyway.
2) when switching to higher power in the beginning, look at the objective from the side to check that it does not crash into the slide. You would not be the first to put a slide on the stage upside down!
3) adjust the lamp brightness for optimum comfort with a dimmer control. If the light source is an intense one (low-voltage, halogen), always use an "anti-infrared" filter because IR in the long run severely damages the eye. Good intense light sources have such a filter built in, check with the dealer if you're not sure.
4) the fine focus control may have a limited range of about 2 mm. In that case there are two small markers somewhere on the limb, plus a third, moveable, marker opposite them. Adjust the fine focus control until the moveable marker is about midway between the fixed markers. If it's at the limit, the fine focus will no longer work in one direction. Check this every now and then.
5) Microscope lamps may produce somewhat yellowish light. If you put
the blue ground glass filter that often comes with a microscope
in the filter ring below the condenser to correct for the yellowish light
and make the illumination more even, you have about the worst
illumination possible. Only use a clear light blue filter
and find a way to attach it permanently to the lamp (some lamps have filter
rings). You can then use the filter ring of the condenser for other purposes
- see later.
Some experiments
If you use a "vintage" or simple microscope, this may have a mirror instead of a built-in lamp. Use the flat surface only. You will then also need an outboard lamp. For the time being, use whatever you have (e.g. a desk lamp), placing the lamp about 35 cm away. Adjust the mirror and the position of the lamp (turn, tilt) for even illumination of the field of view.
Most modern microscopes have some form of built-in illumination. Set up the microscope according to the instructions in the manual, or to the best of your ability if you don't have a manual. Switch in a 10x objective, put a slide (preferably diatoms) on the stage and focus. Rack the condenser up until it almost touches the slide. The field of view should be evenly illuminated. If you have a centering telescope, use it when the following text says take out the eyepiece - focus the top lens of the centering telescope for a sharp bright circle.
Aperture
Take out the eyepiece and look through the tube (this will be called
check
the aperture). You will see the bright circle of the illuminated
objective. This bright circle is called the aperture
(= opening). Aperture is not the same thing as the numerical
aperture (that is a number, not a bright circle) but the two are
closely connected.
Now close the condenser iris diaphragm slowly and you'll see it appear at the edge of the aperture. Refocus the centering telescope if necessary for a sharp image. The condenser iris should be nicely in the middle - if it's not, the condenser is decentered. In that case, rack the condenser down and try whether it moves sideways and "clicks in". If this does not help, consult a microscope expert.
Close the condenser iris fully and note that only a small portion of the aperture is now illuminated. Re-insert the eyepiece and look at the image. Resolution is very poor because the non-illuminated portions of the objective do not fully contribute to image formation. Contrast is fair, though.
Take out the eyepiece, open up the condenser iris until it is no longer visible in the aperture. Insert eyepiece, examine slide. Resolution is much better, but the image is rather "hazy": poor contrast.
Take out the eyepiece, close the condenser iris until it cuts off only about 15% of the aperture, at the edge. Insert eyepiece, examine slide. This gives nearly maximum resolution for the objective in use, with acceptable contrast.
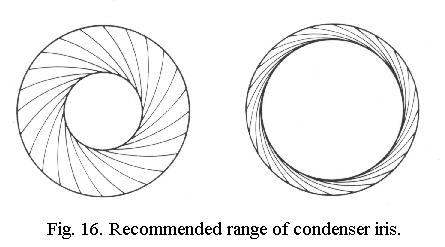
For any objective, Fig. 16 shows the range of the condenser iris that gives acceptable results, from minimum (left) to maximum (right). Contrast decreases whilst resolution increases from left to right. It's your task to find the best position depending on what you wish to see and you'll vary it during the observation, as you will vary the fine focus. You will also regularly take out the eyepiece and check the aperture.
Now switch to the next objective, 20x or 40x and adjust the fine focus for a sharp image. Check the aperture: only the center will be illuminated, because the numerical aperture of the objective is now much higher than before. So for each different objective you will have to reset the condenser iris to a new optimum position, in the range indicated above. Adjust the iris until about 85% of the 20x or 40x objective aperture is illuminated, the image should be nice.
Now rack the condenser down by 2 cm or so, the image will be poor and when you check the aperture, only the center will be illuminated. It's obvious that this is just as wrong as closing the condenser iris. You'll have seen that the intensity of the illumination also changes, but you may never use the setting of the iris or condenser for adjusting the brightness of the image. For that, you will use the dimmer control of the microscope lamp (if the lamp has no dimmer, e.g. a desk lamp, you can use one of the household light dimmer controls).
Question: so why is there a provision to rack the condenser up and down anyway? For two reasons:
- slides differ in thickness and thus may require (very slight) refocusing of the condenser.
- different condensers may be used, requiring refocusing.
The centering telescope of a phase-contrast set is very convenient for checking the aperture as the image is then larger and can be sharply focused by turning the top lens. You can also "focus through" the various levels of the objective to detect dirt on the back lens or grime on the front lens, for instance.
Lens faults
Switch back to 10x objective, focus on the slide. For a microscope
with built-in illumination, place a match or cocktail stick on the clear
window in the foot so that you see its shadow in the microscope. (For a
microscope without built-in illumination, place the match in front of the
lamp you use). Open the condenser iris fully, rack the condenser down until
you see the match in focus. It will show a marked colour fringe, which
changes from blue to red as you vary the position of the condenser. This
is the colour fringe lens fault mentioned earlier and is called chromatic
aberration. It will be severe for an uncorrected condenser, but
even with an achromatic-aplanatic condenser there is a small residue of
colour fringes. In objectives, the degree of correction is very high.
Return to normal observation, 10x objective, condenser iris and condenser position correctly adjusted, focus an object in the middle of the field of view. Without changing focus, shift the object to the edge of the field of view. You'll have to re-adjust the fine focus to see it sharp. This is called curvature of field. The field of view is only flat with "flat-field" or "plan" optics, but even then there may be a small residual curvature.
Switch to the 40x objective, adjust condenser iris and focus for a nice
image. Swing the objective away, put a small drop of water on the cover-glass
of the slide and then put another clean cover-glass on top. Swing
the objective back into position, refocus and see how awful
the image is now. We have intentionally introduced spherical
aberration here, by using a cover-glass of completely wrong thickness.
Remove the extra cover-glass, dry the slide. Normally the objective is
very well corrected for spherical aberration if
the cover-glass has the correct thickness - the 0.17 mm mostly engraved
on the mount. You can therefore ruin the objectives correction for spherical
aberration by using cover-glasses of the wrong thickness (or using no cover-glass
at all!). This is especially the case for "dry" objectives of NA over 0.4.
Correct illumination
As weve seen while juggling with the condenser iris, the set-up of
the illuminating train is important to ensure the best image quality
your lenses can yield. This set-up of everything from the light bulb up
to and including the condenser is what you control yourself and fortunately
there is a simple and rigidly defined procedure.
The guiding principle is that the light-source is focused in the object itself. So when you see the object in focus, the light source should also be in focus. Evidently, to get an evenly illuminated field of view you need an evenly illuminated light source. There are two varieties of this form of illumination.
- Critical illumination. Here the filament of the light bulb itself is the light-source. Because its in focus in the field of view, the image of the filament would be very objectionable and therefore the light bulb is lightly frosted. Such an illuminator should also have a collector lens to ensure that the light from the illuminator forms a parallel beam. That means that the light source is imaged at infinity - or at least a very long distance away. This is essential, if theres no collector, the illuminator does not yield critical illumination but is no better than a desk lamp.
Some plug-in illuminators and built-in lamps offer critical illumination. Critical illumination is simple in use and yields good results.
- Köhler illumination. Here the light source consists of an iris diaphragm in the lamp. This lamp iris is not to be confused with the condenser iris. As the lamp iris is in focus in the field of view, its size can be so adjusted that only the field of view is illuminated. This reduces glare. Lamps for Köhler illumination also have a collector lens system that projects an image of the filament at the level of the condenser iris diaphragm - at a short distance away from the lamp instead of at infinity as in the critical illumination case.
Köhler illumination is somewhat more contrasty than critical illumination but also somewhat more complex to set up at first. It is now standard in research-type microscopes.
Although it may be assumed that modern microscopes from reputable manufacturers do not incorporate design errors, this need not be true if you combine a microscope that has no built-in illumination with a separate lamp. In that case, it may be impossible to set up strict Köhler illumination. This situation will be discussed further on.
«««« »»»»