3. COMPONENTS
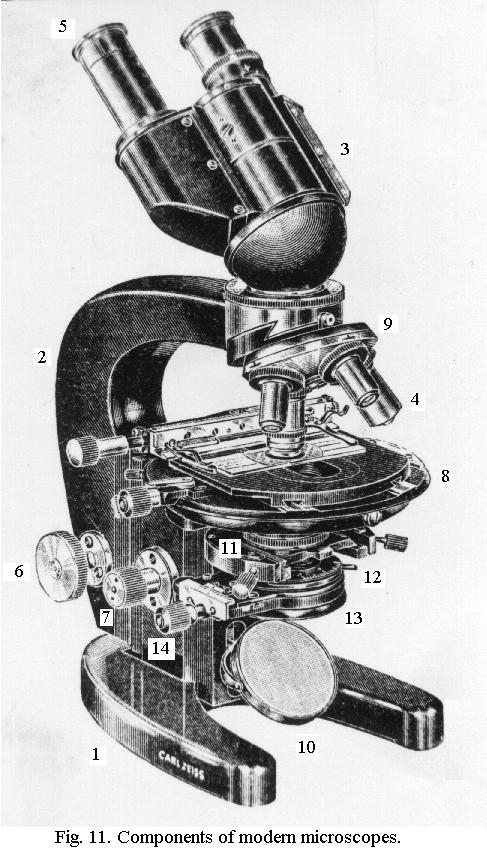
The various parts of the microscope are identified in Fig. 11. Although this stand appeared in 1933, all modern microscopes basically have the same parts - perhaps arranged slightly differently. The model was a true trend-setter and was produced as a Soviet Union copy until the mid-Seventies.
1 = foot (contains built-in light source in modern stands); 2 = limb (inclining in Fig. 9, fixed in most modern stands); 3 = tube (in Fig. 9, its effective length can be adjusted by sliding the inner "draw-tube" that carries the eyepiece (5) in and out, in modern stands its length is fixed); 4 = objectives; 5 = eyepiece; 6 = coarse focus control; 7 = fine focus control (in modern stands coarse and fine focus controls are concentric); 8 = stage (a rotating stage in this case); 9 = revolving nosepiece for quick changing of the objective; 10 = mirror (most modern stands have a built-in light source instead); 11 = substage condenser or condenser for short, which ensures correct illumination; 12 = condenser iris diaphragm, which controls the cone of light produced by the condenser. 13 = swing-out filter ring; 14 = control permitting oblique illumination by shifting the iris diaphragm sideways. This is only rarely present in modern microscopes.
The condenser focus control is not visible here because its on the other side of the microscope, at approximately the same level as the fine focus in the picture.
The objectives
Magnification of the image takes
place in two stages: in the objectives and
in the eyepiece(s). Both have their proper
magnification engraved. Magnification of objectives ranges from
3x to 100x, that of eyepieces from about 5x to about 15x. The total magnification
thus ranges from about 15x to 1500x. Some binocular tubes have their own
magnification
factor, ranging from 1.25x to 1.5x, which should be accounted for
in calculating the eventual magnification.
Objectives also have a parameter called numerical aperture (abbreviated as NA) engraved on their mount. This is the parameter determining the resolving power of that objective and it ranges from 0.1 for a 3x objective to 1.25 or even 1.4 for a 100x objective.
The maximum attainable resolving power of the LM is circa 0.25 µm. This means that two small details (say "dots" of a diatom) 0.25 µm apart can be seen as separate instead of fusing to a single "blob". Depending on individual eyesight, resolving power of the unaided human eye at the normal reading-distance (25 cm) is about 0.3 mm, about 1500 times less. For direct visual observation and very generally speaking, a magnification of 1500x will therefore be sufficient for the very finest details, or 1000x for people with sharp eyesight. There are important exceptions to this rough guide, as we'll see later.
Objectives of less than 10x power are used for general surveys, e.g. in botany, pathology or entomology. Standard biological sets include 10x, 40x and 100x objectives, but I consider an additional 20x indispensable. Without it, it may be difficult to keep oriented if you switch from a 10x to a 40x because the diameter of the field of view suddenly becomes 4x smaller (it is inversely proportional to magnification). A good routine set giving manageable magnification steps of about 2x would thus be as follows:
10x/NA 0.25 or 0.3; 20x/NA 0.45; 40x/NA 0.65; 100x/NA 1.25 or 1.3
The 10x, 20x and 40x objectives are called "dry objectives"; they are used "dry", meaning that there is air between the lens and the slide. The 100x is an "oil immersion objective", meaning that a small drop of special immersion oil is placed on the slide and the front lens of the objective is dipped into it for viewing. The reason why the "lens is oiled to the slide", as the standard expression goes, will become clear later.
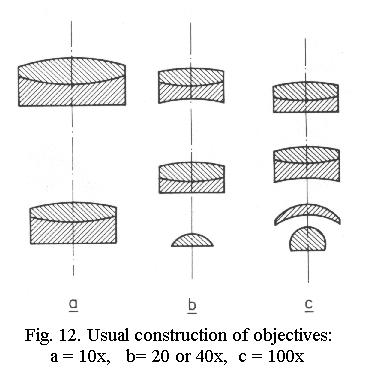
The optical construction of objectives for routine work is shown in Fig. 12; good image quality requires from 4 to 6 lenses of different shapes and kinds of glass, all of them small to tiny, perfectly ground, polished, coated, cemented together and centered. Top-quality objectives may have up to 14 lenses.
Modern objectives are parfocal, meaning that the image stays approximately in focus if you switch from one objective to another, requiring only a small adjustment of the fine-focus control. When objectives are changed by turning the revolving nosepiece, the object should also remain centered.
Finally, two additional numbers are often engraved on the objective mount, the tubelength, typically 160 mm, and cover-glass thickness - typically 0.17 mm. We'll return to these two highly important parameters later.
The eyepiece(s)
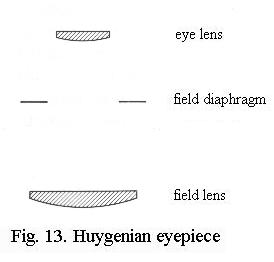
Eyepieces are less complex than
objectives and are often derived from the two-lens Huygenian
eyepiece (after the 17th-century inventor Christiaan Huygens), Fig.
13. Modern designs with a wider and flatter field of view use combinations
instead of two single lenses. In the majority of cases, the effective eyepiecepower used will be about 10x (which means about 6.3x eyepieces if there
is a binocular tube with a proper magnification of 1.5x).
Ordinary eyepieces do not permit
the use of spectacles/glasses, which will lead to an unending bothersome
"on-off" exercise. Also, many people wear glasses not only to correct for
short- or far-sightedness, but also for astigmatism of the eye, which means
that the observer never sees sharply, regardless of distance.
"High-eyepoint"eyepieces are the solution to this problem: glasses can be kept on. You can see where the eyepoint (or exit pupil as it is also called) lies if you set up the microscope for normal observation and then hold a piece of ground glass or thin paper above the eyepiece. In one position close to the top lens, youll get a sharp bright circle, thats the exit pupil.
Eyepieces with a very wide field of view may actually cause fatigue because your eye cannot take in the complete field of view and starts wandering. Be critical, try for yourself !
The condenser
The function of the condenser
is to fill the objective evenly with a cone of light. This cone of light
is narrow for an objective of low NA (e.g. 0.25) but needs to be very wide
for one of high NA (e.g. 1.25). Parts of the objective that do not receive
light cannot fully participate in image formation! Because of this great
variation required, the cone of light exiting from the condenser must be
adjusted with the condenser iris diaphragm.
Condensers also have a numerical aperture, engraved on the mount. A typical value for the condenser NA is 1.2, but as we shall see, this can only be attained when the condenser too is oiled to the slide. As this is messy and the gain is at best small and at worst doubtful, the condenser is likely to be always used "dry" anyway and then its maximum possible NA is 0.9, regardless of what it says on the mount.
The condenser can be racked up and down with the condenser focus control. The most frequent and most serious error made by inexpert microscopists is to rack it up or down to adjust the brightness of the image. For observation, the position of the condenser is rigidly defined and not arbitrary - see further on. For a normal condenser with NA between 0.9 and 1.4, this will mean that the top lens of the condenser almost touches the lower surface of the slide. If you have it at "half-mast", you're doing something seriously wrong. Brightness of the image is controlled with a light dimmer fitted to the illuminator.
For low magnifications (e.g. 3x objective), it may become difficult or impossible to illuminate the field of view (which is then relatively large) entirely with a condenser of NA 0.9 or more. In such cases, a special low-power condenser can be used, or the top lens of a normal condenser is screwed off - or swung aside in some models. For correct illumination, the position of the condenser will then be much lower than with the top lens on. Many modern stands have a separate control by which the "illuminating train" (everything between the lightbulb in the lamp and the slide) is adapted to low-power viewing. This may be a swing-in extra lens below the condenser, or an extra lens in the lamp. If the low-power set-up is used for observation at higher powers, correct illumination cannot be obtained.
The cheapest condensers (sometimes erroneously called an "Abbe-type") have a poor image-forming quality because they suffer from all shortcomings in image formation mentioned earlier. Such uncorrected condensers will not yield perfect illumination with objectives of high NA, as we'll see later.
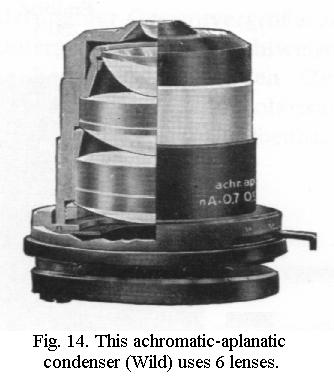
A better type is the aplanatic condenser, which is much less expensive than the top of the range, an achromatic-aplanatic condenser (Fig. 14), yet yields good illumination. An aplanatic condenser of NA 0.9 is much better than an uncorrected one of NA 1.2. Highly corrected condensers are easily recognized because the degree of correction is engraved on the mount.
What we've discussed so far is so-called brightfield microscopy, in which objects are seen against a bright background. Three different methods of illumination require a different type of condenser, as follows.
Darkfield condensers illuminate the objects "from the side" instead of "straight through" as in brightfield. The background is black, therefore, and the objects are bright. The classic example is a room with the curtains almost drawn during a sunny day except for a narrow slit. Tiny dust particles then become visible in the beam of sunlight. Darkfield observation will be discussed later.
Phase-contrast condensers are actually often of the simplest uncorrected type and only differ from the ordinary condenser in having a set of ring-shaped "annular stops", one for each phase-contrast objective, centerable and mounted on a rotating disc. There is also a "clear" (unobstructed) position which allows normal observation. Phase-contrast will be discussed later.
If you're a capable tinkerer, you can make such annular stops yourself, use them with the condenser you already have and just buy phase-contrast objectives, saving a lot of money.
Interference-contrast
condensers are of complex optical design and are used in conjunction
with additional special components in the microscope.
Accessories
A rotating
stage is convenient for ensuring optimum orientation of the object
if the microscope is combined with a photographic or video camera or computer
screen. It is essential for observations in polarized
light or differential interference contrast
(DIC, "Nomarski") because there, the orientation
of the object affects the image. Rotating stages have centering
controls to prevent objects wandering out of the field of view as the stage
is rotated. Fig. 10 shows a rotating stage combined with a mechanical
stage. The latter permits controlled scanning of the slide horizontally
and vertically and by noting the co-ordinates of a detail in a slide it
can quickly be found the next time. Rotating stages are rather rare, mechanical
stages are standard nowadays except for the simplest stands.
A centering telescope comes with phase-contrast sets but is also available separately. It is a small telescope that can be focused from close-up to infinity and is a handy gadget for other purposes as well, for instance to check for correct illumination or dirty objectives.
For simple measurements, an eyepiece micrometer is used, an eyepiece that contains a graduated scale. More exact measurements require a filar micrometer eyepiece, in which a marker visible in the eyepiece is displaced sideways by turning a graduated drum. Both eyepiece micrometer and filar micrometer eyepiece need to be calibrated by the user. For this, you need an object micrometer, a special slide carrying a tiny scale of 1 mm with divisions equalling 0.01 mm (10 µm or 10 "microns"). The user then determines how many divisions of the eyepiece micrometer or filar micrometer correspond to 10 µm. This is done once, for each objective, and the values found will only be correct for that particular model of microscope.
Maintenance
If treated well, the microscope's
lifetime is almost infinite - I have microscopes of over a century old
that perform just like when they were new. Avoid all contact with chemicals,
protect the instrument against dirt by covering it when not in use (a plastic
bag is fine), dust off with a soft brush and cloth. Do
not lubricate or grease, if you think this may be necessary consult
the dealer.
The one thing to avoid at all cost is grimy lenses. The top lens of eyepieces easily collects dust or grease (eyelashes!): breathe and wipe with soft cloth or lens tissue. The top lens of objectives may collect dust if you leave the eyepieces out for some time (dont!). Remove objective from the revolving nosepiece and clean with a soft and completely grease-free brush. Actually, a few dust particles hardly affect image quality, but grease or oil is quite another matter and the front lens of objectives (that is: the lower lens, facing the object) is the one to watch. The front lens of a 40x objective is particularly at risk as it is close to the slide. Remove the objective and inspect, if the front lens is not perfectly shiny, breathe on it and gently wipe with soft cloth or lens tissue.
When using an oil-immersion objective, apply only a very small drop of immersion oil to the cover-glass. With modern microscopes, you can mostly switch from a 40x to a 100x without major refocusing, but to avoid damage in the beginning, follow this procedure:
- look at the lenses from the side
- without applying oil, switch slowly from the 40x to the 100x, checking that the latter does not crash into the cover-glass. It should be very close to the cover-glass, though
- turn aside the 100x, apply small drop of oil to cover-glass
- slowly switch in the 100x and only then look through the microscope.
Oil immersion front lenses are
cleaned at the end of a session by gently wiping them with soft cloth or
lens tissue - you don't need to remove them unless they are really extremely
dirty (not a good sign...). In the latter case, remove the objective from
the revolving nosepiece and clean with soft cloth or lens tissue moistened
with a little xylene, then wipe dry. Always
completely clean immersion oil from the slide as soon as you're finished
with the oil-immersion objective (wipe off with tissue, breathe on slide
and wipe again with clean tissue). Otherwise you're likely to smear the
front lens of the 40x when you switch to it, and anyway, image quality
will be hopeless. Always clean slides before use too, traces of grease
will impair image quality.
Never try to dismantle optical components unless you're a certified master optician.